Configure GitLab SSO (OAuth 2)
This guide explains how to configure Single Sign-On (SSO) using GitLab (Cloud or Self-Managed) via the OAuth 2.0 protocol.
SSO is available on the Baserow Advanced and Enterprise plan. You must have a valid license activated to configure these settings.
Overview
The GitLab SSO integration allows users to log in to Baserow using their existing GitLab accounts.
This works for both GitLab.com and Self-Managed GitLab instances. To set this up, you must create an “Application” in your GitLab user settings (or Instance Admin settings) and connect it to Baserow.
Prerequisites
- Baserow: You must be an Instance Admin on a self-hosted plan.
- GitLab: You must have a GitLab account.
Phase 1: Get Baserow Callback URL
Before registering the app in GitLab, you need to know where GitLab should send users after they log in.
- Log in to your Baserow Admin Panel.
- Navigate to Authentication -> + Add Provider.
- Select GitLab.
- Copy the Callback URL displayed in the modal (e.g.,
https://baserow.yourdomain.com/api/sso/oauth2/callback). - Keep this tab open.
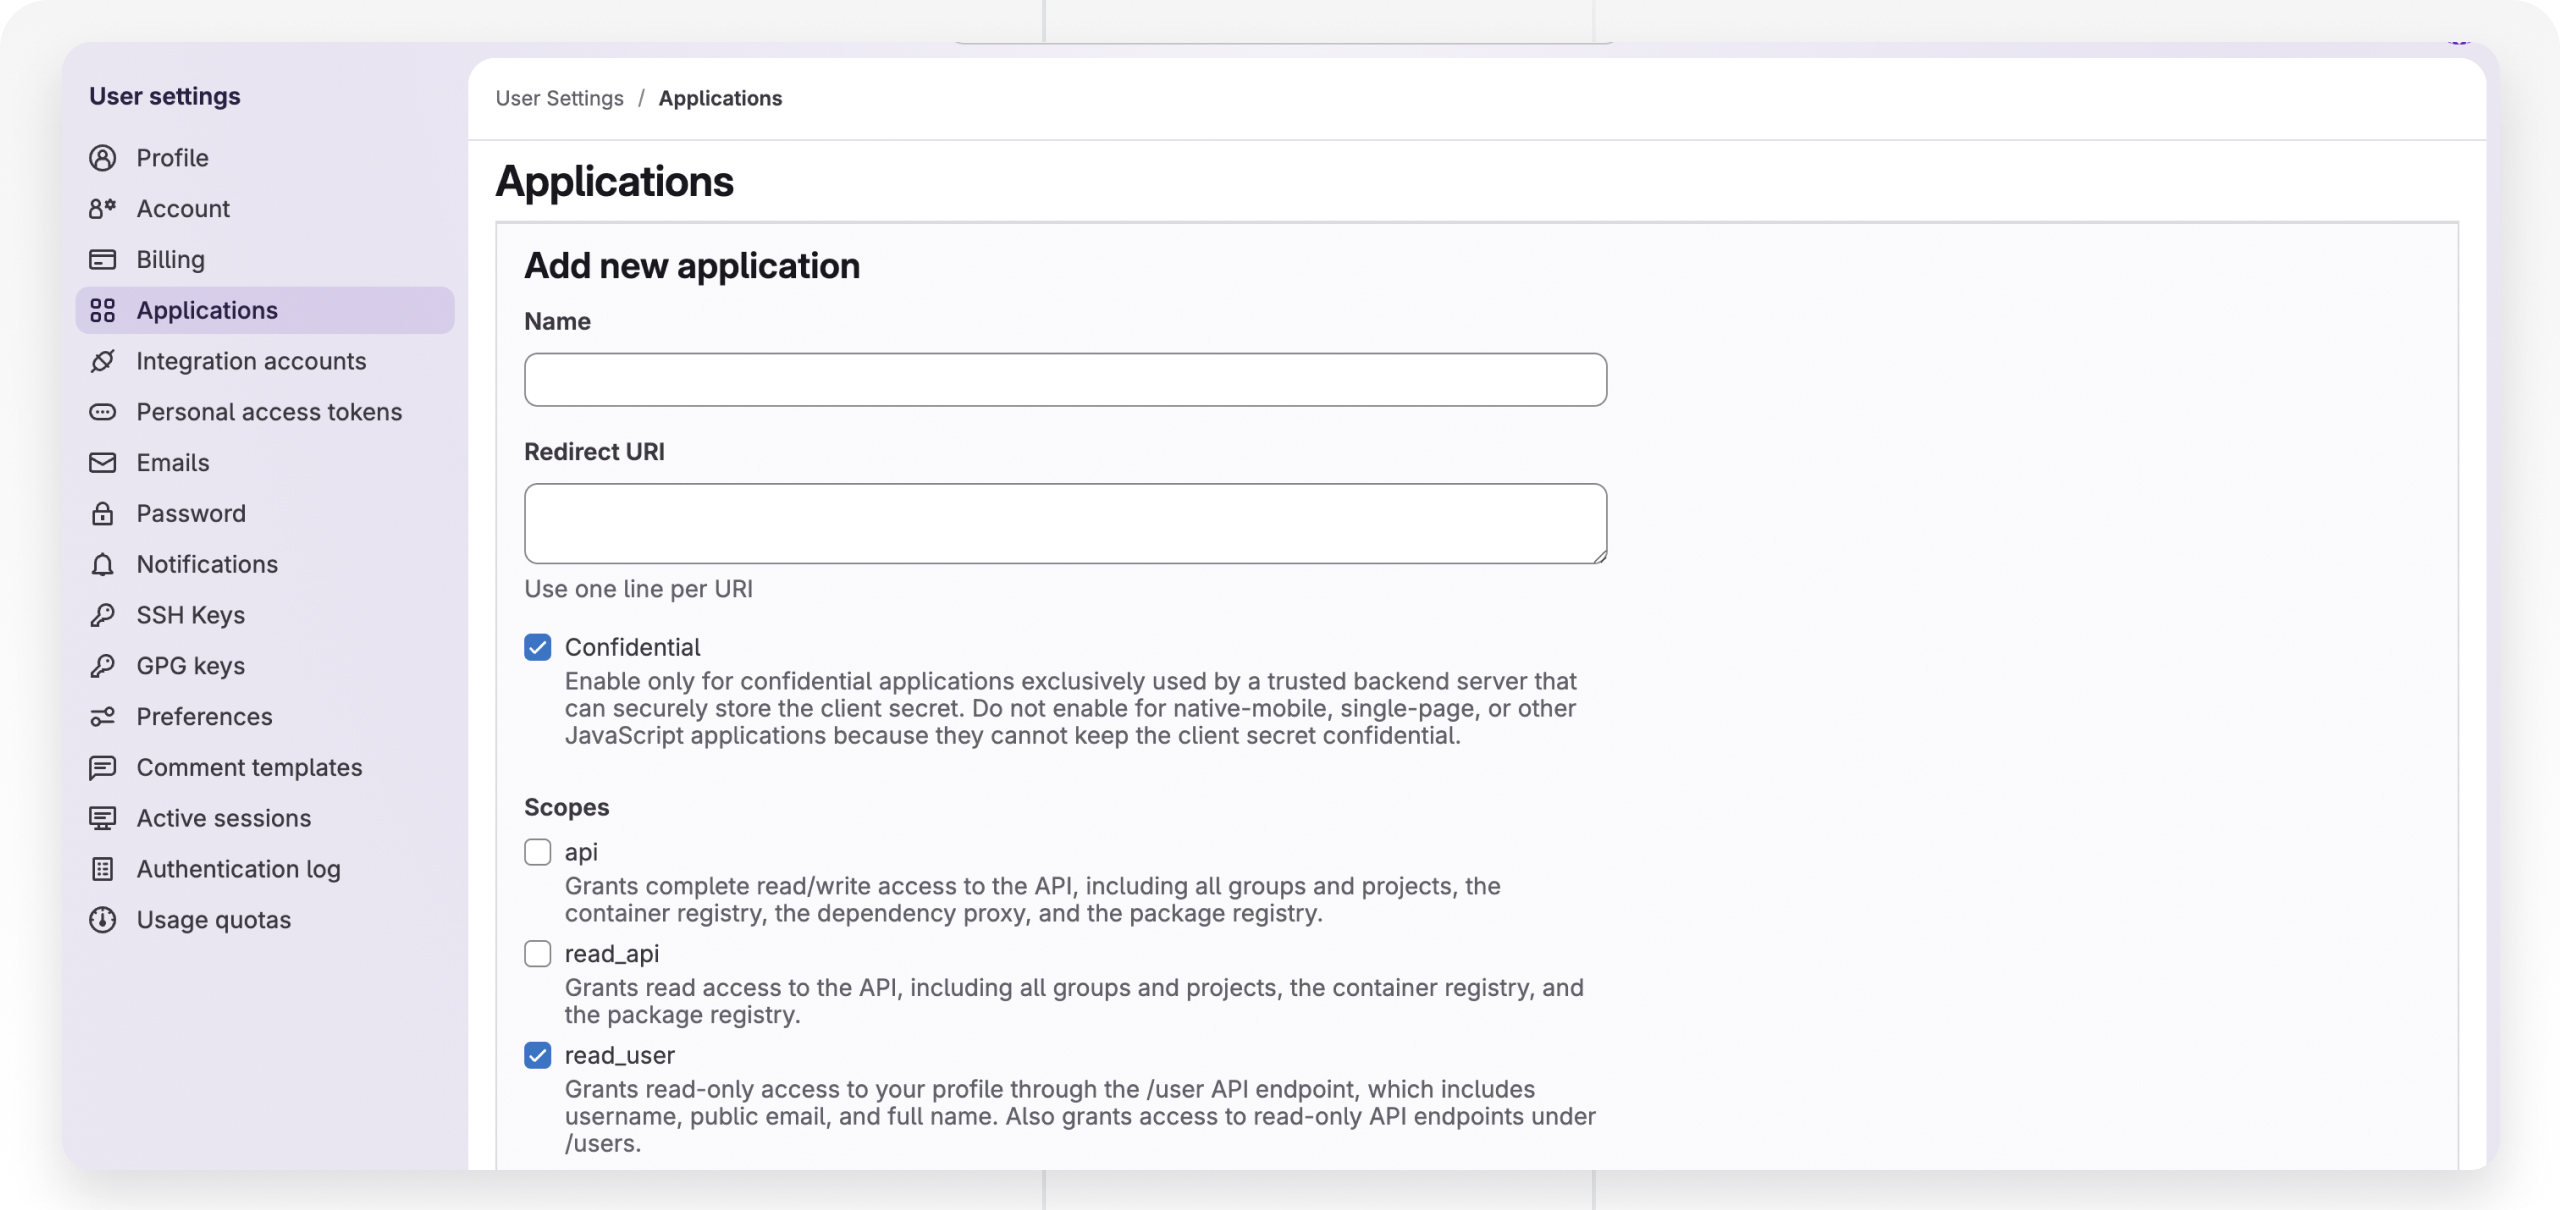
Phase 2: Register GitLab application
- Log in to your GitLab account.
- Navigate to Applications:
- For Personal Accounts: Go to User Settings (Profile) -> Applications.
- For Groups: Go to Group Settings -> Applications.
- For Instance-wide (Self-Managed only): Go to Admin Area -> Applications.
- Add New Application:
- Name:
Baserow - Redirect URI: Paste the Callback URL you copied from Baserow.
- Confidential: Ensure this checkbox is Checked.
- Scopes: Select
read_user. (This is the minimal scope required to identify the user).
- Name:
- Click Save application.
Phase 3: Generate credentials
GitLab will now display your Application ID and Secret.
- Copy the Application ID.
- Copy the Secret.
- Note: Keep these secure. The secret functions as a password for your application.
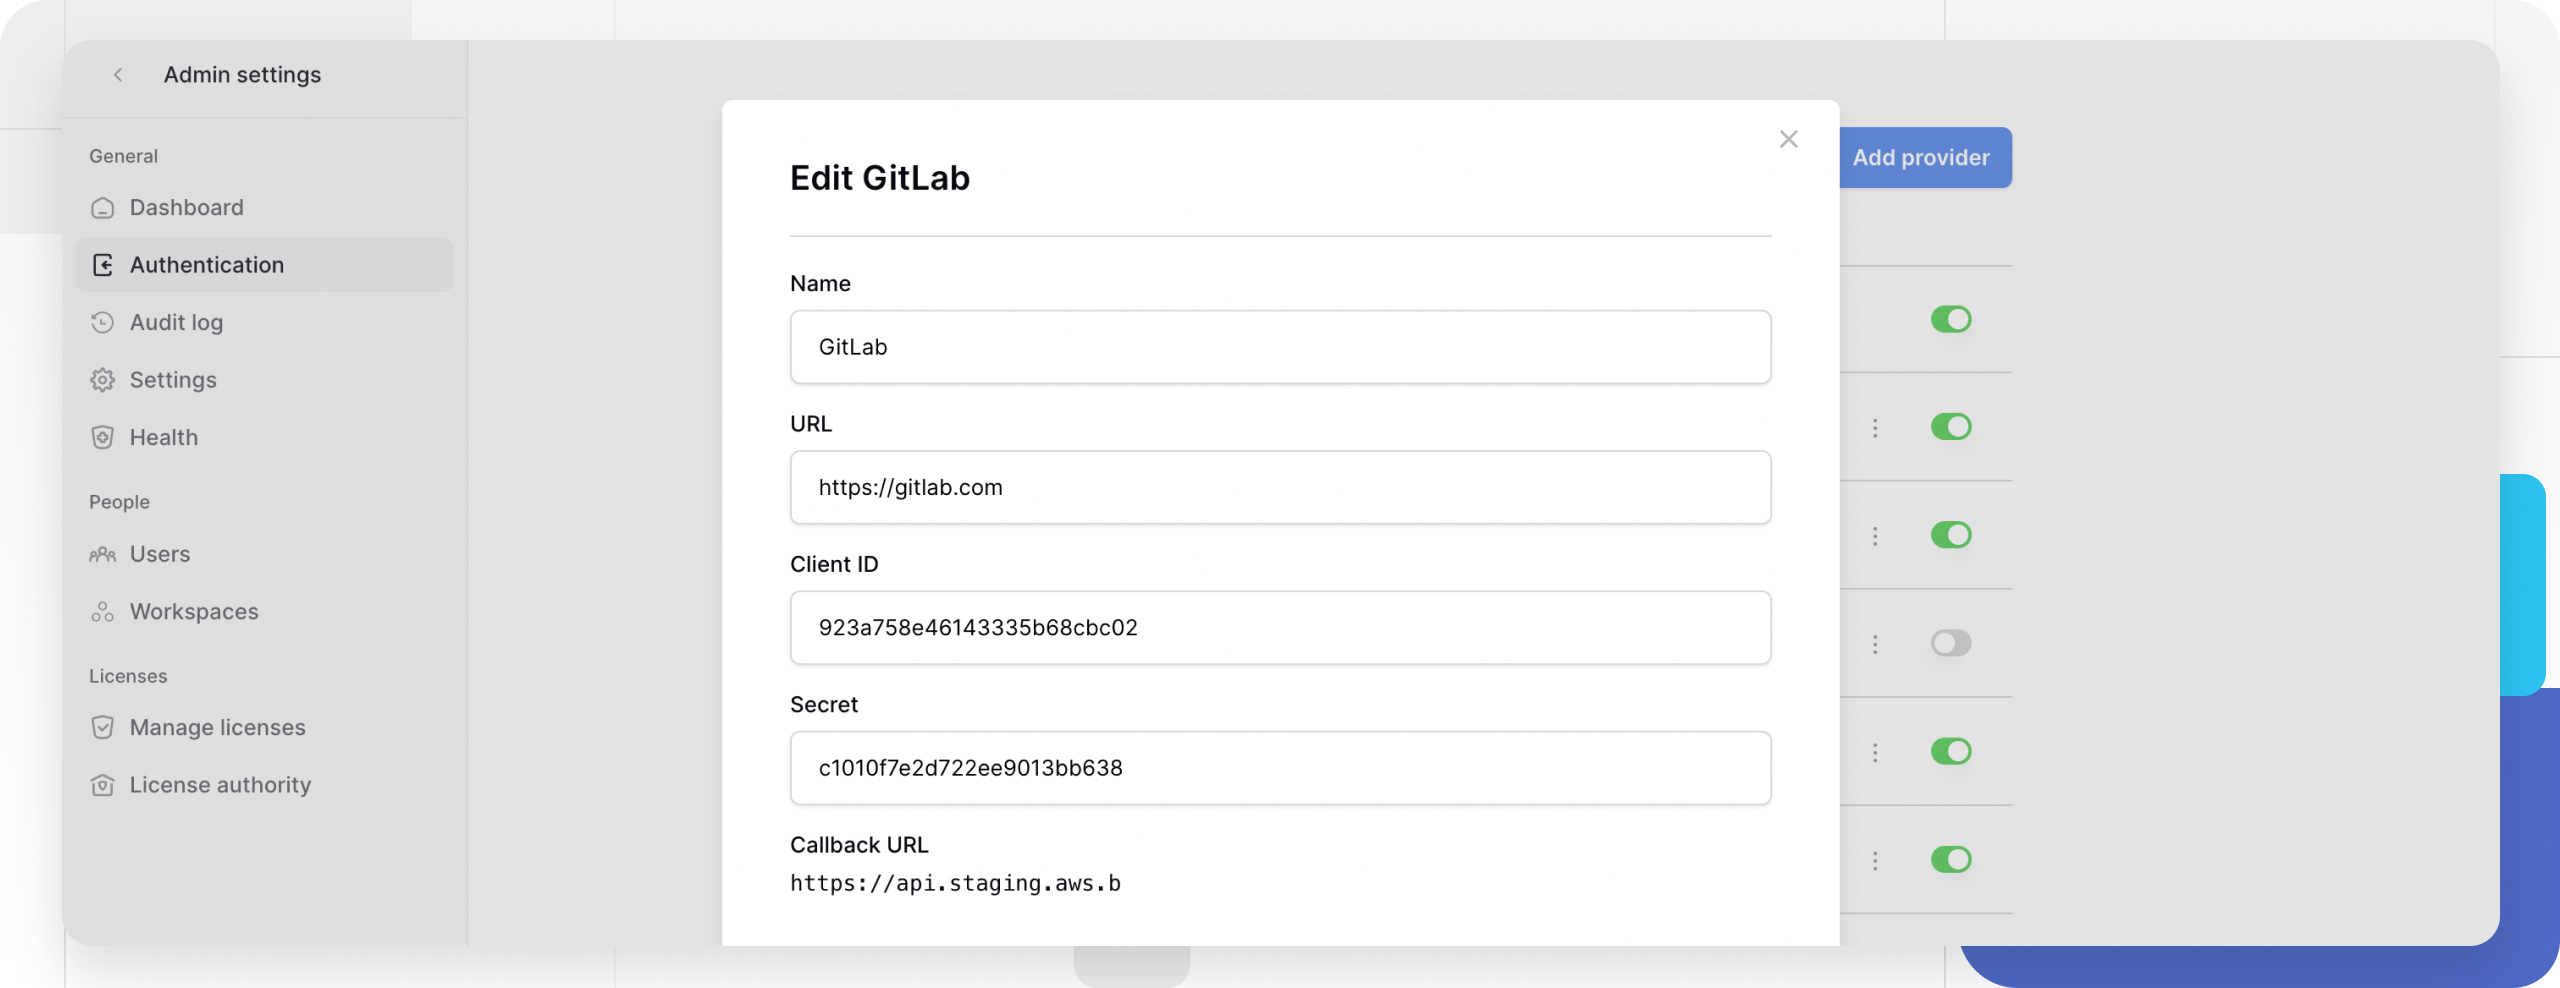
Phase 4: Connect GitLab to Baserow
- Return to the Baserow Admin Panel (where you left the modal open).
- Name: Enter
GitLab. - Client ID: Paste the Application ID from GitLab.
- Secret: Paste the Secret from GitLab.
- Base URL:
- If using GitLab.com: Leave this field blank (or enter
https://gitlab.com). - If using Self-Managed GitLab: Enter the full URL of your GitLab instance (e.g.,
https://gitlab.company.com).
- If using GitLab.com: Leave this field blank (or enter
- Click Save.
Learn more: Connect GitLab to Baserow
Troubleshooting & Common Issues
“The provided authorization grant is invalid, expired, or revoked”
This often happens if the Callback URL in GitLab does not exactly match the URL Baserow is expecting.
- Check: Did you copy the URL exactly from the Baserow modal?
- Check: Did you verify the protocol (
httpvshttps)?
Self-Managed GitLab: “500 Internal Server Error”
If you are using a private GitLab instance, ensure your Baserow server can reach your GitLab server over the network. If they are on the same internal network, you may need to configure Docker networking or firewall rules to allow the connection.
Frequently Asked Questions (FAQ)
Does this work with GitLab Groups?
Yes, but with caveats. Creating the app in a Group does not restrict login access to only members of that group; it just means that group owns the application. Any user on that GitLab instance (or GitLab.com) could potentially log in.
- To restrict access: We recommend disabling “Allow creating new accounts” in Baserow settings so only invited users can join.
Learn more: Global instance settings
Can I map GitLab Groups to Baserow Roles?
Not currently. Baserow supports Just-In-Time (JIT) provisioning, which creates the user account immediately upon login. However, it does not sync GitLab Group memberships to assign Baserow roles (e.g., Admin vs. Editor). You must manually assign roles in Baserow after the user logs in.
Related content
Still need help? If you’re looking for something else, please feel free to make recommendations or ask us questions; we’re ready to assist you.
- Ask the Baserow community
- Contact support for questions about Baserow or help with your account.