Invite users to a workspace
Workspace admins can invite users via email to collaborate on databases and tables within the workspace.
This guide covers how to invite users to your Baserow workspace, assign permissions, and help new users accept invitations and join your team.
Who can invite users
Only workspace admins can invite new users to workspaces. If you’re not a workspace admin, you’ll need to ask an existing admin to either invite the user or upgrade your role to admin first.
Plan-specific roles: Free plans have simplified roles. Paid plans offer granular roles for advanced permission management.
Invite a user to a workspace
Workspace admins send email invitations to add new users. Before you invite users, consider the impact on your subscription plan.
- Navigate to the workspace you want to add users to
- Click Members tab in the side bar
- Click Invite Member in the top-right corner
- Enter the user’s email address
- Select the role (permission level) for this user:
- Optionally add a custom message with context or instructions
- Click Send Invite
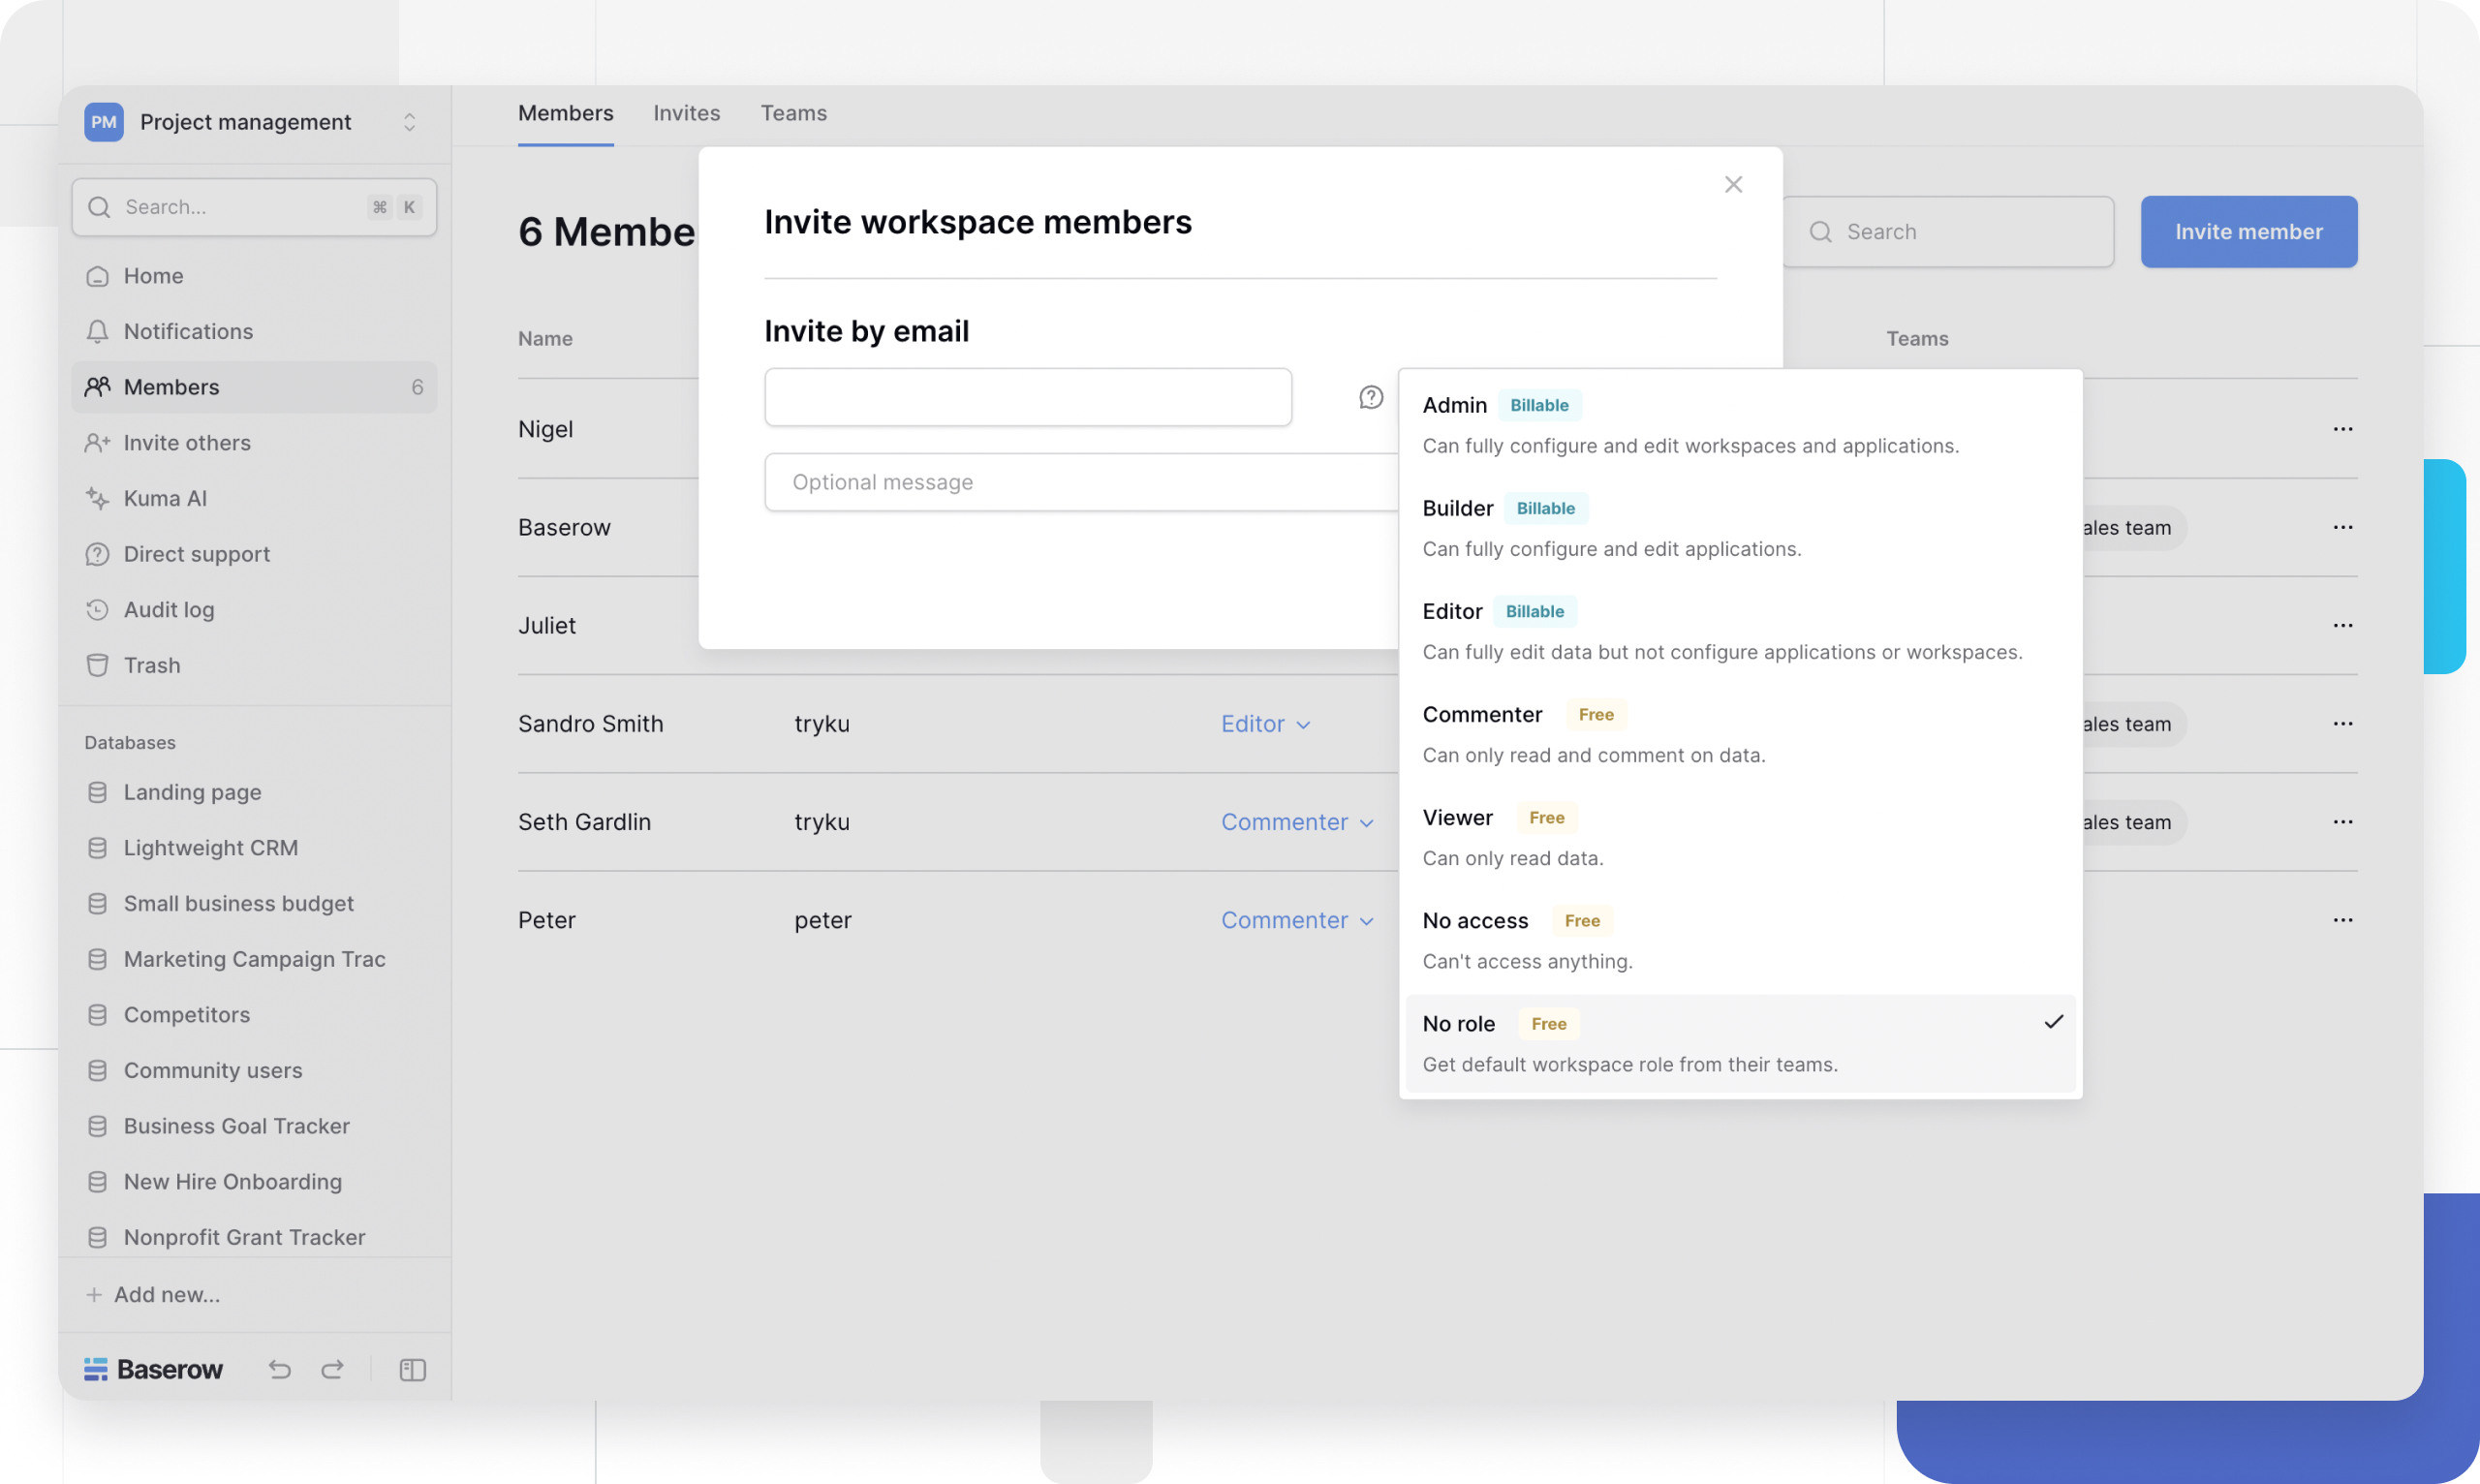
You cannot send invitations to users already in the workspace. Remove them first if you need to change their email or re-invite them.
The invited user receives an email invitation with an “Accept invitation” button and link. Depending on whether they have an existing Baserow account, they’ll follow different flows to join.
Accept invitation (new users)
If you don’t have a Baserow account, creating one from an invitation is straightforward.
Create account from invitation email
- Check your email inbox for the Baserow invitation
- Click Accept invitation in the email
- Baserow pre-fills the invited email address
- Create a password for your account
- Complete account creation
- Verify your email by clicking the link in the confirmation email
- Log in and access the workspace
Email not received? Check your spam folder. If it’s not there, ask the workspace admin to resend the invitation or contact support.
Different email preferred? The system auto-fills the invited email. To use a different address, ask the workspace admin to send a new invitation to your preferred email.
Accept invitation (existing users)
If you already have a Baserow account, accepting workspace invitations is simple.
Accept from dashboard
- Log in to your existing Baserow account
- You’ll see a notification on your dashboard about the workspace invitation
- Click Accept to join the workspace immediately
- Or click Reject if you don’t want to join
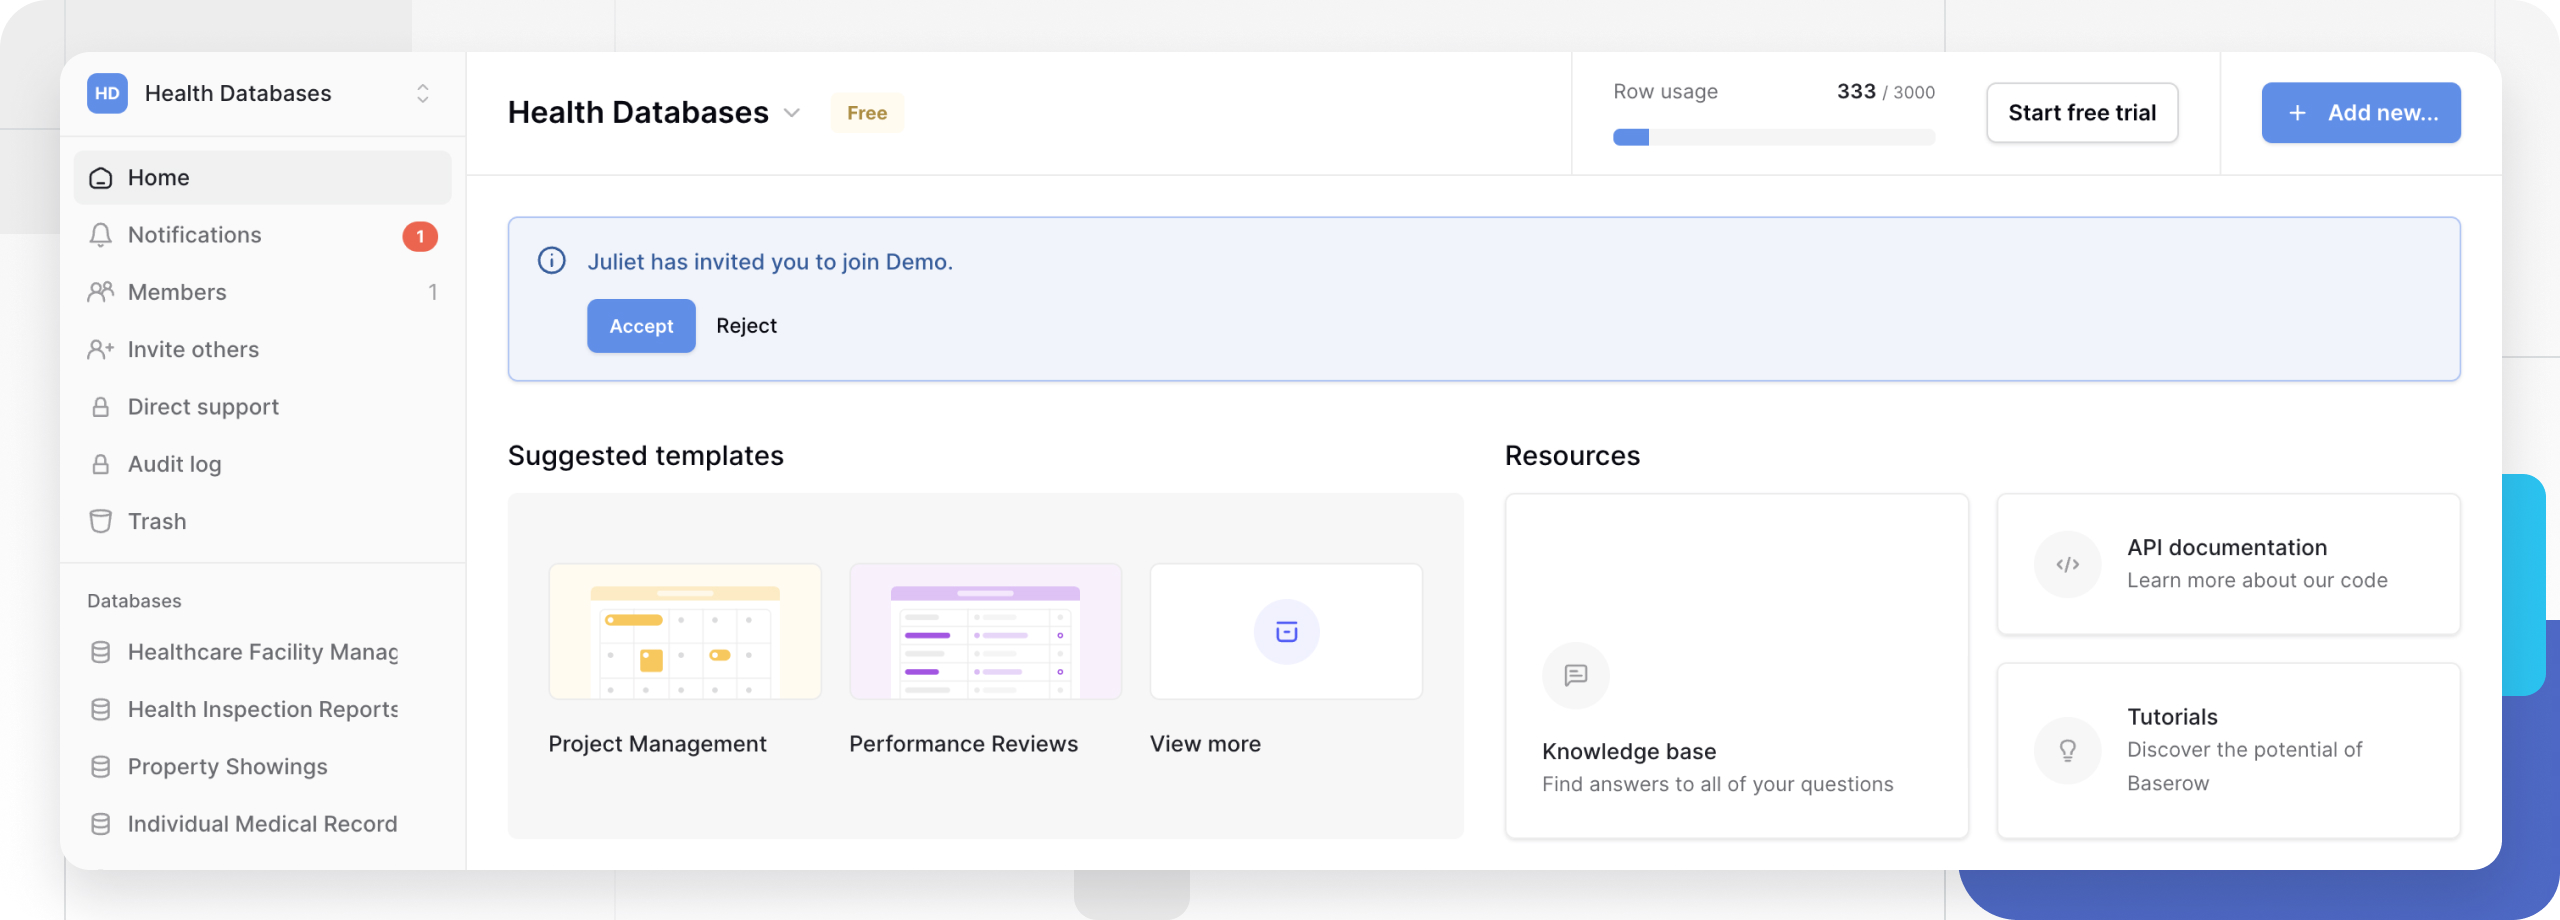
You can also accept the invitation via email if you prefer. Both methods work identically.
Access the workspace
Once you accept, the workspace appears in your account immediately. You can access all databases and tables according to your assigned role.
Manage pending invitations
Workspace admins can view and cancel pending invitations that haven’t been accepted yet.
View pending invites
- Navigate to Workspace -> Members -> Invites
- Pending invitations show with the email address, the default role assigned, and the message sent on the invite.
Cancel invitations
If you invited someone by mistake or they no longer need access, cancel the invitation before they accept:
- Navigate to Workspace -> Members -> Invites
- Click the three-dot menu (⋮) next to the invitation
- Select Cancel invite
Canceled invitations can’t be accepted. Send a new invitation if needed.
Workspace member visibility
All workspace members with the right permissions for the related workspace can see the complete workspace member list.
Use the workspace member list to identify who to @mention in comments or assign using the collaborator field.
Permission planning: Decide which role new users need before inviting. You can change roles later, but starting with the right permission level prevents access issues.
Learn more: Permissions overview
Frequently asked questions
Can non-admin workspace members invite users to workspaces?
No. Only workspace admins can invite new users. If you need to add someone, ask a workspace admin to send the invitation or request an admin role upgrade if you’ll be inviting users regularly.
How many users can collaborate in a workspace?
There’s no hard limit on workspace members. Free plans have row and storage limits (check your plan), while paid plans support unlimited workspaces with unlimited members. Performance remains good even with dozens of simultaneous workspace members.
What happens if someone accepts an invitation to a workspace they’re already in?
They can’t. Baserow prevents sending invitations to existing workspace members. If someone needs a different role, workspace admins can change their permissions directly in workspace member settings.
Can I invite multiple users at once?
Not currently. Invite users one at a time through the invitation process. For large teams, consider inviting admins first, who can then help invite additional users.
Do invited users automatically get access to all databases?
Yes, depending on their role assigned to the invite. Workspace members have access to databases within the workspace according to their role. Users on a paid plan can restrict access to specific databases or tables using granular permissions.
How long does an invitation remain valid?
Invitations don’t expire automatically. They remain valid until accepted or canceled by a workspace admin. However, if a user doesn’t accept for an extended period, consider canceling and resending to ensure they receive a fresh email.
Can I change someone’s role after they join?
Yes. Workspace admins can change workspace member roles anytime. Role changes take effect immediately.
What if an invited user can’t find the invitation email?
First, check spam/junk folders. If not found, workspace admins should cancel the original invitation and send a new one. Ensure the email address is spelt correctly when sending invitations.
Learn more: Pricing plans
Related resources
Workspace member management
- Manage workspace members - Change roles, remove members
- Remove a workspace member - Revoke access
- Assign roles to workspace members - Permission configuration
Permissions
- Permissions overview - Role-based access control
- Assign database-level roles - Granular permissions (Advanced/Enterprise)
- Create and manage teams - Group-based permissions (Advanced/Enterprise)
Collaboration
- Collaboration overview - Team collaboration guide
- Row comments - Communicate with @mentions
- Collaborator field - Assign tasks to workspace members
- Public sharing - Share without workspace access
Still need help? If you’re looking for something else, please feel free to make recommendations or ask us questions; we’re ready to assist you.
-
Contact support for questions about Baserow or help with your account
- On this page
- Who can invite users
- Invite a user to a workspace
- Accept invitation (new users)
- Accept invitation (existing users)
- Manage pending invitations
- Workspace member visibility
- Frequently asked questions
- Can non-admin workspace members invite users to workspaces?
- How many users can collaborate in a workspace?
- What happens if someone accepts an invitation to a workspace they’re already in?
- Can I invite multiple users at once?
- Do invited users automatically get access to all databases?
- How long does an invitation remain valid?
- Can I change someone’s role after they join?
- What if an invited user can’t find the invitation email?
- Related resources