Create and manage teams in a workspace
Teams in Baserow enable workspace admins to manage permissions for multiple members simultaneously, creating organized groups with shared access levels across databases and tables.
This guide covers how to create teams in Baserow workspaces, assign default roles to groups of members, and manage team permissions for efficient collaboration at scale.
Paid feature: Role-based permissions are available on the Baserow Advanced and Enterprise plans.
Overview
Rather than setting permissions individually for each workspace member, teams allow you to assign a default role to a group. All team members automatically inherit that role throughout the workspace, with options to customize permissions at the database or table level when needed.
Teams are valuable for large organizations with departments, project groups, or client teams that need consistent access levels. For example, create a “Marketing Team” with Editor access, a “Client Review Team” with Commenter access, or an “Executive Team” with Admin access.
Teams can also form hierarchies; higher-level teams can access everything owned by lower-level teams, but not vice versa. This creates natural organizational structures like Department → Project Group → Individual Contributors.
Learn more: Manage permissions in Baserow
How teams work
Teams vs. individual permissions
| Approach | Best For | Permission Management | Updates |
|---|---|---|---|
| Teams | Groups of 3+ members with shared roles | Set once at team level | Change team role to update all members |
| Individual permissions | Unique access needs, small workspaces | Set per member | Update each member individually |
Team permission inheritance
When you create a team:
- Default role applies workspace-wide – All team members get the assigned role for the entire workspace
- Exceptions can be set – Override the default role for specific databases or tables
- Individual permissions take precedence – Member-specific roles override team defaults
- Team hierarchy matters – Higher teams can access lower team content (but not vice versa)
Learn more: How teams work, team permission inheritance and how to assign roles to teams at workspace level
Create a team step-by-step
Prerequisites
- Workspace admin permissions
- At least one workspace member to add to the team (learn how to invite workspace members)
Steps to create a team
-
Navigate to your workspace
-
Select Members in the sidebar to open the Members page
-
Click the Teams tab at the top of the page
-
Click Create team
-
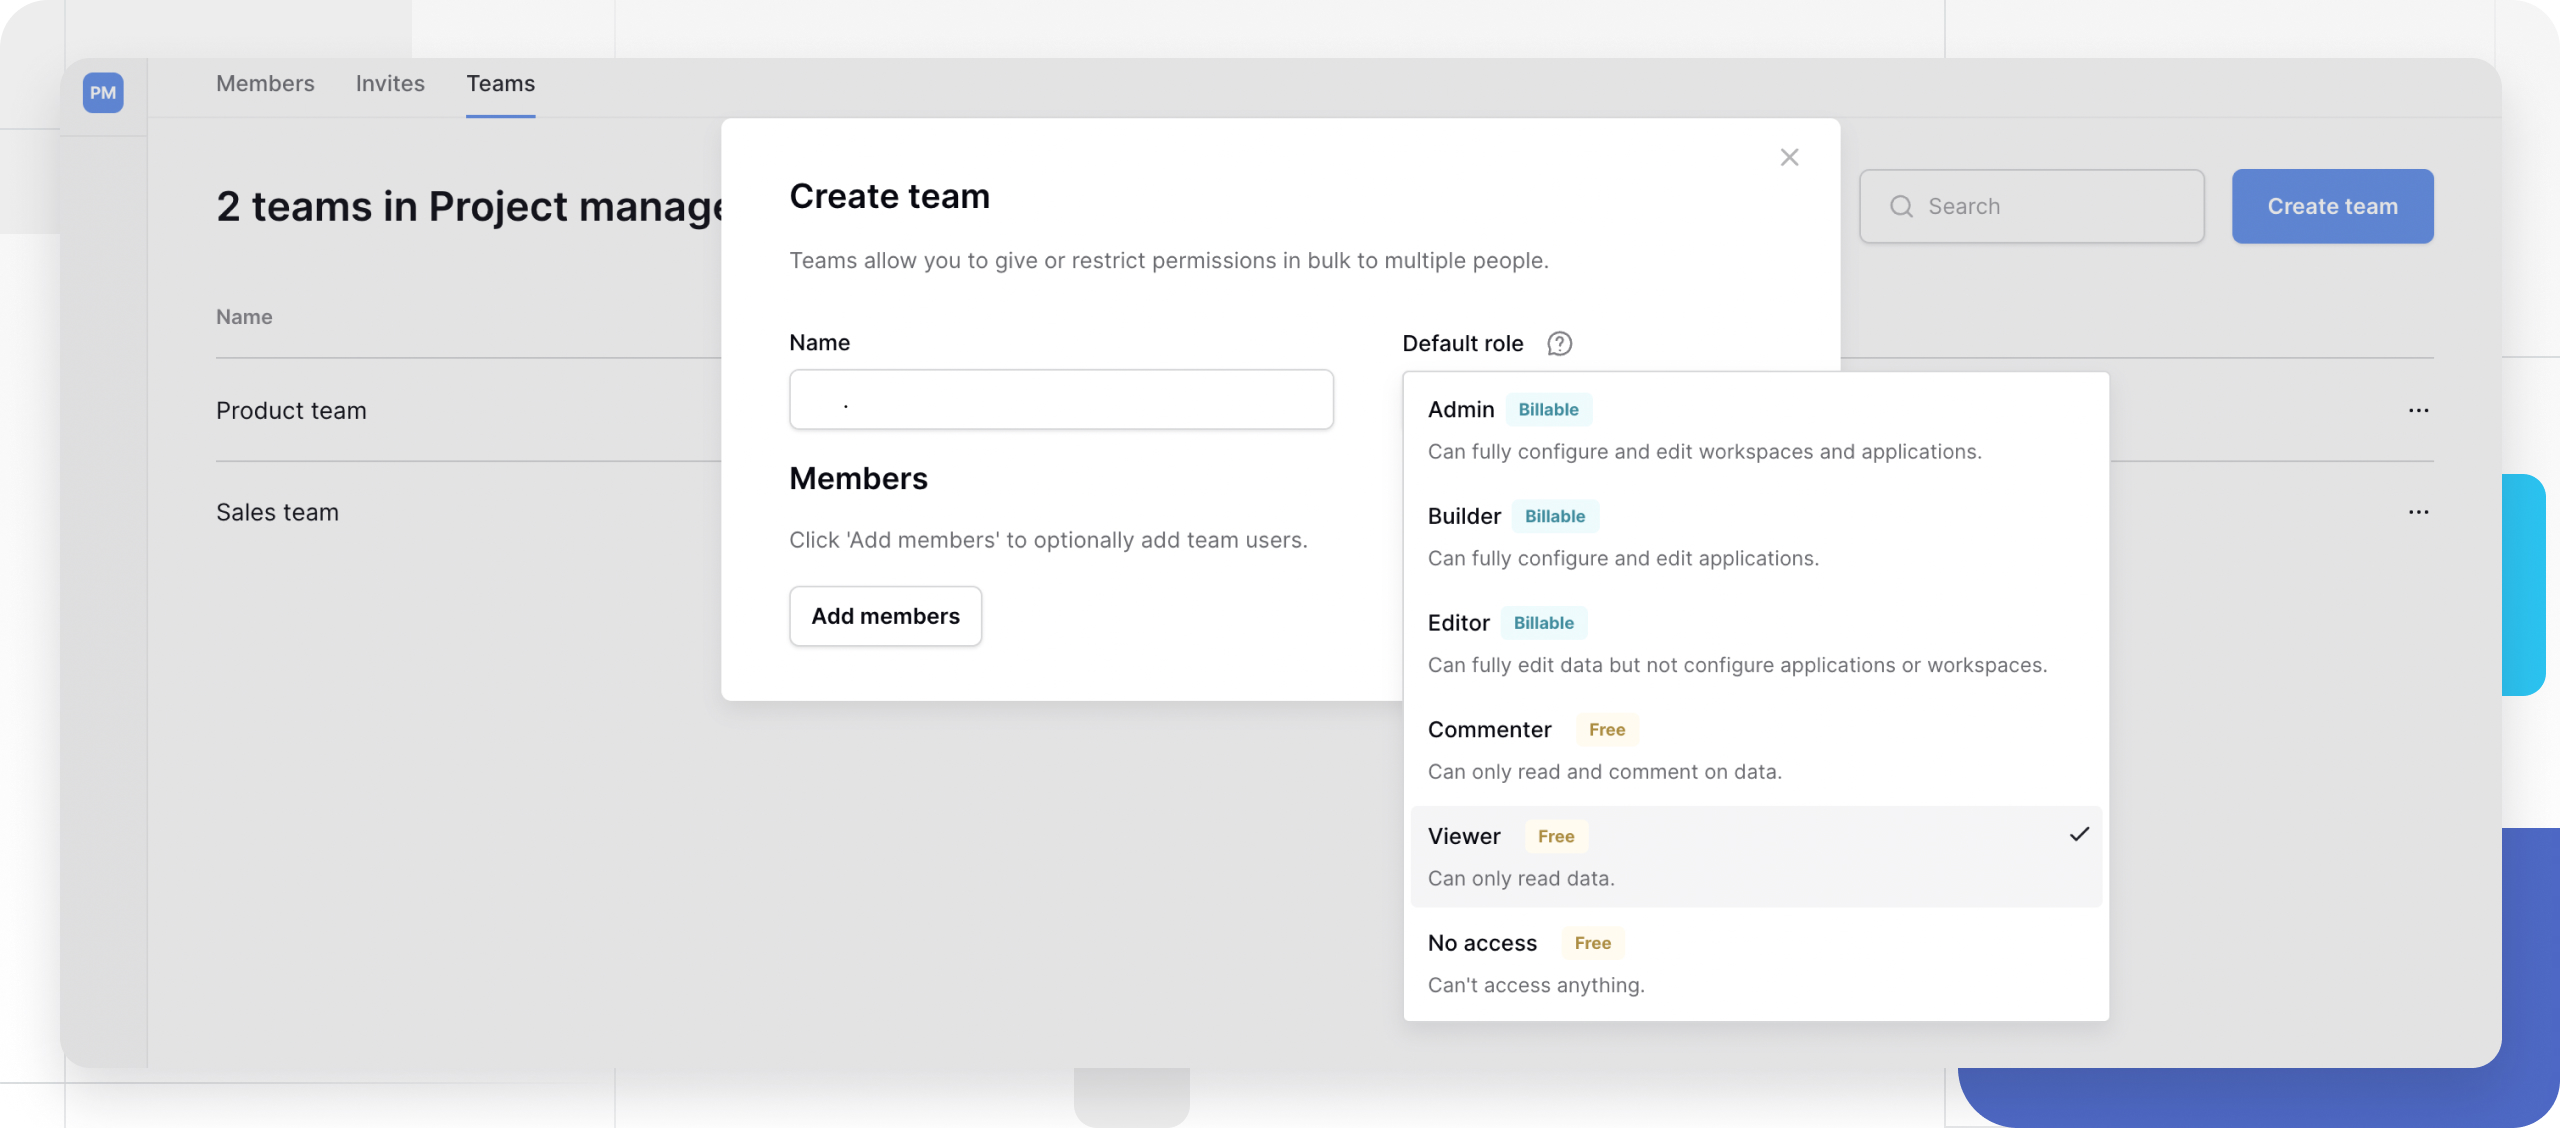
In the team creation dialog, input team name, select default role from the dropdown, and add workspace members to the team by clicking Add members button
-
Search for members to add:
- Use the search box to find specific members
- Check individual boxes or click Select all
- The modal shows the total members selected
- Click Invite to add them to the team

-
Click Save to create the team
All selected members now have the team’s default role throughout the workspace. You can customize their access at the database or table level if needed.
Manage existing teams
Edit team settings
To modify a team’s name, default role, or members:
- Open the Members page and click the Teams tab
- Click the three-dot menu (•••) next to the team name
- Select Edit team
- Make your changes: Update team name, Change the default role from the dropdown, or Add or remove members
- Click Save
Changing the default role immediately updates permissions for all team members across the workspace.
Add members to an existing team
- Click the three-dot menu (•••) next to the team name
- Select Edit team
- Click Add members
- Search and select members using checkboxes
- Click Invite, then Save
New members immediately inherit the team’s default role.
Remove members from teams
When you remove a member from a team, they immediately lose all team-based permissions but retain any individual permissions assigned directly to them.
- Navigate to Members → Teams tab
- Click the three-dot menu (•••) next to the team name
- Select Edit team
- Click the delete icon next to the member you want to remove
- Click Save
Removed members lose team-based permissions but retain any individual permissions assigned directly to them.
Note: Removing a member from a team cannot be undone. To restore access, you must re-add them to the team.
Delete a team
- Click the three-dot menu (•••) next to the team name
- Select Delete team
- Confirm the deletion

Deleting a team removes the team structure but does not delete members from the workspace. Members retain any individual permissions assigned to them.
Frequently asked questions
Can a workspace member belong to multiple teams?
Yes. Members can belong to multiple teams simultaneously. When this happens, they receive the highest permission level from any team they’re part of. Individual permissions still take precedence over all team permissions.
What happens when I change a team’s default role?
All team members immediately inherit the new role across the workspace, unless they have individual permission overrides at the database or table level. Changes apply in real-time.
Do I need to add members to the workspace before adding them to a team?
Yes. Members must first be invited to the workspace before they can be added to any team. Teams organize existing workspace members; they don’t handle initial workspace invitations.
What’s the difference between teams and assigning roles individually?
Teams allow bulk permission management for groups. Instead of setting permissions for each member individually, you set them once at the team level. This is more efficient for organizations with consistent role structures.
Can I see which teams a member belongs to?
Yes. On the Members page, you can view each member’s team memberships. Click on a member to see their individual permissions and team assignments.
What happens to team members when I delete a team?
Team members remain in the workspace with any individual permissions they had. Only the team structure and team-based permissions are removed. Members are not deleted from the workspace.
Related content
- Assign roles to teams at workspace level
- Understand role hierarchy
- Manage workspace members
- Add workspace collaborators
- Assign roles at database level
- Permissions overview
Still need help? If you’re looking for something else, please feel free to make recommendations or ask us questions; we’re ready to assist you.
-
Contact support for questions about Baserow or help with your account
- On this page
- Overview
- How teams work
- Create a team step-by-step
- Manage existing teams
- Frequently asked questions
- Can a workspace member belong to multiple teams?
- What happens when I change a team’s default role?
- Do I need to add members to the workspace before adding them to a team?
- What’s the difference between teams and assigning roles individually?
- Can I see which teams a member belongs to?
- What happens to team members when I delete a team?
- Related content