Create a Baserow table via data sync
Data synchronization ensures your external data is consistent and up-to-date across multiple platforms and tables. Perfect for dashboards and unified reporting.
By automating the process of updating data, you can eliminate the need for manual updates in different systems. This guarantees that everyone within your organization has access to the latest information, reducing errors and increasing efficiency.
Some sync sources (Baserow, Jira, GitHub, GitLab, Hubspot) are available with a paid plan. To access them, please upgrade your account by subscribing.
This section will guide you through the process of setting up and managing data sync in Baserow.
For other ways to create a Baserow table, please see these articles:
- Start with a new table
- Duplicate an existing table
- Paste table data
- Create a new table from an import.
Overview of data sync
Data sync creates live-updating tables that automatically pull information from external sources. Unlike manual imports, synced tables refresh automatically, ensuring everyone works with the latest data without manual updates.
Data sync eliminates manual data entry and ensures single-source-of-truth consistency across platforms.
Synced tables are read-only in Baserow, meaning you modify data at the source and see changes reflected automatically.

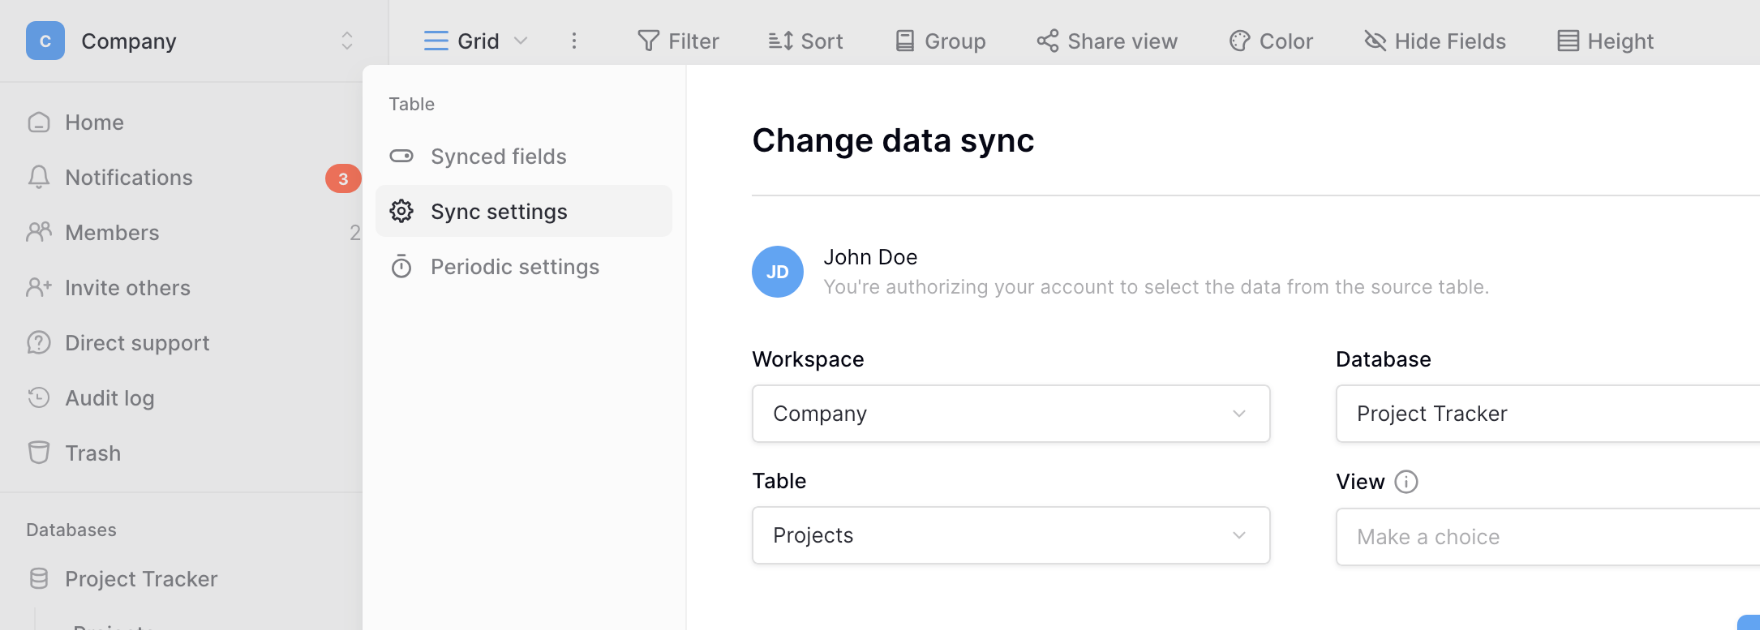
How to set up data sync
Setting up any sync source follows the same basic pattern, with source-specific connection details varying.
Basic setup process
- Navigate to your database in the sidebar and click + New table
- Select your sync source from the available integration options
- Enter connection details specific to your source (see source sections below)
- Name your synced table descriptively to identify the data source
- Select fields to sync. You don’t need all fields; choose only what’s relevant.
Field types cannot be changed on synced fields.
- Toggle on Auto add new properties to automatically add and synchronize newly available properties from the data source into the Baserow table. Note that for this to work, all properties must be synced.
- Click Create and sync table to establish the connection

Your table is created immediately and begins syncing. Data appears as read-only with sync indicators (arrows) beside field names.
Data sync sources
Data sync in Baserow can integrate with multiple sources:
| Source | Best for | Update frequency | Two-way sync |
|---|---|---|---|
| PostgreSQL | Database integration | Manual/scheduled | Yes |
| Baserow table | Cross-workspace data | Manual/scheduled | No |
| Jira issues | Project management tracking | Manual/scheduled | No |
| GitHub issues | Development workflow | Manual/scheduled | No |
| GitLab issues | DevOps integration | Manual/scheduled | No |
| HubSpot contacts | CRM synchronization | Manual/scheduled | No |
| iCal feed | Calendar and events | Manual/scheduled | No |
Sync source configurations
Sync iCal feed
iCal feed sync is designed to bring calendar data into Baserow. The iCal calendar sync synchronizes automatically with the entries in the URL’s calendar file.
It supports the ICS (Internet Calendar and Scheduling) file type. Simply provide the iCal URL from your calendar service.
This is useful for syncing shared calendars, project timelines, or event schedules across different platforms into a single database.
Sync PostgreSQL table
Connect directly to PostgreSQL databases to view and manage data in Baserow’s interface. Supports optional two-way sync for editing data in Baserow and pushing changes back to PostgreSQL.
Connection setup
To initiate the synchronization process, you’ll need to provide the following information:
- Server hostname: The address of your PostgreSQL server.
- Username: The username used to access the database.
- Password: The corresponding password for the specified username.
- Database name: The name of the database containing the table you want to synchronize.
- Schema name: The schema within the database where the table resides.
- Table name: The exact name of the PostgreSQL table you wish to synchronize.
- Port number: The port number used by the PostgreSQL server.
- SSL mode: The desired SSL mode for the connection.
When you first set up synchronization, Baserow will select all rows from the specified PostgreSQL table.
Two-way synchronization
Baserow supports two-way sync with PostgreSQL, extending the data sync feature to keep information consistent between Baserow and your PostgreSQL databases.
With two-way sync enabled, you can sync changes from PostgreSQL into Baserow to keep your workspace up to date, and push updates made in Baserow back to PostgreSQL in real time.
After connecting your PostgreSQL database and selecting the fields you want to sync:
- Toggle the “Two-way sync” option.
- This allows you to edit cell values directly in Baserow and push the updates back into your PostgreSQL database.
- Changes are sent to PostgreSQL in real time. Updates from PostgreSQL are pulled when the periodic sync runs.
- Click Create and sync table to finish setup.
Important: We recommend creating backups of your PostgreSQL database before enabling two-way sync to avoid accidental changes.
Permissions
If you only intend to use one-way sync (PostgreSQL → Baserow), we advise limiting the user account used for synchronization to read-only permissions. This prevents accidental or malicious modifications to your PostgreSQL data. For two-way sync, ensure the account has appropriate write permissions.
Sync Baserow table
Baserow table sync allows you to synchronize tables across different workspaces in Baserow. This ensures that updates in the source table are reflected automatically in synced versions.
Required details: Select source workspace, database, and table from dropdowns.

Sync Jira issues
Baserow offers integration with Jira, allowing you to sync your issues and maintain a unified view across different teams. This eliminates the need to constantly switch between tools and manually update information on both platforms.
Here’s how to establish the connection:
- Locate your Jira instance URL: The base URL of your Jira instance (e.g.,
https://your-domain.atlassian.net). - Provide your Jira credentials: Baserow requires authentication to access your Jira data. Authenticate with either a Personal Access Token (recommended) or username with API token from Atlassian account security settings.
- Specify Jira project key (Optional): Optionally specify a project key to sync only specific projects. Leaving this field blank will result in importing all issues from your Jira instance.
The personal access token authentication method provides improved security and allows for more granular permission management compared to traditional username/password authentication.
Sync GitHub issues
Synchronize GitHub issues with Baserow for unified tracking. Here’s how to establish the connection:
- Owner: Username or owner of the repository. Typically in the top left corner
owner / repo - Repository: The name of the repository. Typically in the top left corner
owner / repo - API token: Generate an API token from GitHub settings with read-only access to Issues under Repository permissions.
Sync GitLab issues
Connect GitLab projects for issue tracking. Here’s how to set up the integration:
- Base URL: Enter your GitLab base URL (e.g.,
https://gitlab.com) - Project ID: Found by clicking the three-dot menu in your project and selecting “Copy project ID”
- Access token: Create a personal access token with
read_apiscope from GitLab user settings

Sync HubSpot contacts
Synchronize HubSpot CRM contacts directly into Baserow. Here’s how to set up the synchronization
- Name: The table requires a name to help identify and organize your data.
- Private app access token: Generate a private app access token from HubSpot (Settings > Integrations > Private Apps) with these scopes:
crm.objects.contacts.read,crm.schemas.contacts.read, andcrm.objects.custom.read
Use this token during the table setup process to establish a secure connection between HubSpot and Baserow.

Manage and update sync settings
Once a sync is established, you can easily manage and update it as needed. The field configuration options are available. You can also create and manage views.
With these integrations, you can synchronize data in external platforms directly into Baserow, simplifying workflows, improving collaboration, and making data management more efficient.
You have the flexibility to choose only the fields relevant to your workflow, which helps to keep your workspace clean and focused.
The sync table feature only supports field types like single text, number, date, and boolean. Calculated fields like Link to table, Lookup, Rollup and Formula cannot be synced. This is because the value of those fields might depend on other tables that have a different set of permissions.
Trigger manual sync
While sync can be scheduled, you can manually refresh data anytime. This will refresh the data, pulling the latest information from the main source.
To pull the latest data from your connected source into Baserow,
- Go to the synced table in Baserow and click on the three-dot menu to open the table options.
- Click Sync table.
During this process, a lock is placed on the updated rows, which may temporarily slow down API requests or table modifications.
Periodic sync
Configure automatic sync schedules through the ellipsis menu of any synced table. The default interval setting is set to “Manual” and can be changed to either “Hourly” or “Daily”. Periodic sync offers three intervals:
-
Manual (default): No automatic syncing—trigger updates only when needed.
-
Hourly: Sync runs every hour at a specific minute and second you define (e.g., 29 minutes and 18 seconds past each hour).

- Daily: Sync occurs once per day at a specific time you set using 24-hour format (e.g., 16:29:18 for 4:29:18 PM).

Delete rows when they are deleted or hidden in the source
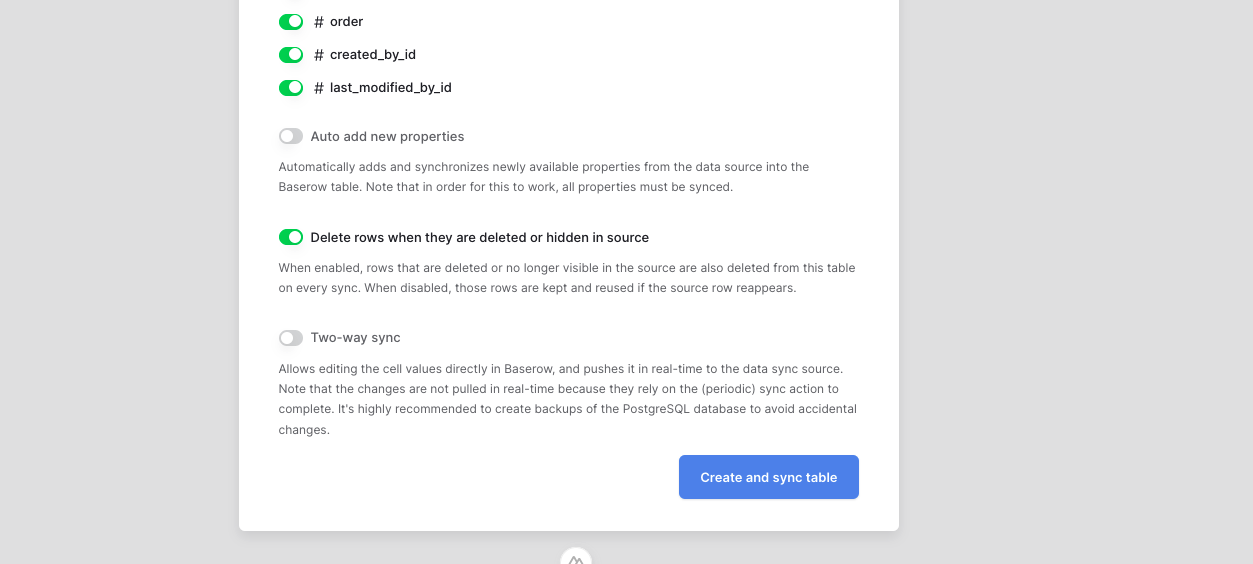
By default, Delete rows when they are deleted or hidden in the source is enabled.
When enabled, rows that are deleted or no longer visible in the source are also deleted from the synced table during each synchronization.
Disable this option if you want to keep those rows in your synced table. This is useful when you’ve added custom fields, notes, or other information in Baserow that you don’t want to lose if a record is removed or temporarily hidden in the source.
If the same row becomes visible in the source again, Baserow automatically reuses the existing row and synchronizes it again instead of creating a duplicate.
Add new fields
Synced fields are read-only, but you can add new editable fields to synced tables for tracking additional information not provided by the source. These custom fields don’t interfere with synced data and update independently.
Synced fields display an arrow indicator to distinguish them from custom editable fields.

Customize views
Although data is read-only, you can create multiple views of synced tables with different filters, sorts, and groupings. This lets different teams see synchronized data in ways that suit their workflows without affecting the underlying sync.
Frequently asked questions
Can I edit data in synced tables?
No, synced tables are read-only by default. This prevents conflicts between Baserow and your source system. To change data, modify it at the source and trigger a sync update. The exception is PostgreSQL with two-way sync enabled, which allows editing in Baserow and pushes changes back to PostgreSQL.
What’s the difference between data sync and importing?
Importing creates a one-time copy of data that becomes independent from the source. Data sync maintains an ongoing connection where tables automatically update when source data changes. Use imports for static data you’ll modify in Baserow, use sync for live dashboards and reporting.
How often does data sync refresh?
By default, syncs are manual; you trigger them when needed. Configure periodic sync for automatic hourly or daily updates at specific times. Real-time sync isn’t available; there’s always a delay between source changes and Baserow updates.
Can I sync data from multiple sources into one table?
No, each synced table connects to a single source. To combine data from multiple sources, create separate synced tables and use Link to table fields on regular (non-synced) tables to reference and combine the information.
What happens if my sync source becomes unavailable?
Synced tables retain their last successfully synced data. When the source becomes available again, trigger a manual sync or wait for the next scheduled sync to update. No data is lost during source outages; tables simply don’t update until connectivity restores.
Related content
Understand synced data:
- Field types overview – Learn which field types can sync
- Field customization – Add custom fields to synced tables
- Create views – Visualize synced data different ways
Alternative table creation methods:
- Create blank tables – Start from scratch for full control
- Import data – One-time data transfer from files
- Duplicate tables – Copy existing structures
Still need help? If you’re looking for something else, please feel free to make recommendations or ask us questions; we’re ready to assist you.
- Ask the Baserow community
- Contact support for questions about Baserow or help with your account.