Configure element events and workflows
Events are the logic layer of your application. They allow you to define exactly what happens when a user interacts with an element, whether it’s showing a success message, updating a database row, or sending an email to a customer.
This guide covers how to add interactivity to your application by triggering actions on clicks, form submissions, and page loads.
Overview
- Triggers: Events are triggered by user actions, such as On Click (Button), On Submit (Form), or after a User Login.
- Workflows: You can stack multiple actions on a single trigger (e.g., Create Row -> Send Email -> Show Notification -> Go to Home Page).
- Context: Actions can access data from the element that triggered them (e.g., using the text from a form input to populate an email body).

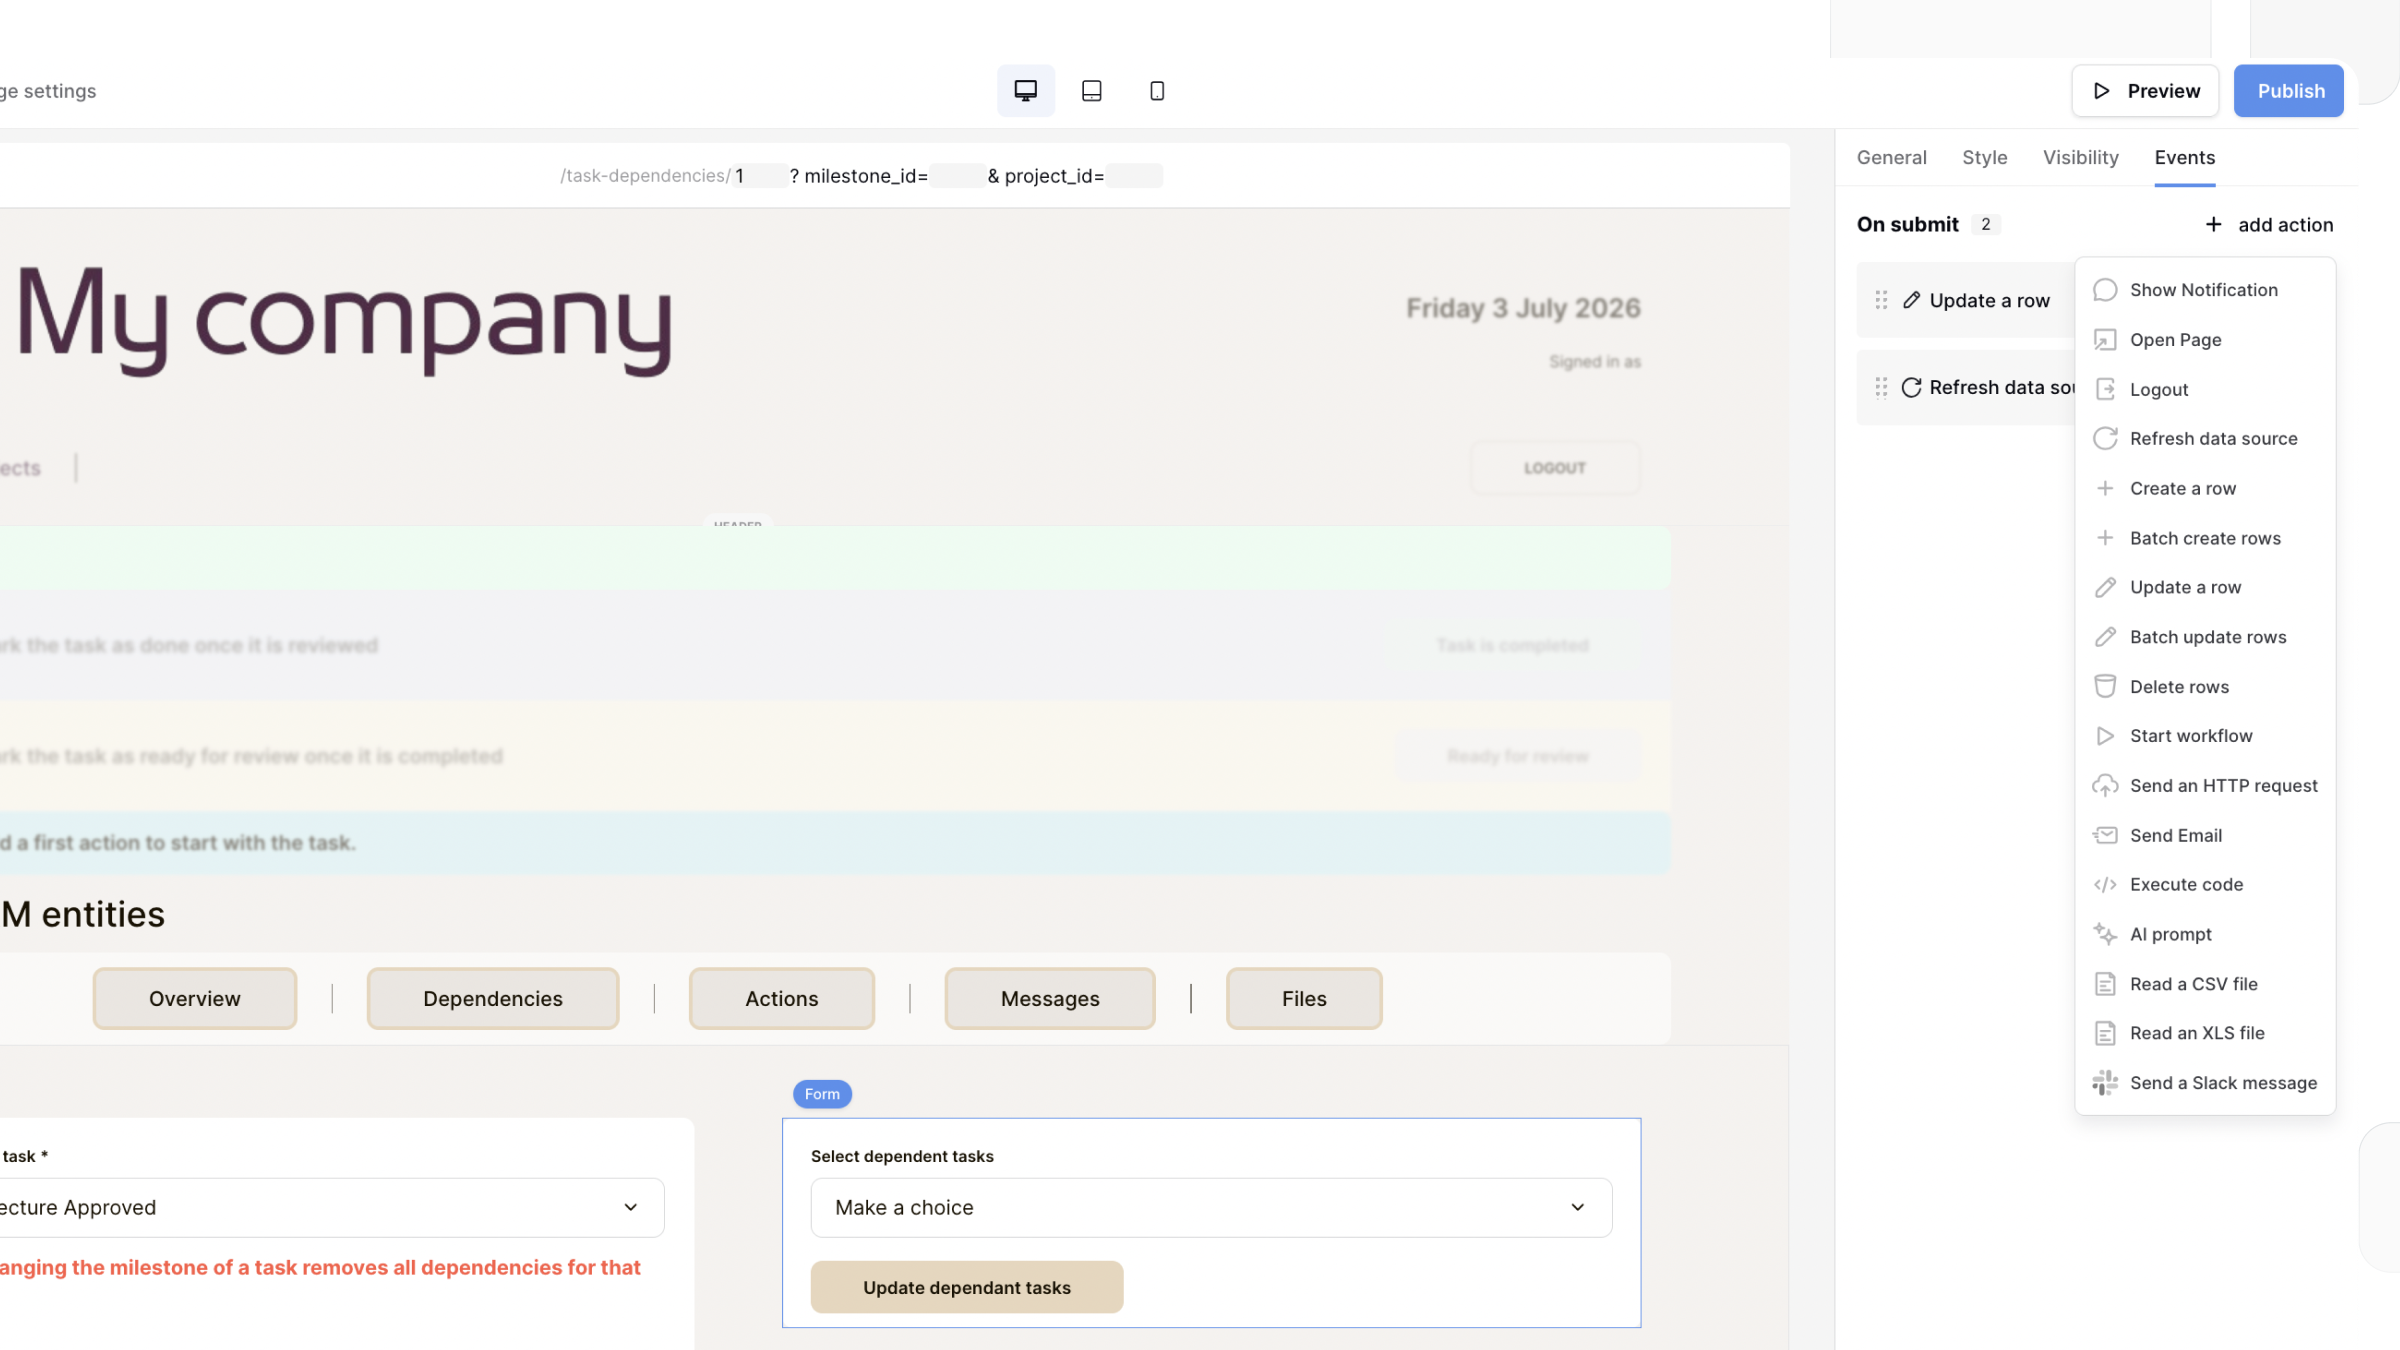
How to add an event
- Select the interactive element (e.g., Button or Form) on your canvas.
- Click the Events tab in the properties panel on the right.
- Choose your trigger (e.g., On Click).
- Click + Add action and select the desired operation from the list.
- (Optional) Drag and drop actions to reorder the sequence of execution.
Action reference
Events are categorized by their function. Below is a guide to every available action type.
UI and Navigation Actions
| Action | Description | Use Case |
|---|---|---|
| Open page | Redirects the user to another page or external URL. | Navigating to a “Thank You” page after submission. |
| Show notification | Displays a temporary pop-up toast message. | Confirming “Profile Updated” without leaving the page. |
| Refresh data source | Forces a data source to reload its content. | Updating a list immediately after adding a new item. |
| Logout | Ends the user’s session. | Creating a “Sign Out” button in a menu. |

Data Operations (CRUD)
These actions interact directly with your Baserow database.
- Create row: Adds a new record to a table. You must map your form inputs to the table columns.
- Batch create rows: Creates multiple records in a single action from an array of row objects.
- Update row: Modifies an existing record. Requires a Row ID to identify which item to update.
- Batch update rows: Updates multiple existing records in a single action from an array of row objects. Each object must include a Row ID.
- Delete row: Permanently removes a record. Requires a Row ID.

Core actions
- Send email: Sends a custom email via SMTP (Gmail, Outlook, etc.).
- Send HTTP request: Connects to any API (e.g., Stripe, Zapier, Webhooks).
- Execute code: Runs custom JavaScript to transform data, perform calculations, or implement custom business logic.
- AI prompt: Sends text to a generative AI model for analysis or content creation.
External Integrations
- Send Slack message: Posts a message to a specific channel or user.
Learn more about how to configure the Slack message action.
Send email (SMTP)
The Send email action allows you to send automated notifications directly from your application.
Configuration
- Integration: Select or add an SMTP integration.
* Host:
smtp.gmail.com(Example) * Port:587(TLS) or465(SSL) * Auth: Username and Password (use an App Password for Gmail). - Recipient (To): Enter a static email or bind it to a form field (e.g.,
{{ form.email }}). - You can also configure additional fields such as CC, BCC, and select the Body Type as needed.
- Message: Supports plain text or HTML. You can insert dynamic variables to personalize the content (e.g., “Hello
{{ User.First_Name }}”).
Note for Gmail users: You need to create an App Password and use it instead of your regular email password.

HTTP request
The HTTP request action allows you to send requests to external APIs and services directly from your application. Use this action to trigger complex workflows in tools like Make, n8n, or custom backends.
Steps:
- Method: Choose GET, POST, PUT, DELETE, etc.
- URL: The endpoint of the external service.
- Set query parameters: Add any necessary query parameters.
- Set headers: Add any necessary headers for authentication, content type, or other requirements.
- Body: Select JSON, Form Data, or Raw. You can map application data into the JSON body to pass information to the external tool.
- Timeout: Set the amount of time this request has to succeed before timing out and failing.
This action is perfect for integrating with payment processors, sending data to CRM systems, triggering automated workflows, or communicating with any external API that your application needs to interact with.
Update row
To update a specific row, the workflow needs to know which row to target.
- Select Table: Choose the database table to update.
- Row ID: This is critical. You must provide the ID of the row.
- Context: Usually, this comes from a Page Parameter (e.g., on a “Edit Profile” page, the ID is in the URL) or from a Data Source.
- Field Mapping: Select which columns to update and map them to your form inputs.

Execute code
The new ‘Code execution’ event lets you write JavaScript to transform data, perform calculations, and prepare information before the next step in your automation or application.
- Open your Application Builder app.
- Select the interactive element (for example, a Button or Form) that should run the code.
- Open the Events tab in the properties panel.
- Under the desired trigger (for example, On click or On submit), click + Add action.
- Select Execute code.
The action contains two main sections:
- Data injections
- Code editor
👉 See how to configure this event.
AI prompt
The AI Prompt node connects to generative AI models to execute prompts, analyze data, or generate content directly within your workflow. This allows you to build powerful automations that can summarize text, categorize customer feedback, translate languages, or generate email replies based on your Baserow data.
Learn more about how to configure the AI prompt.
Read a CSV file
The Read a CSV file action reads structured CSV data and makes each row available to later actions in your application workflow.
This is useful for processing spreadsheets uploaded through forms, reading files stored in Baserow file fields, or creating and updating records from CSV data.
Add the action
- Select the interactive element that will trigger the action.
- Open the Events tab.
- Click + Add action.
- Select Read a CSV file.
👉 Learn more about configuring the Read a CSV file action.
Read an XLS file
The Read an XLS file action reads data from .xls and .xlsx spreadsheets and makes each row available to later actions in your application workflow.
You can optionally choose which worksheet to read, making it easy to process uploaded Excel files without importing them into a database first.
Add the action
- Select the interactive element that will trigger the action.
- Open the Events tab.
- Click + Add action.
- Select Read an XLS file.
👉 Learn more about configuring the Read an XLS file action.
Start workflow
The Start workflow action starts a published automation workflow with a Manual trigger. This lets you reuse the same workflow from multiple applications and automations instead of duplicating your logic.
This is useful for centralizing common processes, such as sending reports, importing data, or running approval workflows.
👉 Learn more about configuring the Start workflow action.
Frequently asked questions (FAQ)
Can I run multiple actions at once?
Yes. Actions run sequentially from top to bottom. For example, you can create a row, then send an email, then show a notification.
How do I get the Row ID for an update?
The Row ID is usually passed via the URL (e.g., /edit-task/:id). In your Update Row action, you can select this Page Parameter as the source for the Row ID field.
Why isn’t my email sending?
Check your SMTP credentials. If you are using Gmail, you must use an App Password and enable TLS on port 587. Standard passwords will not work due to security restrictions.
Related content
Still need help? If you’re looking for something else, please feel free to make recommendations or ask us questions; we’re ready to assist you.
- Ask the Baserow community
- Contact support for questions about Baserow or help with your account.