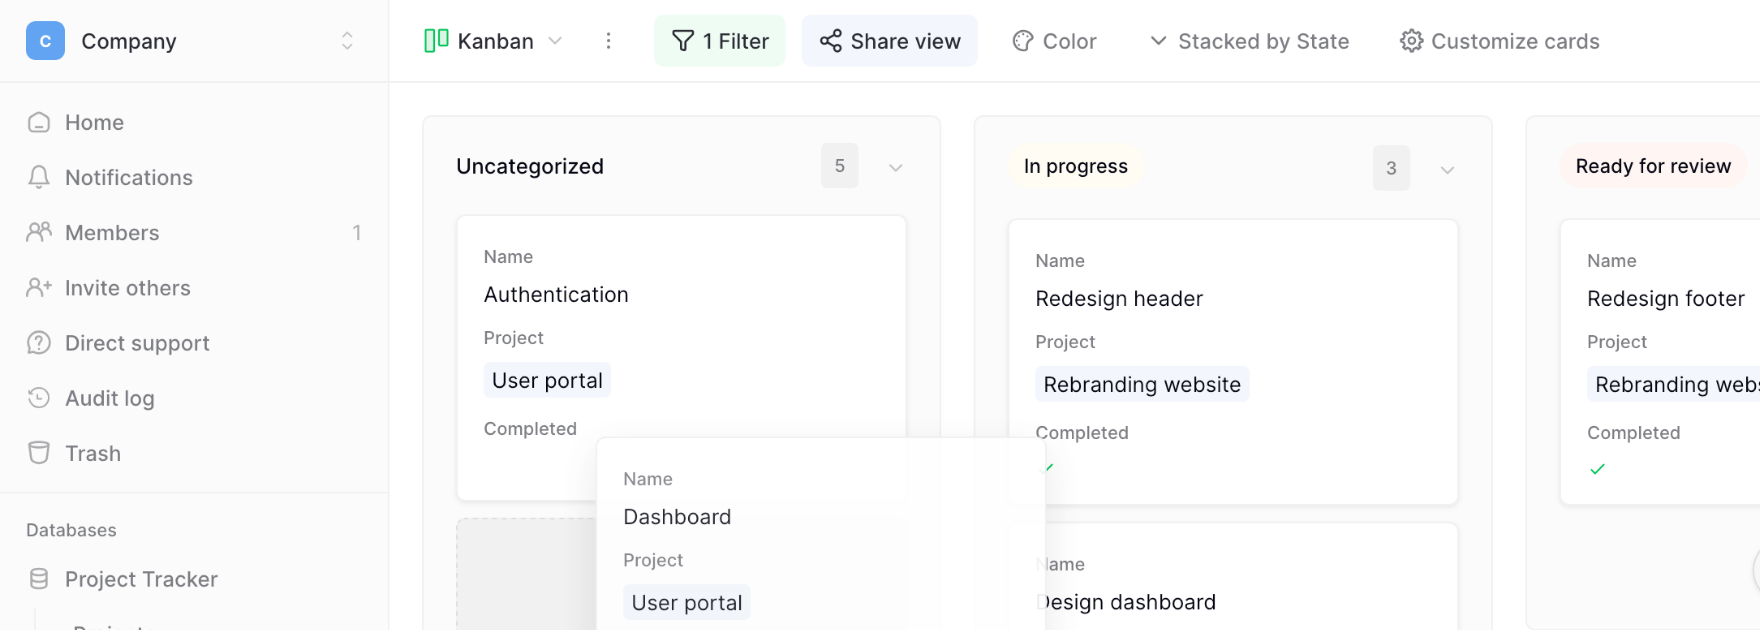
Kanban view
Kanban view displays records as cards organized into columns, making it perfect for tracking work through stages like sales pipelines, project workflows, or content production.
This guide covers how to use Baserow’s kanban view for visual workflow management with drag-and-drop cards organized by status or category.
Premium feature: Kanban view requires paid plans. Users on the free plan cannot create kanban views.
Learn more about views in general: Views overview
What is Kanban view?
Kanban view organizes records into vertical columns based on a Single select field. Each column represents a status, stage, or category, and each record displays as a card that you can drag between columns to update its status. This visual workflow makes it easy to see work in progress and identify bottlenecks. Perfect for sales pipelines, production tracking, etc.
Kanban view excels at: Sales pipelines (Lead → Qualified → Proposal → Closed), bug tracking (New → In Progress → Testing → Resolved), content calendars (Idea → Draft → Review → Published), recruitment workflows (Applied → Screening → Interview → Hired), and any process with clear stages.
Kanban view vs other view types
| Feature | Kanban | Grid | Gallery | Calendar |
|---|---|---|---|---|
| Best for | Status tracking | Detailed data work | Visual browsing | Date-based events |
| Organization | By status columns | By rows | By cards | By dates |
| Status updates | Drag between columns | Edit field | Edit field | Drag to dates |
| Visual workflow | ✓ Excellent | Poor | Medium | Medium |
| Data density | Low (cards) | High (rows) | Medium (cards) | Medium |
| Bulk operations | Limited | ✓ Extensive | Limited | Limited |
| Premium feature | Yes | No | No | No |
Learn more: Grid view | Gallery view | Calendar view
Create a Kanban view
Kanban views require a Single select field to define columns. Each option in the Single select field becomes a column on your kanban board.
Prerequisites
Your table must have at least one Single select field. If you don’t have one:
- Create a Single select field before creating the Kanban view
- Add options for each stage (e.g., “To Do,” “In Progress,” “Done”)
- Optionally, populate existing records with appropriate status values
Create the view
- Click the view dropdown at the top-left of the table
- Select Kanban from the view type options
- Choose Collaborative or Personal permission type
- Enter a name for your kanban view
- Select the Single select field that determines columns (or create a new one)
- Click Create view

Cards appear in columns based on their Single select field values. Records without a value appear in the “Uncategorized” column.
Organize cards by status
The kanban board organizes around a Single select field that defines your workflow stages.
Stacked by field
The toolbar shows which Single select field currently organizes your kanban board: “Stacked by [field name]”
Change the stacked-by field:
- Click Stacked by [field] in the toolbar
- Select a different Single select field from the dropdown
- Or create a new Single select field with different options

The kanban reorganizes immediately, with cards redistributing into columns based on the new field’s values.
Uncategorized column
Records where the stacked-by field is empty appear in the “Uncategorized” column. This helps identify records that need status assignment.
Moving cards to uncategorized: Drag a card into the Uncategorized column to clear its status value. The Single select field becomes empty.
Moving cards from uncategorized: Drag a card from Uncategorized to any other column to assign it that status.
Move cards between columns
Drag-and-drop is the primary interaction in Kanban view, making status updates intuitive and quick.
Update card status
- Click and hold any card
- Drag to the target column
- Release to drop the card
The card’s Single select field updates automatically to match the new column. This change syncs across all views; you’ll see the updated status in Grid view and other views immediately.
Reorder cards within columns
Cards within a column can be reordered manually:
- Drag a card up or down within its current column
- Drop it at the desired position
Manual ordering lets you prioritize cards within each stage without changing their status.

Customize card content
Control what information displays on kanban cards to show the most relevant data for quick decision-making.
Customize cards interface
Click Customize cards in the toolbar to access card configuration options:
Cover field: Display a File field image at the top of each card for visual identification (products, profiles, documents).
Search fields: If you have many fields, use the search box to quickly find specific fields to show or hide.
Field visibility: Show or hide specific fields on cards using toggles. Green toggle (switched right) = visible. Gray toggle (switched left) = hidden.
Field order: Drag fields using the handle (⋮⋮) to reorder how they appear on cards.
Quick actions: Use Hide all or Show all buttons to quickly toggle all fields at once.

Cover field setup
The cover field displays images from a File field at the top of each card, making visual identification easier.
Requirements:
- Table must have at least one File field
- Works best with image files (photos, logos, screenshots)
- Other file types show file icons instead of previews
Configure cover:
- Click Customize cards
- Select a File field from the Cover field dropdown
- Choose No cover to remove cover images
Cover images appear when you share Kanban views publicly.
Reorder card fields
Field order on cards affects how quickly you can scan information. Put the most important fields first.
- Click Customize cards in the toolbar
- Drag the handle (⋮⋮) next to any field name
- Move fields up or down to desired position
- Close to save changes

Manage columns (stacks)
Columns in the Kanban view correspond to options in your Single select field. Column management affects the field itself and all views using that field.
Create cards in columns
Add new records directly from the kanban board:
- Click the three-dot menu (⋮⋮⋮) at the top of any column
- Select Create card
- Fill in field values for the new record
- Click Create

The new card appears in the column you created it from, with the Single select field automatically set to that column’s value.
Edit column properties
Customize how columns appear on your board:
- Click the three-dot menu (⋮⋮⋮) at the top of a column
- Select Edit stack
- Change the column name (updates the select option name)
- Change the color scheme for visual differentiation
- Click Change to save
Color coding helps distinguish stages visually: red for urgent, yellow for review needed, green for complete.
Delete columns
Warning: Deleting a column deletes the corresponding single select option, which clears that value from all records. This cannot be undone.
- Click the three-dot menu (⋮⋮⋮) at the top of the column
- Select Delete stack
- Confirm the deletion
Cards in the deleted column move to “Uncategorized” with their status cleared.
Kanban view toolbar options
The toolbar at the top of Kanban view provides quick access to common operations:
Filter - Show only cards matching specific conditions. Useful for focusing on high-priority items or specific assignees.
Sort – Define how cards are ordered within each column. You can add multiple sort conditions and reorder them using drag and drop.
Share view - Generate public links or embed codes to share your kanban board externally.
Row colors - Apply conditional formatting to highlight specific cards based on field values.
Stacked by - Change which Single select field organizes columns (covered above).
Customize cards - Configure card content and appearance (covered above).
Each of these features has detailed documentation at the linked pages.
Kanban view management
Access view management options by clicking the three-dot menu (⋮) next to the view name:
- Duplicate view - Copy configuration to a new view
- Import file - Add data from CSV, JSON, or XML files
- Convert view type - Change between collaborative and personal
- Webhooks - Configure external notifications when cards move
- Rename view - Update the view name
- Delete view - Remove the view permanently
Learn more: View configuration options
Why use Kanban view?
Kanban view provides visual workflow management that’s impossible to replicate in Grid view or other view types. The column-based layout makes process stages immediately visible.
Visual workflow clarity: See all work stages at once. Identify bottlenecks where cards accumulate and spot empty columns that need attention. This bird’s-eye view reveals workflow health instantly.
Intuitive status updates: Drag cards between columns to update status; no field editing required. The visual action of moving a card matches the mental model of progressing work through stages.
Team coordination: Everyone sees the same board layout, making kanban ideal for team collaboration. Stand-up meetings become easier when the entire workflow displays visually.
Flexible card content: Customize which fields appear on cards to show the most relevant information for quick decision-making without opening full records.
Frequently asked questions
Can I have multiple Kanban views with different columns?
Yes, but each Kanban view uses a Single select field to define columns. Create multiple Single select fields (e.g., “Status” and “Priority”) and create separate Kanban views for each. You can’t stack by multiple fields simultaneously in one Kanban view.
What happens to cards when I delete them?
Right-clicking a card shows a Delete option that removes the record from your table. The deletion affects all views; the record disappears from the Grid view, other kanban boards, and everywhere else. Always verify card content before deleting to prevent data loss. Learn more: Delete row.
Why are some cards missing from my Kanban view?
Cards may be hidden by active filters. Check the toolbar for filter indicators. Also verify the stacked-by field; cards where that field is empty appear in “Uncategorized” which may be off-screen if you have many columns.
Can I change which field determines columns?
Yes. Click Stacked by [field] in the toolbar and select a different Single select field. The kanban reorganizes immediately with new columns based on the selected field’s options. All cards are rearranged into appropriate columns.
Do kanban changes sync to other views instantly?
Yes. When you drag a card between columns, the status field updates immediately across all views. Team members viewing Grid view or other kanban boards see the change in real-time (with a page refresh if needed).
Can I export Kanban view data?
Kanban view doesn’t have direct export. Switch to Grid view to access export functionality, or use table export to download all data. The export contains the same data; only the access point differs.
How many columns can a Kanban view have?
You can have as many columns as options in your Single select field. However, many columns (20+) require horizontal scrolling and may reduce usability. Consider if multiple Kanban views with different Single select fields would organize your workflow better.
Related resources
View basics
- Views overview - Understanding all view types
- Create custom views - Step-by-step view creation
- View configuration options - General view settings
Kanban features
- Single select field - Required for kanban columns
- File field - For card cover images
- Filters in Baserow - Focus on specific cards
- Row coloring - Highlight important cards
- Public sharing - Share kanban boards externally
Related field types
- Collaborator field - Assign cards to team members
- Date field - Track due dates and timelines
Other view types
- Grid view - Spreadsheet interface
- Gallery view - Visual card display
- Calendar view - Date-based scheduling
- Form view - Data collection
Plans and features
- Pricing plans - Feature availability by plan
Still need help? If you’re looking for something else, please feel free to make recommendations or ask us questions; we’re ready to assist you.
-
Contact support for questions about Baserow or help with your account
- On this page
- What is Kanban view?
- Kanban view vs other view types
- Create a Kanban view
- Organize cards by status
- Move cards between columns
- Customize card content
- Manage columns (stacks)
- Kanban view toolbar options
- Kanban view management
- Why use Kanban view?
- Frequently asked questions
- Can I have multiple Kanban views with different columns?
- What happens to cards when I delete them?
- Why are some cards missing from my Kanban view?
- Can I change which field determines columns?
- Do kanban changes sync to other views instantly?
- Can I export Kanban view data?
- How many columns can a Kanban view have?
- Related resources