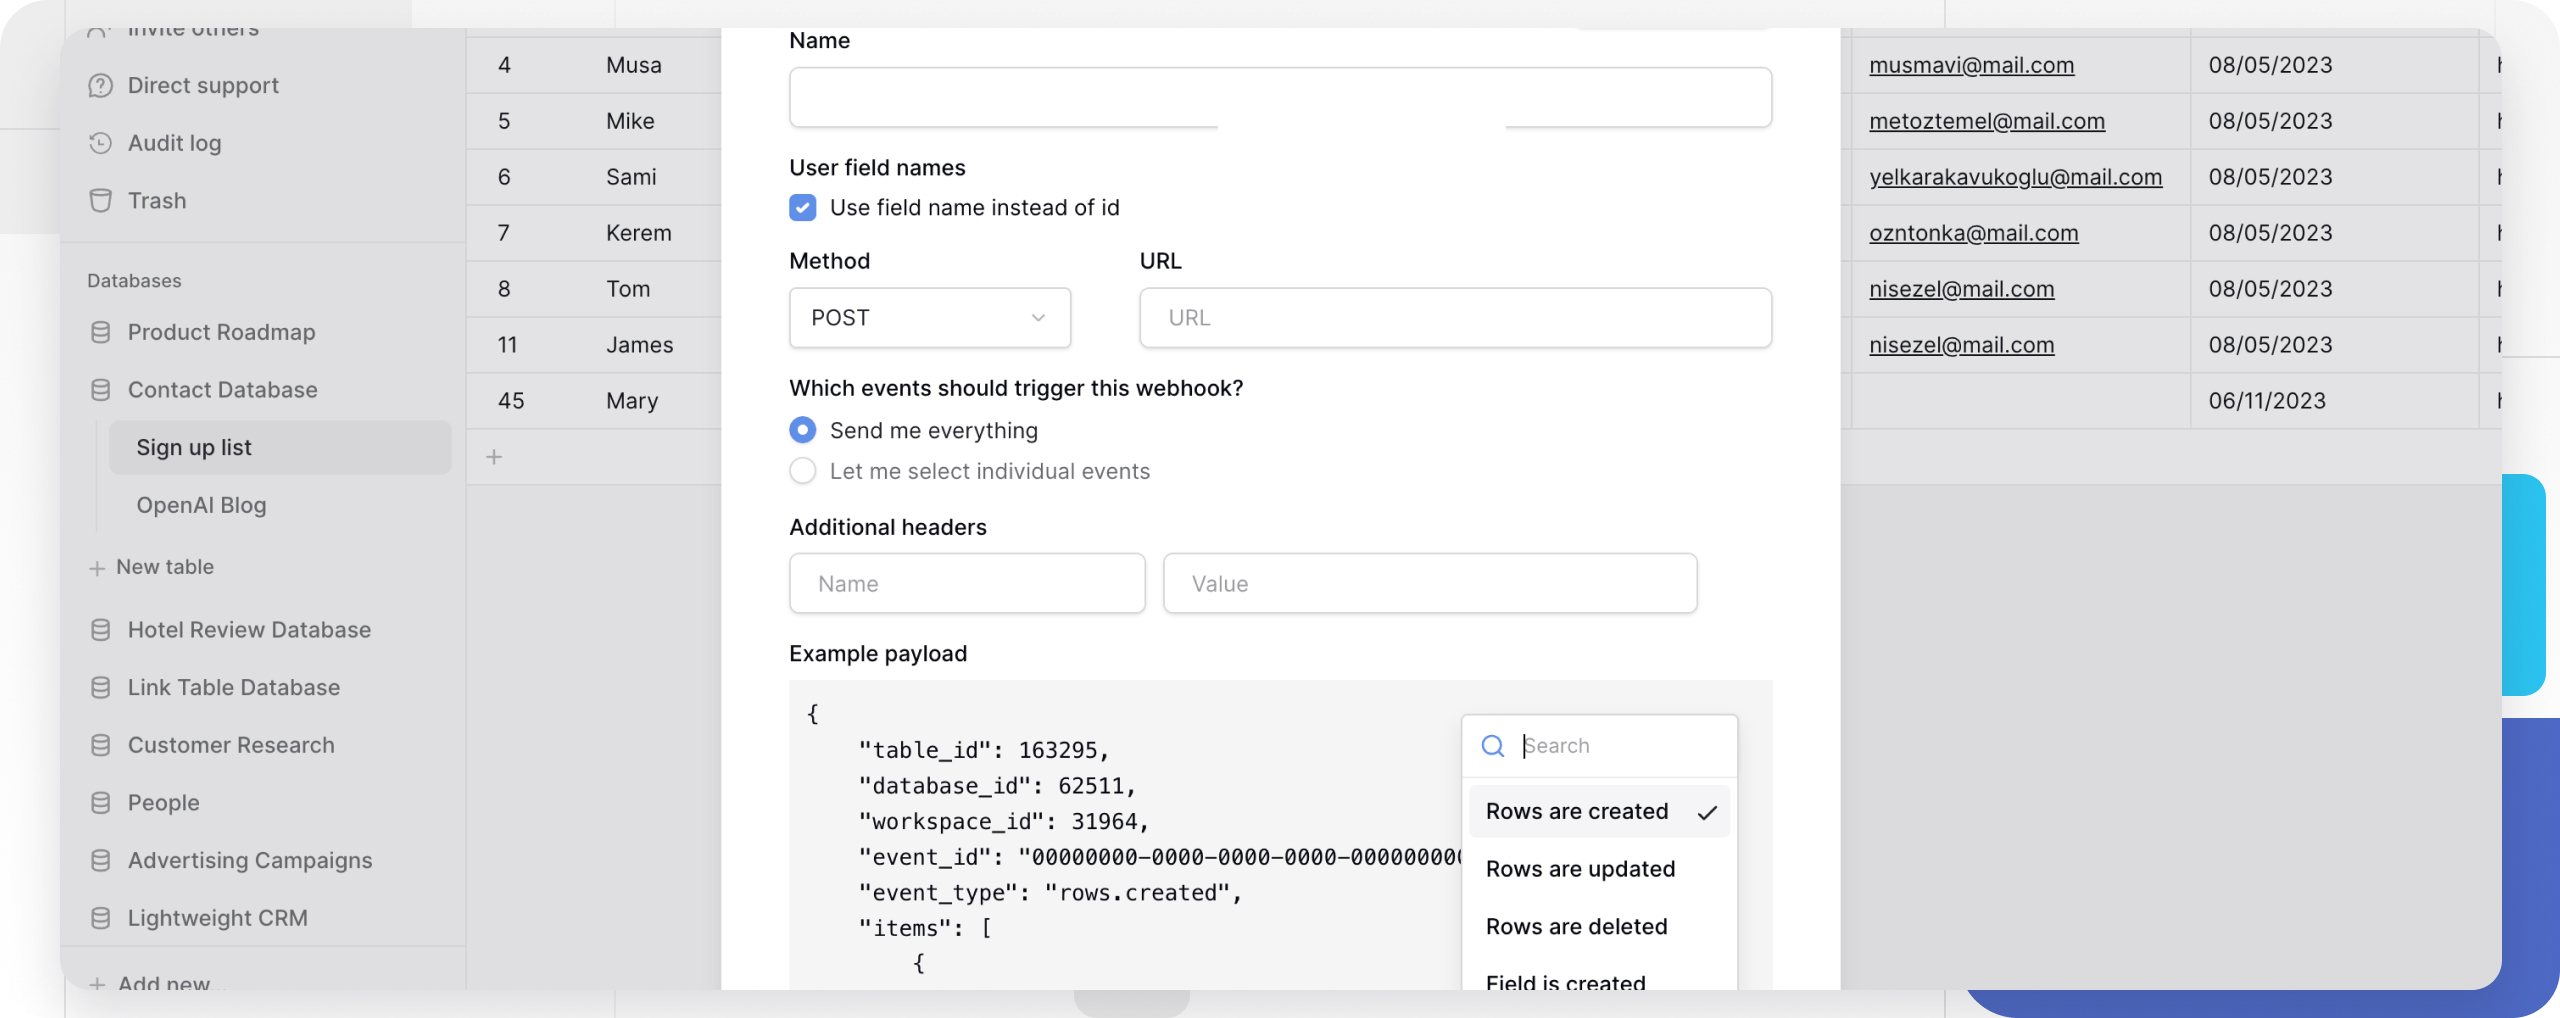
Baserow webhooks: Real-time notifications for data changes
Baserow webhooks automatically notify external systems when your data changes. Webhooks eliminate manual data monitoring by sending instant notifications to any URL when your database changes occur.
Set up webhooks to trigger actions when rows are created, updated, deleted, or when views and fields change - no manual checking required.
What are Baserow webhooks?
Webhooks are automated notifications that Baserow sends to external applications whenever specific events happen in your database. Instead of constantly checking for changes, webhooks push updates to your systems in real-time.
When you create, update, or delete data in Baserow, webhooks instantly notify your chosen endpoint with detailed information about what changed. This enables seamless integration with other tools, automated workflows, and real-time data synchronization.
For webhooks in Baserow Cloud, there is a maximum capacity of 5,000 pending calls per webhook. Any additional calls beyond this limit will be dropped. Please note that webhook calls are handled one at a time.
Webhook event types
Baserow supports multiple webhook events to match different integration needs:
Row events
- Rows created: Triggers when new rows are added
- Rows updated: Triggers when existing rows are modified
- Rows deleted: Triggers when rows are removed
View events
- View created: Triggers when new views are added
- View updated: Triggers when view configurations change
- View deleted: Triggers when views are removed
Field events
- Field created: Triggers when new fields are added
- Field updated: Triggers when field properties change
- Field deleted: Triggers when fields are removed
Advanced events
- Conditional row update: Triggers only when specific field values change
- Row enters view: Triggers when rows match view filter conditions
If using deprecated webhook types (
row.created,row.updated,row.deleted), migrate to the new batch types (rows.created,rows.updated,rows.deleted) for better performance.

How to create a webhook
-
Access webhook settings
- Click the ••• menu beside your table or view
- Select Webhooks
- Click Create webhook +
-
Configure basic settings
- Enter a descriptive name for your webhook
- Choose HTTP method (GET, POST, PUT, PATCH, DELETE)
- Add your target URL endpoint
-
Select trigger events
- Choose “Send everything” for all events
- Or select specific events you want to monitor
-
Add custom headers (optional)
- Include authentication tokens
- Set content-type or other required headers
-
Test your webhook
- Click Trigger test webhook
- Verify your endpoint receives the test payload
- Check the response in Baserow
-
Save and activate
- Click Save to enable your webhook
- Test with real actions to confirm functionality
Webhook payload structure
Baserow sends structured JSON payloads containing event details and affected data.
Example payload for “View Created”:
{
    "table_id": 50000,
    "database_id": 1000,
    "workspace_id": 300,
    "event_id": "00000000-0000-0000-0000-000000000000",
    "event_type": "view.created",
    "view": {
        "id": 0,
        "table_id": 0,
        "name": "View",
        "order": 1,
        "type": "grid",
        "table": null,
        "filter_type": "AND",
        "filters_disabled": false,
        "public_view_has_password": false,
        "show_logo": true,
        "ownership_type": "collaborative",
        "owned_by_id": null,
        "row_identifier_type": "id",
        "public": false
    }
}
Key payload elements:
- Identifiers:
table_id,database_id,workspace_idspecify the source - Event info:
event_typeandevent_iddescribe what happened - Data object: Contains the full details of the affected item
Managing webhooks
Edit existing webhooks
- Access webhook settings via table ••• menu
- Click details on your webhook
- Select Edit view
- Modify settings as needed
- Click Save

Monitor webhook activity
View webhook call logs to troubleshoot issues:
- Go to webhook details
- Select Call log view
- Review request/response details for each call
Delete webhooks
In the webhook edit view, click Delete at the bottom. Warning: Deleted webhooks cannot be restored.
Error handling and reliability
Baserow implements automatic retry logic for failed webhook calls:
- Retry attempts: Limited number of retries for failed calls
- Success criteria: Endpoint must return
200 OKstatus - Best practices: Ensure your endpoint is reliable and can handle traffic spikes
Frequently asked questions
How can I identify which user triggered a webhook event?
To include user information in your webhook payload, add a Last Modified By field to your table. Webhooks send the complete data of the row that was changed. By adding the Last Modified By field, the webhook payload will automatically include this field’s value, identifying the specific user account responsible for the latest update.
What happens if my webhook endpoint is down?
Baserow automatically retries failed webhook calls a limited number of times. Ensure your endpoint returns a 200 OK status code and can handle temporary traffic spikes.
Can I filter which rows trigger webhooks?
Yes, use conditional row update webhooks to trigger only when specific field values change. You can also use view-based webhooks that only trigger for rows matching view filters.
How do I troubleshoot webhook failures?
Check the webhook call logs in Baserow to see request/response details. Common issues include wrong URLs, missing authentication headers, or endpoints not returning 200 OK status codes.
Are there rate limits for webhooks?
Baserow doesn’t impose strict rate limits, but ensure your receiving endpoint can handle the volume of changes in your database. Consider batching operations if you’re making many simultaneous updates.
Can I use webhooks with external automation tools?
Yes, webhooks work seamlessly with Zapier, Make, n8n, and other automation platforms. Simply use the webhook URL provided by your automation tool as the endpoint.
Related content
Based on the Baserow documentation structure, you might also find these topics helpful:
- Zapier integration - Connect Baserow with 4000+ apps
- Make integration - Advanced automation workflows
- n8n integration - Open-source workflow automation
- Database API documentation - Direct API access
- Database tokens - Authentication for integrations
Tutorials
- How to create a real-time notification system with Baserow webhooks
- How to set up webhooks in Baserow for real-time data updates
- How to set up a webhook to trigger on specific field changes
Still need help? If you’re looking for something else, please feel free to make recommendations or ask us questions; we’re ready to assist you.
-
Contact support for questions about Baserow or help with your account