Row coloring in Baserow
Row coloring transforms how you scan and understand your data at a glance, helping teams spot patterns, track status, and prioritize tasks without reading every cell.
This guide explains how to use row coloring to visually organize data in your Baserow views using color coding based on single select fields or custom conditions.
Premium feature: Row coloring is available on paid plans. Upgrade to apply custom colors and visual decorators to your rows.
Overview
Row coloring adds visual organization to your Baserow tables by applying colors based on field values or custom conditions. This feature helps you quickly identify patterns, prioritize items, and organize information visually across Grid, Gallery, and Kanban views.
Each view maintains its own independent coloring configuration, allowing you to optimize the visual presentation for different audiences or purposes. You can color rows based on single select field values for simple categorization, or create sophisticated conditional rules that automatically apply colors when records meet specific criteria.
Row coloring options
Decorator types
| Decorator type | Visual effect | Best for |
|---|---|---|
| Left border | Colored flag on the left edge of rows/cards | Subtle indicators that don’t distract from content |
| Background color | Full row background color | Bold visual separation, high-priority items |
Coloring methods
| Method | Works with | Use case |
|---|---|---|
| Single select field | Single select fields only | Status tracking, categories, departments |
| Conditions | Any field type | Complex rules, multi-field logic, priority systems |
When to use row coloring
Status tracking: Color rows by project status (Not Started, In Progress, Complete) using single select fields for instant visual progress updates.
Priority management: Apply conditional coloring to highlight high-priority tasks, overdue items, or records requiring immediate attention.
Category identification: Use single select coloring to distinguish between different types of records, departments, or product categories at a glance.
Pattern recognition: Set up conditional rules to automatically highlight outliers, budget overruns, or performance metrics that exceed thresholds.
How to add row coloring
- Click the Color button in the view toolbar at the top of your table
- Choose your decorator type:
- Left Border - Adds a colored flag to the left edge of rows
- Background color - Applies color to the entire row
- Select your coloring method:
- Single select field - Match colors to a single select field
- Conditions - Create custom rules for automatic coloring
- Configure your chosen method (see detailed instructions below)
Each view can have one decorator of each type (one left border configuration and one background color configuration).
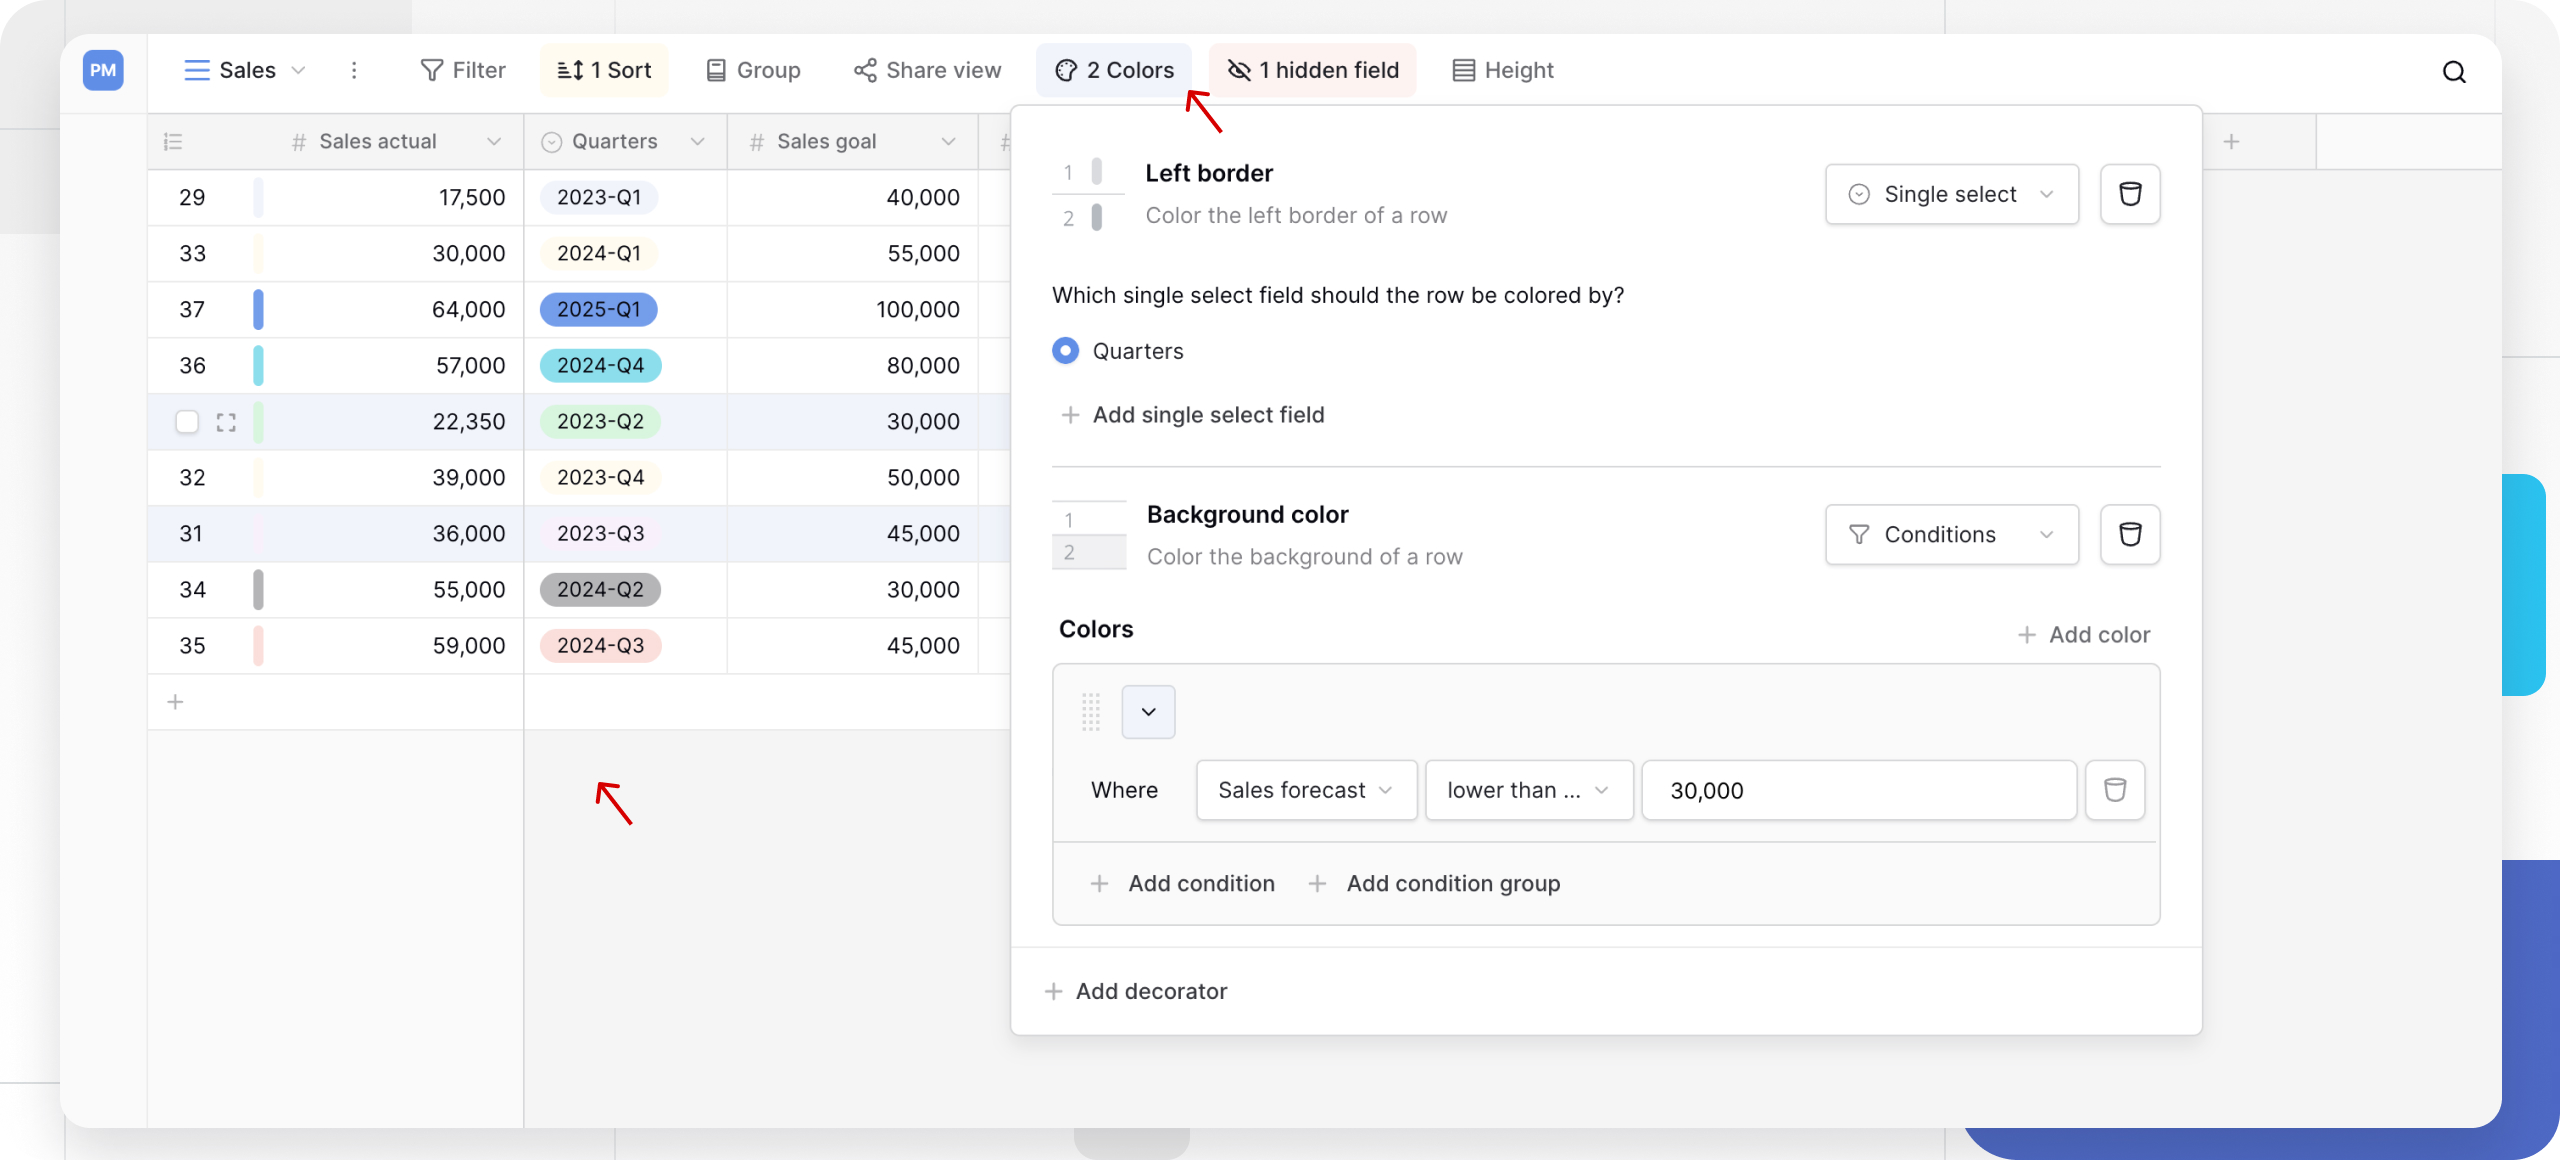
How to color rows by single select field
Single select field coloring automatically matches row colors to the colors assigned in your single select field options. This method is ideal for simple categorization where each row belongs to one category.
- Click Color in the view toolbar
- Choose your decorator type (Left Border or Background color)
- Select Single select as the coloring method
- Choose which single select field should control the row colors
- If no single select field exists, create one when prompted
The row colors automatically update whenever you change a record’s single select value.

Example: A project tracking table with a “Status” single select field (Not Started, In Progress, Complete) automatically colors rows to match each status, making project progress visible at a glance.
How to color rows by conditions
Conditional coloring applies colors automatically when records meet specific criteria you define. This method works with any field type and supports complex multi-field logic.
- Click Color in the view toolbar
- Choose your decorator type (Left Border or Background color)
- Select Conditions as the coloring method
- Click Add condition or Add condition group to create your first rule
- Define your condition:
- Select a field to evaluate
- Choose an operator (equals, contains, is greater than, etc.)
- Enter the comparison value
- Choose a color for records matching this condition
- Add additional conditions as needed by clicking Add condition or Add condition group
- Optionally, click + add color to set a default color for rows that don’t match any conditions. This color applies by default.
Conditional coloring evaluates continuously, so colors update automatically when data changes. Learn more about creating filter conditions.

Example: An invoicing table that automatically colors rows red when the “Due Date” field is in the past and the “Status” field is not “Paid,” making overdue invoices immediately visible.
How to change row coloring
Update your coloring configuration at any time without losing your data:
- Click Color in the view toolbar
- Select the decorator you want to modify (Left border or Background color)
- Click the dropdown menu to switch between Single select and Conditions
- Reconfigure with your new settings
You can also modify individual color values or conditions within an existing configuration without switching methods.

How to remove row coloring
Remove coloring from a specific decorator type:
- Click Color in the view toolbar
- Select the decorator you want to remove (Left border or Background color)
- Click the delete icon next to the color specification
This removes the coloring configuration but doesn’t affect your underlying data.

Frequently asked questions
Can I use row coloring on free plans?
No, row coloring is a paid feature. You need a paid plan to apply custom colors and visual decorators to your rows. Free plans can view colored rows created by paid users.
Does row coloring affect other views of the same table?
No, row coloring is view-specific. Each view (Grid, Gallery, Kanban) can have its own independent coloring configuration. This allows you to optimize the visual presentation for different purposes without affecting other views.
Can I use both left border and background color at the same time?
Yes, you can configure one left border decorator and one background color decorator simultaneously on the same view. However, you can only have one configuration of each type per view.
What’s the difference between single select coloring and conditional coloring?
Single select coloring automatically matches row colors to your single select field options, simple and visual. Conditional coloring evaluates rules you define and can work with any field type, supporting complex logic like “color red if amount > $1000 AND status is pending.”
How many conditional color rules can I create?
There’s no fixed limit on the number of conditional color rules. However, for performance and clarity, consider consolidating related conditions and keeping your rule set focused on the most important visual indicators.
Do colored rows appear in exported data?
Row coloring is a visual feature within Baserow views and does not export as cell background colors in CSV or Excel files. The underlying data exports normally, but visual decorators remain in the Baserow interface.
Related content
- Single select field - Learn about the field type used for simple row coloring
- View customization - Explore other view configuration options
- Filters in Baserow - Understand how to create conditions
- Grid View guide - Learn about Grid View features
- Gallery View guide - Explore Gallery View with row coloring
- Kanban View guide - Discover Kanban View coloring options
Still need help? If you’re looking for something else, please feel free to make recommendations or ask us questions; we’re ready to assist you.
-
Contact support for questions about Baserow or help with your account
- On this page
- Overview
- Row coloring options
- When to use row coloring
- How to add row coloring
- How to color rows by single select field
- How to color rows by conditions
- How to change row coloring
- How to remove row coloring
- Frequently asked questions
- Can I use row coloring on free plans?
- Does row coloring affect other views of the same table?
- Can I use both left border and background color at the same time?
- What’s the difference between single select coloring and conditional coloring?
- How many conditional color rules can I create?
- Do colored rows appear in exported data?
- Related content