Connect and configure Data Sources
Data Sources are the engine of the Baserow Application Builder. They act as the connection pipeline that fetches specific data from your backend database tables and delivers it to your frontend application pages.
This guide covers how to connect your application to your database to display, filter, and interact with real-time data.
Overview
In the Baserow Application Builder, Data Sources act as the bridge that fetches information from your database so it can be displayed by elements (like tables, forms, or text fields).
Without a data source, your application is a static page; with one, it becomes a dynamic tool that can display, filter, and manipulate live records. They allow you to fetch specific data, filter it, summarize it, and display it to your users in real-time.
- Real-time Connection: When you connect a data source, changes in your database are reflected in the application immediately without republishing.
- Actions: You can fetch a list of items, a single specific item, or a mathematical summary (count/sum). The Summarize field action allows you to perform calculations on your data without loading every individual row. This is highly efficient for dashboards.
- Filtering logic: You can apply filters at the Data Source level. These can work on top of (or independently from) your Database Views.
- Scope: Data sources can be local (specific to one page) or shared (accessible across the whole app).
Actions
When adding a data source, you must choose an Action. This determines what kind of data is returned to your application.
| Action | Description | Best for |
|---|---|---|
| List multiple rows | Retrieves a page of rows from a specific table. | Displaying grids, galleries, or lists of items (e.g., “All Products”). |
| Get single row | Retrieves one specific row based on a Row ID. | Detail pages (e.g., “Product Details” or “User Profile”). |
| Summarize field | Calculates aggregate statistics (Sum, Avg, Count) across rows. | Dashboards and KPI cards (e.g., “Total Revenue” or “Open Tickets”). |
Add a new data source
You can add multiple data sources to a single page.
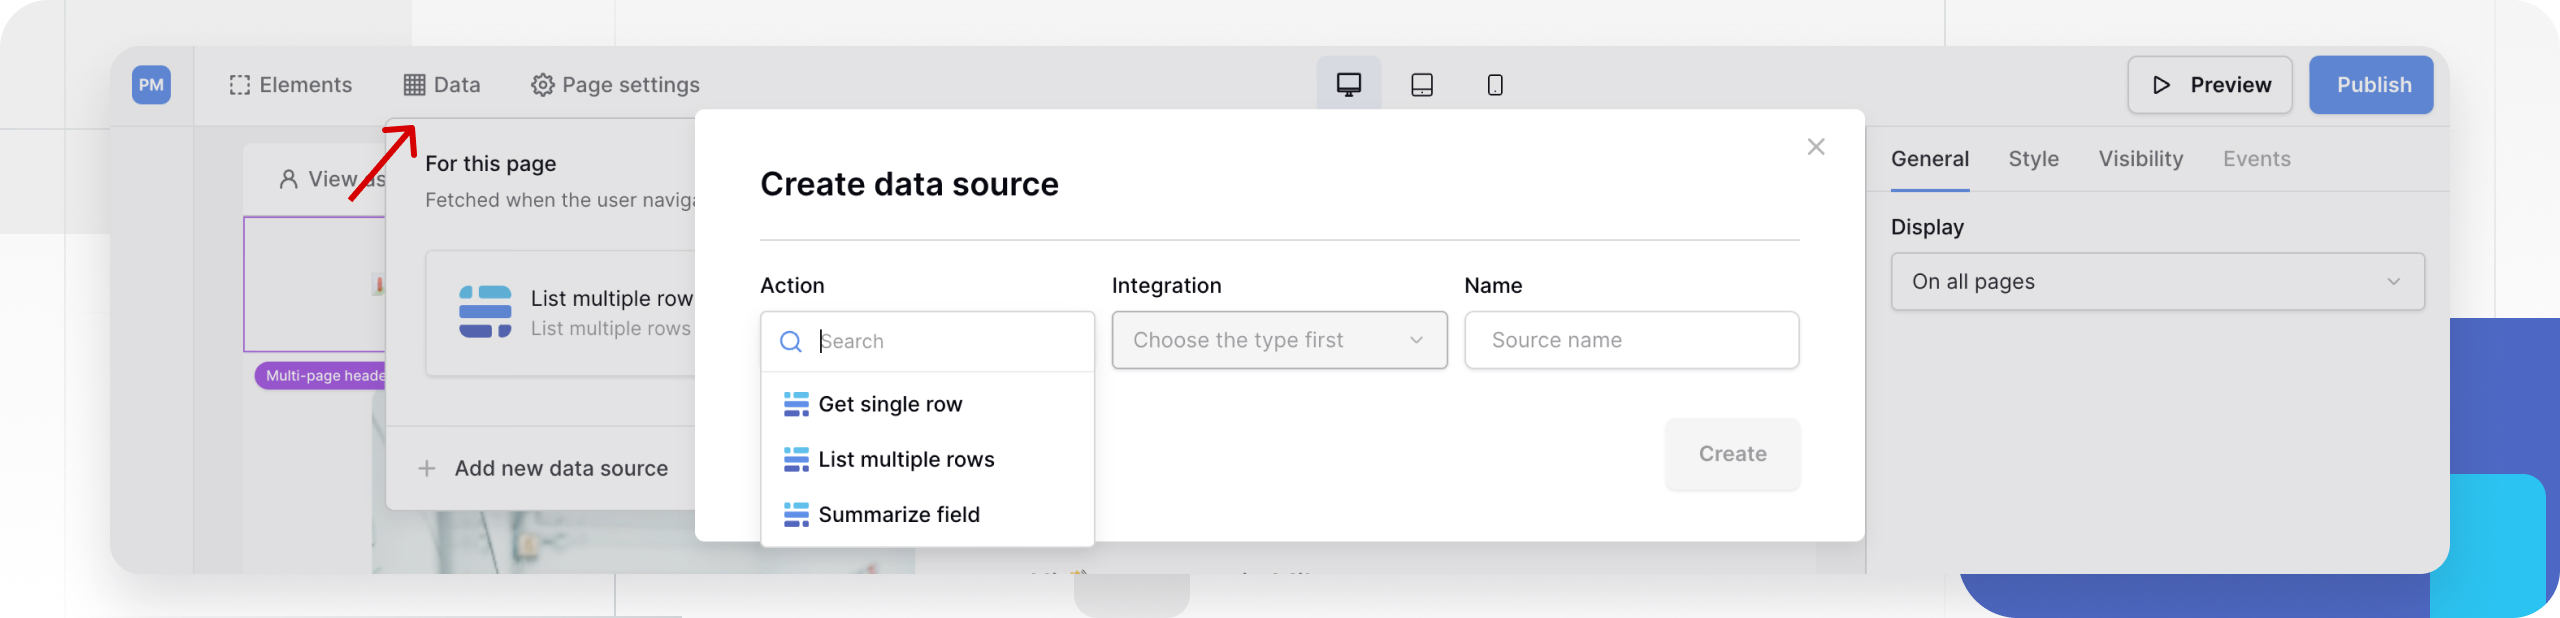
- Open your application -> page in the Builder.
- Click the Data tab in the top navigation bar (between Elements and Settings).
- Click + Add data source.
- Select Action: Choose one of the actions listed (e.g., List multiple rows, Summarize field).
- Choose Integration: Select an existing integration or add a new integration to connect to the workspace.
- Click the Create button
- Configure Source: Select the Database, Table, and optionally a View.
- If you select Summarize field as your Action:
- Field: Choose the numerical or select field you want to calculate.
- Aggregation type: Select the math operation (e.g.,
Sum,Average,Min,Max,Count,Empty).
- If you select Get single row as your action, you must provide a Row ID. This is often done dynamically using a Page Parameter (e.g.,
/product/:id).Leave this value empty to return the first row.
- Refinements: Add filters to the data source to only view or calculate specific rows (e.g., “Sum of Revenue” where “Status” is “Paid”).

Filter data
Filters allow you to control exactly which rows are passed to your application. You can define static conditions (e.g., Status is Active) using specific fields or dynamic filters using formulas.
- In the Data Source settings, locate the Filter section.
- Click + Add additional filter.
- Select the field, condition, and value.
Learn more: Filter rows by field
Hierachy: Database Views vs. Application Filters
Filters in the Application Builder work in conjunction with filters in your Database Views. It is important to understand how Data Source filters interact with your underlying Database Views.
| Configuration | Result |
|---|---|
| Table only (No View selected) | The application receives all raw data from the table. Any filters you add in the Application Builder are the only filters applied. |
| Table + View | *AND Logic applies. Rows must match the Database View filters AND the Application Builder filters to be visible. If a row is hidden in the Database View, the Application Builder cannot see it. |
- Scenario A: Table selected, No View selected
- The Application Builder receives all raw data from the table.
- Any filters you add here apply only to the app. This is useful if you want to filter data independently from how it is viewed in the database.
- Scenario B: Table AND View selected
- Baserow respects the View’s filters first.
- Application Builder filters are applied on top of the View’s results (AND logic).
- Use Case: Select a “Public Products” view to ensure draft items are never loaded, then add an Application filter to search for specific names.
Best Practice: If your Database View already filters for “Active Projects,” you do not need to repeat that filter in the App Builder. Only add new filters if you need to narrow the list further.
Learn more: Database Views
Formula filtering
For advanced use cases, you can switch a filter value to “Formula” mode by clicking the ∑ (Sum) icon. This allows you to filter based on dynamic user inputs or page parameters, such as Page Parameters or logged-in user attributes.
Click the Sum (∑) symbol next to the value input to switch to formula mode.

Sort data
Sorting is available for the List multiple rows action.
You can order your data (e.g., Alphabetical, Newest First) directly in the source configuration.
Sorting determines the order in which items appear. You can add multiple sort layers (e.g., sort by “Status,” then by “Date Created”).
Sorting precedence
Similar to filtering, the Application Builder respects the database structure but gives priority to local settings:
- Data Source Sort (Highest Priority): If you define a sort in the Application Builder Data Source, it overrides the Database View’s sort.
- Database View Sort: If no Application sort is defined, the rows appear in the order defined by the selected Database View.
- Creation Date: If no View or Application sort is defined, rows appear by creation date (ID).
- User Actions: If a user manually sorts a table on the published page, this happens temporarily on the fly and does not persist.
To add a sort, click Sorts → Add additional sort in the Data Source panel.
Search data
You can enable search functionality within your data source to let users find specific items. The Search configuration allows you to define which fields should be queried when a user searches a list.
- Specific fields: You can restrict the search to specific fields to optimize performance and relevance.
- All fields: If left empty, the search query will check all compatible text fields and return all items.
- Dynamic Search: You typically bind the search query to an Input Element or a Page Parameter, allowing users to type a query and update the list in real-time.

Default result count
Available for the “List multiple rows” action.
If you select List multiple rows as your action, you can define the default result count. This is the default number of records this data source will fetch on your page.
Setting the value to 0 and using it on a collection element will improve performance on page load by only fetching the records when the element is paginated.
Shared vs. Local data sources
By default, a data source belongs to the specific page where you create it. However, you can create Shared Data Sources to use the same data connection across multiple pages.
- Local Data Source: Exists only on one page. Good for specific page data.
- Shared Data Source: Accessible by every page in the application. Good for global data like “Current User Profile” or “Navigation Menu Items.”
To share a source: Go to the Data Sources tab and toggle the Share between pages option for the specific source.
You set up the connection once (including filters and sorts) and reuse it everywhere. This saves time and ensures consistency.

Manage data sources
Refresh schema
If you change your database structure (e.g., adding a new column to a table), your Data Source might not see it immediately.
Click Refresh fields from data source in the General panel to update the schema connection. It verifies if there have been any changes to the data in the source since it was last retrieved. This updates the schema in the editor so you can map elements to the new fields.

Delete data source
If a data source is no longer needed:
- Open the Data panel.
- Find the source in the list.
- Click the Trash icon next to the data source name.
This permanently removes the connection from the application. Any elements connected to this source will stop displaying data.
Frequently asked questions (FAQ)
Why is my data source empty?
Check your filters. If you selected a Database View that is empty, or applied conflicting filters (e.g., “Status is Active” AND “Status is Archived”), no data will return.
Does “Summarize field” count against row limits?
No. Summarizing performs the calculation on the backend and sends only the final number to the frontend, which is efficient for performance. Learn more about field summaries.
Why can’t I see a specific row in my app?
Check if you have selected a View in your Data Source configuration. If the row is filtered out of that View in the database, the Application Builder cannot access it. If you selected a Database View that already has strict filters, and then added more filters in the Application Builder, you may have filtered out all records. Try removing the Application Builder filters or selecting “None” for the View
Can I use the same data source on two different pages?
Yes, but only if you mark it as a Shared Data Source. Otherwise, data sources are scoped to the page where they were created.
Does “Get single row” require a parameter?
Yes. If you do not provide a Row ID (either a static number or a dynamic parameter), the data source will simply return the first row found in the table.
What is the difference between an Integration and a Data Source?
- Integration: This is the authentication/connection to the database (The “Key”).
- Data Source: This is the specific query requesting data (The “Request”). You can have many Data Sources using a single Integration.
Does changing data in the Application update the Database?
Yes. The Application Builder reflects live data. If you use a Form or Input element to modify a record, that change is immediately saved to your Baserow database.
Do I need to republish my application when data changes?
No. The connection is live. If you update a record in your database, the change is reflected in the application immediately upon the next refresh or page load. Learn more about when you need to publish.
Can I filter data based on the logged-in user?
Yes. You can use a Filter where a field (like “Owner”) equals the User Source ID. This ensures users only see their own data.
What happens if I don’t map a Row ID in “Get single row”?
If the Row ID field is left empty, the data source will simply return the first row found in the table.
Related content
- Page Parameters and Routing
- Overview of Database Views
- Display data with Application Builder Elements
- Database Views Overview
- User Sources (Authentication)
Still need help? If you’re looking for something else, please feel free to make recommendations or ask us questions; we’re ready to assist you.
- Ask the Baserow community
- Contact support for questions about Baserow or help with your account.
- On this page
- Overview
- Actions
- Add a new data source
- Filter data
- Sort data
- Search data
- Default result count
- Shared vs. Local data sources
- Manage data sources
- Frequently asked questions (FAQ)
- Why is my data source empty?
- Does “Summarize field” count against row limits?
- Why can’t I see a specific row in my app?
- Can I use the same data source on two different pages?
- Does “Get single row” require a parameter?
- What is the difference between an Integration and a Data Source?
- Does changing data in the Application update the Database?
- Do I need to republish my application when data changes?
- Can I filter data based on the logged-in user?
- What happens if I don’t map a Row ID in “Get single row”?
- Related content