Workflow actions: Reading and modifying data
Baserow workflow actions turn static data into dynamic processes by automating updates, notifications, and external syncs instantly.
This guide covers the available action types, how to configure them, and how to control workflow logic using routers and iterators.
Overview
Actions are the core working units of your automation, taking the data payload from the trigger and using it to perform tasks across your database or external platforms.
After a trigger initiates your workflow, actions execute sequentially to accomplish your automation goals. Whether you need to add customer data to your database, send welcome emails, update order statuses, or sync information with external services, actions handle these tasks automatically.
| Action type | Function | Examples |
|---|---|---|
| Data actions | CRUD operations on Baserow tables | Create row, Update row, Delete row, Get/List rows, Summarize field |
| Logic actions | Control flow and loops | Router (If/Then), Iterator (Loops) |
| Integrations | External communication | HTTP Request, Send Email, AI Prompt, Send a Slack message |
Workflows do not run in Draft mode. All new workflows start in the Draft state by default. Your automation will not process any data until you explicitly click the Publish button in the top right corner of the workflow editor.
How actions use trigger data
Once a trigger starts the workflow, actions execute sequentially to manipulate data or communicate with other services.
Every action can access data from previous nodes in the workflow:
- Trigger payloads: Row data from created/updated/deleted records
- Previous action results: Data retrieved by “Get single row” or “List multiple rows”
- HTTP responses: Data returned from external API calls
- Dynamic values: You can use formulas to transform data between steps (e.g., formatting a date before sending it in an email).
This data flow allows you to build automations where each action builds upon the results of previous steps. The trigger node must be tested first to confirm the configuration is correct.
| Concept | Description | Example |
|---|---|---|
| Sequential execution | Actions run in order from top to bottom | Create row → Send email → Update status |
| Data mapping | Data from the trigger/previous action data can be used in later steps to action fields. Every action can access data from the trigger and any previous action in the chain. | Use trigger’s “customer_email” field in “Send email” action |
| Sample data | Test data generated for workflow building | Test creates a row, then uses that row’s ID in the update action |
| Dependencies | Actions require previous nodes to be tested first | Can’t configure “Update row” until “Create row” is tested |
Baserow data actions
These actions interact directly with your Baserow tables, providing complete control over your data.
All Baserow data actions require these basic settings:
- Label: Descriptive name for the action
- Integration: Connection to your Baserow database
- Database: Which database contains the table
- Table: The specific table to interact with
Create a row
This action automatically adds a new row to a specified table when certain events occur. You can define the values that should be included in the new row based on your workflow needs.
Configuration:
- Select your integration, database, and table
- Map fields: For each field in your table:
- Enter static values (like “New” for a status field)
- Use trigger data (like the customer name from a form submission)
- Combine multiple values (like first name + last name)
- Test the action to generate a sample row
Common use cases include adding new customers from website form submissions, creating tasks when a project’s status changes, logging activity when external events occur, or duplicating existing rows with modifications.
Batch create rows
Use Batch create rows to create multiple records in a Baserow table at once.
Configuration:
- Open your workflow.
- Click the + button where you want to add an action.
- Select Batch create rows.
Configure the following options:
- Label (optional) — Give the action a descriptive name.
- Integration — Select the Baserow integration.
- Database — Choose the database where the rows will be created.
- Table — Choose the destination table.
- Rows — Select or enter a formula that returns an array of row objects. You can use outputs from previous actions or switch to Expert mode to write a custom formula.
Each object in the array becomes a new row. Object keys should match the destination table’s field names or field IDs.
You can create up to 1,000 rows in a single action.
Self-hosted: Instance administrators can change this limit by configuring INTEGRATION_LOCAL_BASEROW_BATCH_OPERATION_SIZE_LIMIT.
Update a row
This action allows you to modify existing records in your table based on changing conditions or new information. It updates specific field values in a row without altering any other fields.
Configuration:
- Select your integration, database, and table
- Row ID: The
row_idvalue must be an integer or convertible to an integer. Specify which row to update using:- Use the row ID from your trigger (for row update triggers)
- Reference a row ID from a previous “Get single row” action
- Use a specific row ID number
- Map fields: Define which fields to update and their new values
- Test the action to verify the update
Common use cases include updating an order status when payment is received, marking tasks as complete when all subtasks are finished, incrementing counters when events occur, and syncing changes from external systems.
Only mapped fields are updated. All other fields retain their current values.
Batch update rows
Use Batch update rows to update multiple existing records in a Baserow table at once.
Configuration:
- Open your workflow.
- Click the + button where you want to add an action.
- Select Batch update rows.
Configure the following options:
- Label (optional) — Give the action a descriptive name.
- Integration — Select the Baserow integration.
- Database — Choose the database containing the rows to update.
- Table — Choose the table containing the rows to update.
- Rows — Select or enter a formula that returns an array of row objects. Each object must include an
idproperty identifying the row to update. You can use outputs from previous actions or switch to Expert mode to write a custom formula.
The remaining properties in each object define the field values to update.
You can update up to 1,000 rows in a single action.
Self-hosted: Instance administrators can change this limit by configuring INTEGRATION_LOCAL_BASEROW_BATCH_OPERATION_SIZE_LIMIT.
Delete a row
This action removes records from your table that are no longer needed or meet specific deletion criteria.
Configuration:
- Select your integration, database, and table
- Row ID: The row_id value must be an integer or convertible to an integer. Specify which row to delete using:
- Trigger data (for row deleted triggers to log deletions)
- A previous action’s row ID
- A specific row ID number
- Test the action (use test data, not production data)
Common use cases include automatically removing expired records, cleaning up temporary data after processing, deleting spam or invalid submissions, and archiving data by copying it elsewhere before deletion.
When rows are deleted, they’re moved to the workspace trash and can be restored within a limited time. After this period, the rows are permanently removed. Learn more about deleting and recovering data in Baserow.
Get single row
This action retrieves the details of a specific record so that its data can be used in subsequent workflow steps. It fetches all information for one row, allowing you to reference it in later actions.
Configuration:
- Select your integration, database, and table
- View: (Optional) Apply a view’s filters and sorting
- Row ID: (Optional) The
row_idvalue must be an integer or convertible to an integer. Specify a specific row- Leave empty to get the first matching row after refinements
- Refinements: Apply additional filters:
- Filter by field values
- Search for specific text
- Sort results
How row selection works:
- If you specify a Row ID → Returns that exact row (if it exists)
- If Row ID is empty → Returns the first row matching your refinements
- If no refinements → Returns the first row in the table/view
Common use cases include looking up customer details before sending personalized emails, checking current inventory levels before creating orders, retrieving configuration settings for the workflow, and finding related records that need to be updated.
List multiple rows
This action retrieves multiple records from your table, allowing you to process, analyze, or display them in batch operations. It fetches data for several rows based on specified criteria and returns them as a collection that can be iterated through in your workflow.
To process each row from this list individually, pass the results to an Iterator node.
Configuration:
- Select your integration, database, and table
- View: (Optional) Apply a view’s filters and sorting
- Refinements: Configure criteria:
- Add filters to narrow results
- Apply sorting to control order
- Use search to find specific text
- Default result count: How many rows to fetch
- Set to a specific number (e.g., 10, 50, 100)
- Set to 0 for on-demand loading (better performance)
Setting default result count to 0 and using pagination can improve page load times.
Common use cases include finding all overdue tasks to send reminder emails, getting recent orders for daily summary reports, listing active customers for batch updates, and retrieving filtered data for synchronization with external systems.
Summarize field
This action calculates aggregate statistics across multiple rows without retrieving each individual record. It performs mathematical operations on a specified field and returns a single calculated value.
Configuration:
- Select your integration, database, and table
- Field: Choose which field to summarize
- Aggregation type: Select the calculation. Learn more about data summaries
- Refinements: Apply filters to calculate only on specific rows
Common use cases include calculating total revenue for the current month, counting how many tasks are still open, finding the average rating across all reviews, and identifying the highest priority value currently in the queue.
Start workflow
The Start workflow action starts another automation workflow. You can use it to start another workflow or restart the current workflow, allowing it to run again and follow a different path if needed.
You can use it in both Automation Builder and Application Builder to reuse existing workflows instead of duplicating the same logic in multiple places.
This is useful for breaking large automations into smaller, reusable workflows that can be started whenever they’re needed.
Configure the action by selecting:
- Label (optional) – Give the action a custom name.
- Workflow – Select the workflow to start.
Only published workflows with a Manual trigger can be selected. If the selected workflow has unpublished changes, the latest published version will run.
Example
A project management application includes a Generate daily report button.
When a user clicks the button, the application uses the Start workflow action to start the Daily report workflow. The same workflow can also be started from other automations, allowing the reporting logic to be reused instead of recreated in multiple workflows.
Notes
- Only workflows with a Manual trigger can be started.
- Only the latest published version of a workflow is executed.
- If a workflow has unpublished changes, those changes won’t be used until the workflow is published.
Workflow control actions
Router (conditional branching)
The Router node creates conditional branching within your workflow, allowing you to execute different actions based on data values. It functions like “if-this-then-that” logic, splitting your workflow into multiple paths so that each set of actions runs only when its conditions are met.
How the Router node works:
- Define branches: Add multiple conditional paths (e.g., “High Priority,” “Medium Priority,” “Low Priority”)
- Set conditions: Switch from using regular input to using advanced input, to use Baserow formula conditions. With the advanced input, you can use operators to compare values directly within the router configuration.
- Execution order: Branches are checked left to right
- First match wins: The workflow follows the first branch where the condition is true
- Default fallback: If no conditions are met, the “Default branch” executes
Configuration:
- Branch conditions: Must use formulas or comparisons that return true/false
- Branch labels: Give each path a descriptive name
- Default branch: Optionally label this fallback path
You cannot delete or replace a Router node until all downstream nodes in its branches have been removed first. This prevents orphaned nodes from existing in your workflow.
Common use cases include routing high-value orders to a manager for approval, sending different email templates based on customer type, applying different validation rules depending on the data source, and escalating tasks according to their age or priority.

Iterator (iterate on items)
The Iterator node provides advanced workflow control by letting you process multiple items in a list, one by one. It acts as a loop, running a set of nested actions for each item in a data source you provide.
This action is useful for batch operations. Its most common use case is processing the results from a List multiple rows action. For example, if you use “List multiple rows” to find 10 customers, you can use an Iterator to loop through that list and send 10 separate, personalized emails.
Configuration:
- Select the Iterator node to open its settings.
- Configure the required fields in the sidebar:
| Setting | Description |
|---|---|
| Label | A descriptive name for your iterator (e.g., “Loop over each task”). |
| Source | The list or array of items you want to iterate over. This is typically mapped from the result of a “List multiple rows” action. |
Advanced formula mode: Switch to advanced input to use Baserow formula functions and operators to define the source list dynamically.
After configuring the Source, add new action nodes by dragging them inside the Iterator node in the workflow builder.
These nested actions will run once for each item in the source list. Inside a nested action (like “Update a row”), you can access the data for the current item from the Iterator’s output in the data mapping panel. This allows you to use the row_id or other fields from the specific item being processed in that loop.
The workflow will only proceed to the nodes after the Iterator once all items in the list have been processed.
Core actions
Send an HTTP request
This action allows your workflow to connect to any external API or web service, enabling broad integration possibilities. It sends data via HTTP requests, letting you trigger actions in other platforms or retrieve information from external systems.
Use the generic HTTP Request action to connect to thousands of tools, including Dropbox, CloseCRM, Salesforce, HubSpot, Gmail, Shopify, etc.
Configuration:
| Setting | Description | Example |
|---|---|---|
| HTTP method | Request type required by the API | POST (create data), GET (retrieve data), PUT (update data), DELETE (remove data), PATCH, HEAD, OPTIONS |
| Endpoint URL | The API’s destination address | https://api.example.com/v1/customers |
| Query parameters | Data passed in the URL | ?customer_id=123&action=notify |
| Headers | Metadata sent with the request | Authorization: Token YOUR_TOKEN |
| Body type | Format of the data payload | JSON (most common), Form data, Raw text |
| Body content | The actual data being sent | Customer details, order information, etc. |
| Timeout | Max wait time for response | 30 seconds (default) |
You can insert trigger and action data anywhere using dynamic data.
Common use cases include sending new customer data to your CRM, notifying Slack channels when important events occur, automatically creating Trello cards or Jira issues, syncing order data with fulfillment services, updating external inventory management systems, and triggering workflows in platforms like Zapier or Make.
Example: Sending data to Slack
Method: POST
URL: https://hooks.slack.com/services/YOUR/WEBHOOK/URL
Body Type: JSON
Body:
{
  "text": "New customer registered: customer_name",
  "channel": "#sales"
}
Learn more about Baserow database tokens.
Send an email
This action allows your workflow to automatically notify users, teams, or customers when specific events occur. It sends emails using your configured SMTP settings, enabling immediate communication from your automation.
Automations can use a pre-configured SMTP server when self-hosting. This removes the need to configure email settings for each automation individually, while still allowing custom configurations when needed.
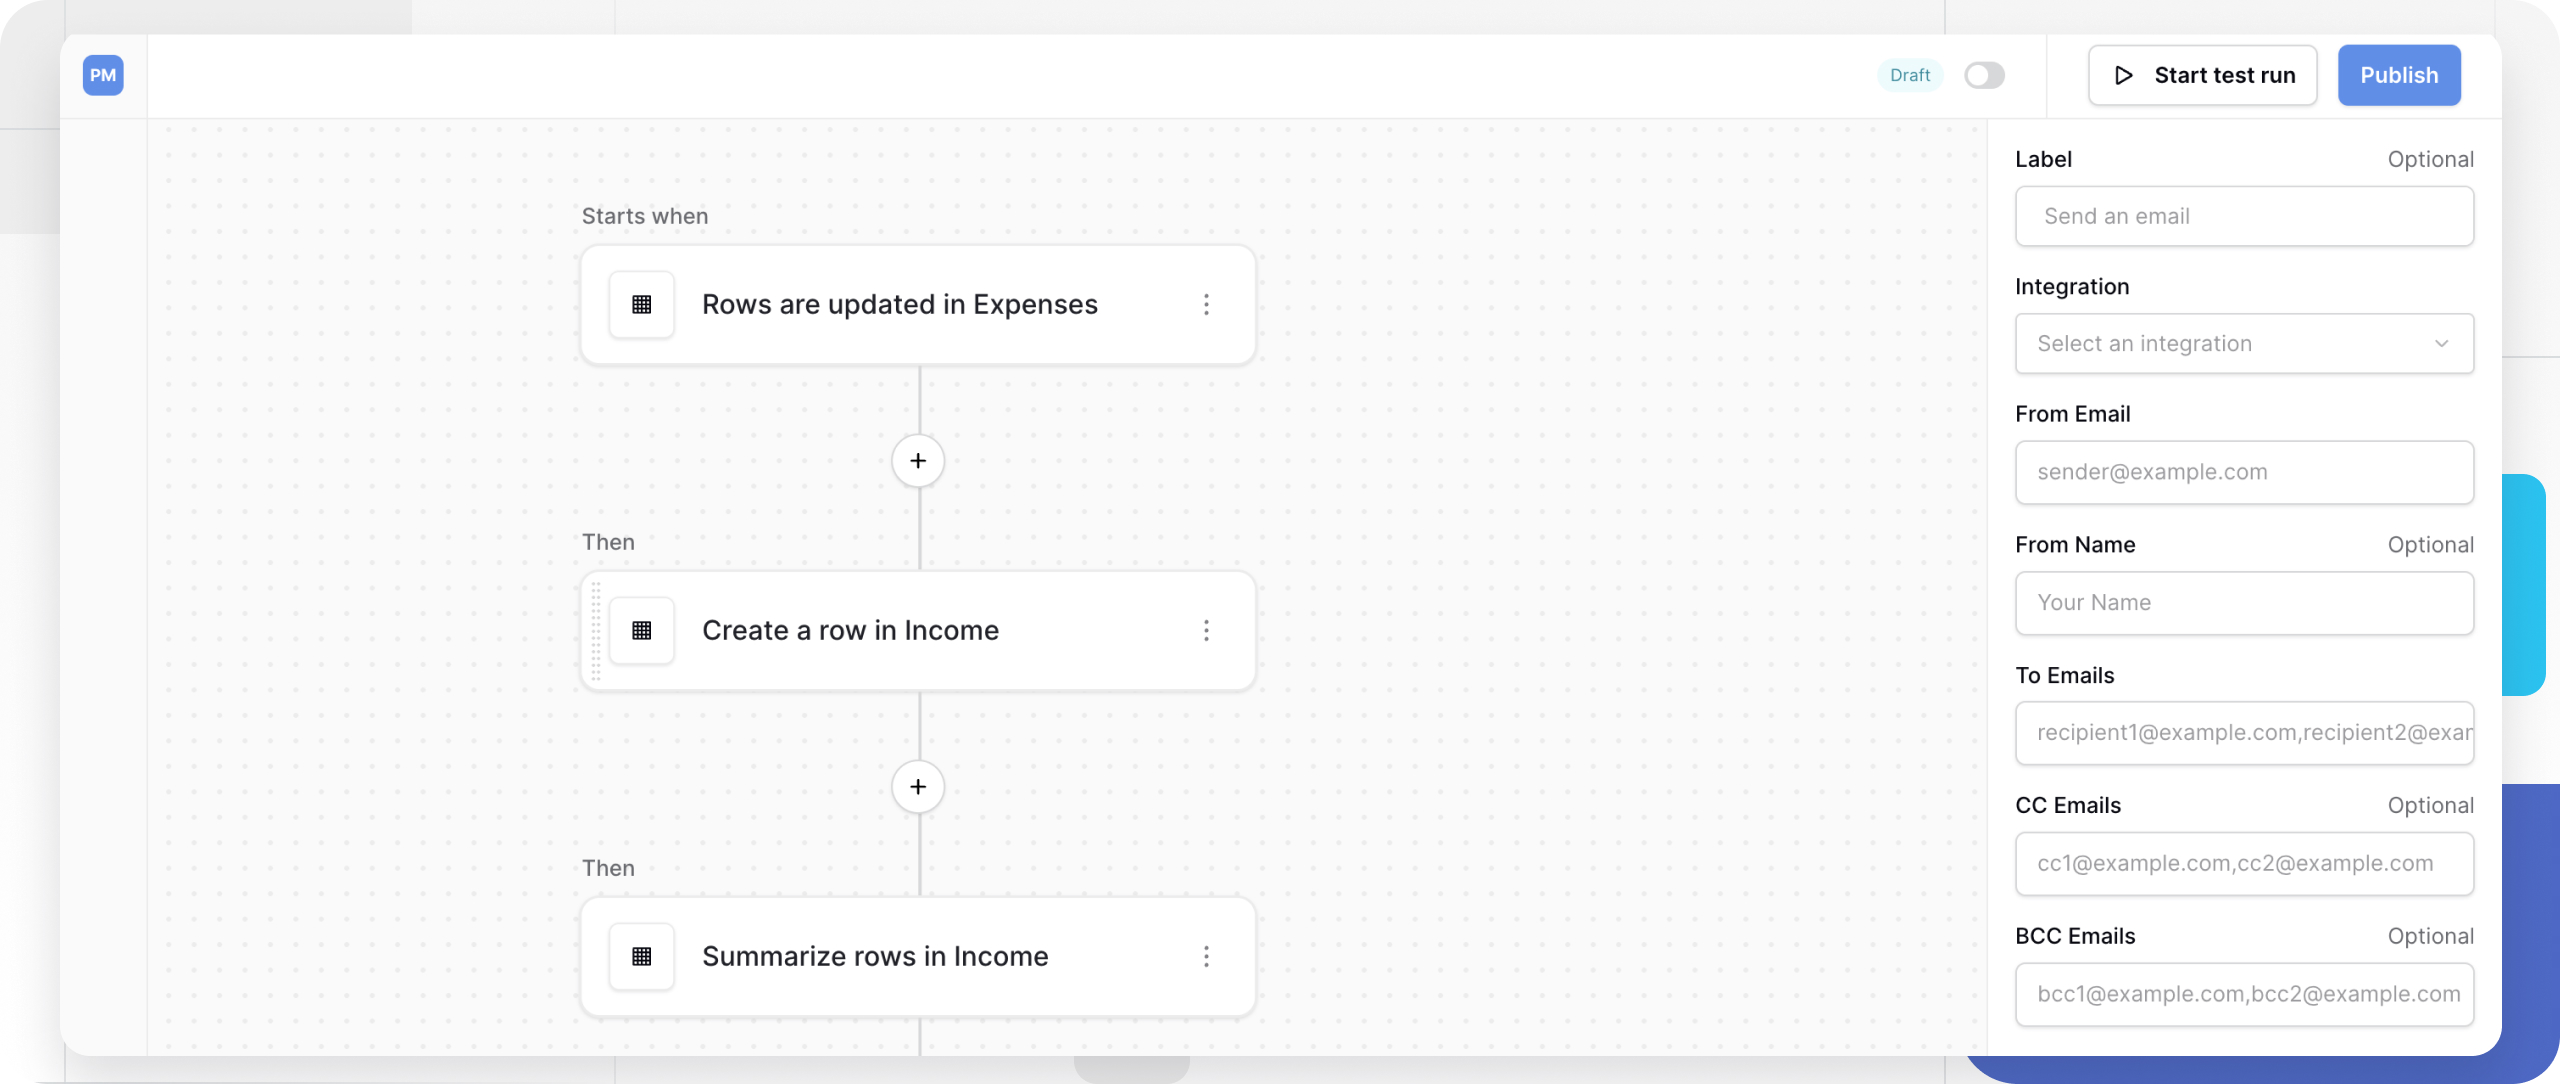
Configuration:
SMTP configuration for email actions
To send emails from Baserow, you must configure an SMTP integration for each email action.
Open the Integration sidebar and select Add new integration. In the modal, enter your SMTP credentials: host, port, username, and password.
Recipients:
- From email: The sender address (must be configured in your SMTP settings)
- From name: (Optional) Display name for the sender (e.g., “Baserow Notifications”)
- To emails: Primary recipients (comma-separated for multiple)
- CC emails: (Optional) Carbon copy recipients
- BCC emails: (Optional) Blind carbon copy recipients
Content:
- Subject: Email subject line (can include dynamic data)
New order #order_id received - Body: Email content (can include trigger/action data)
Hello customer_name, thank you for your order... - Body type: Plain text or HTML for styled emails
Common use cases include welcoming new users after registration, sending order confirmation emails, notifying team members when tasks are assigned, alerting managers about high-priority items, sending daily or weekly summary reports, and reminding users about upcoming deadlines.
HTML email example:
<h2>Welcome to Baserow, customer_name!</h2>
<p>Your account has been created successfully.</p>
<ul>
  <li>Email: email</li>
  <li>Account ID: row_id</li>
</ul>
<p><a href="https://baserow.io/dashboard">Get Started</a></p>
Execute code node
The Execute code action lets you run JavaScript directly inside Automation workflows and Application Builder pages.
Use it to transform data, perform calculations, generate custom outputs, or prepare information before passing it to the next action.
For example, you can use the Execute code action to:
- Format data before sending an email
- Clean or transform text before updating a row
- Perform calculations that aren’t possible with formulas alone
- Generate HTML, JSON, or other structured output
- Process lists of records before creating or updating data
The action returns an object whose values can be used by any following workflow action.
The Execute code action is available on the Advanced and Enterprise plans.
Currently, JavaScript is the supported language.
Add an Execute code action
- Open your Automation workflow.
- Click the + button where you want to add a new action (after a trigger or another action).
- Select Execute code.
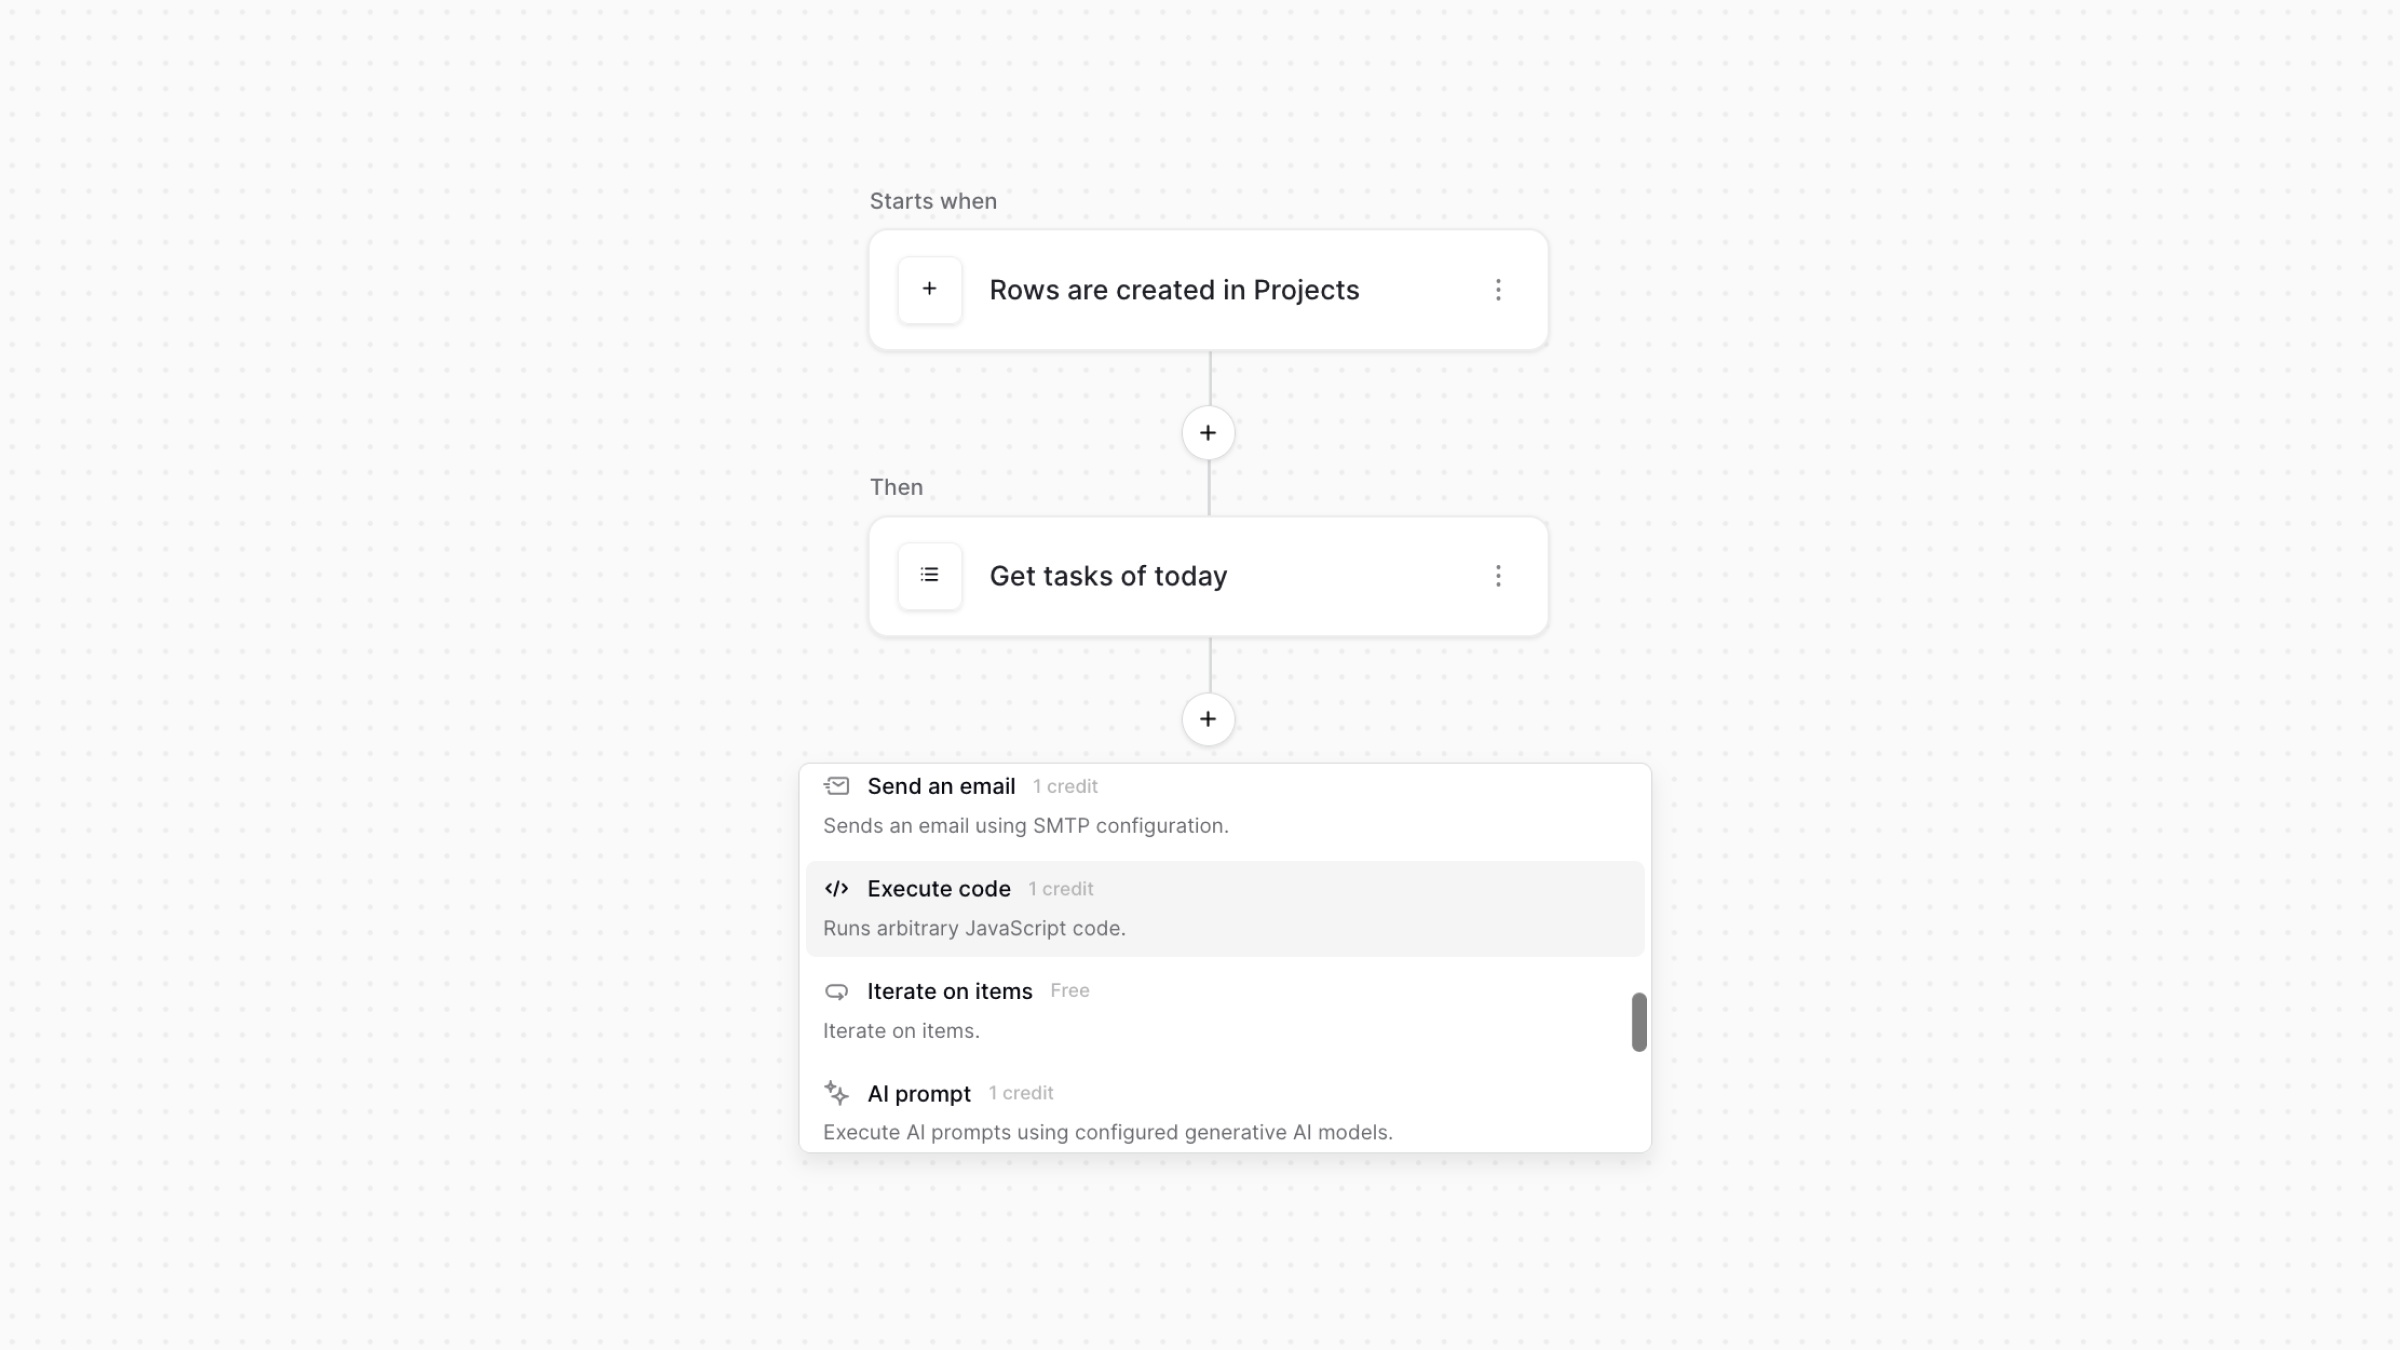
The action contains two main sections:
- Data injections
- Code editor
Configure data injections
Before your code runs, you define which values should be available inside your JavaScript.
Rather than exposing the entire workflow context, Baserow lets you inject only the values your code needs.
Each injection consists of:
- Name — the variable name available inside your code
- Value — any formula or value from previous workflow steps
For example:
| Name | Value |
|---|---|
| tasks | Previous node → Get tasks of today |
| customerName | Current row → Name |
| total | Formula result |
Inside your JavaScript, these values are available through the context object:
context.tasks
context.customerName
context.total
You can add multiple injections if your code requires several inputs.
Write JavaScript
The Code section is where you write your JavaScript.
Your code must define a main(context) function.
Baserow automatically calls this function when the workflow runs.
Example:
function main(context) {
return {
        message:`Hello${context.customerName}`
    }
}
The returned object becomes the output of the Execute code action and can be referenced by later workflow steps.
Return values
The Execute code action always returns an object.
Each property of that object becomes available to subsequent workflow actions.
For example:
function main(context) {
return {
        total:42,
        status:"Complete"
    }
}
Later actions can reference:
totalstatus
just like outputs from any other workflow step.
Use the full-screen editor
For larger scripts, click the Expand editor button in the top-right corner of the code editor.
The full-screen editor provides more space for writing and editing JavaScript while keeping syntax highlighting.
Test your code
Click Test node to execute your code using the current workflow data.
The Output section displays the object returned by your script, making it easy to verify your logic before publishing the workflow.
Example: Build an HTML email
One practical use case is generating HTML before sending an email.
Suppose you have a workflow that:
- Runs every morning.
- Retrieves today’s tasks.
- Uses Execute code to generate an HTML table.
- Sends that HTML as a daily report by email.
Workflow:
Periodic trigger
    ↓
Get tasks of today
    ↓
Execute code
    ↓
Send email
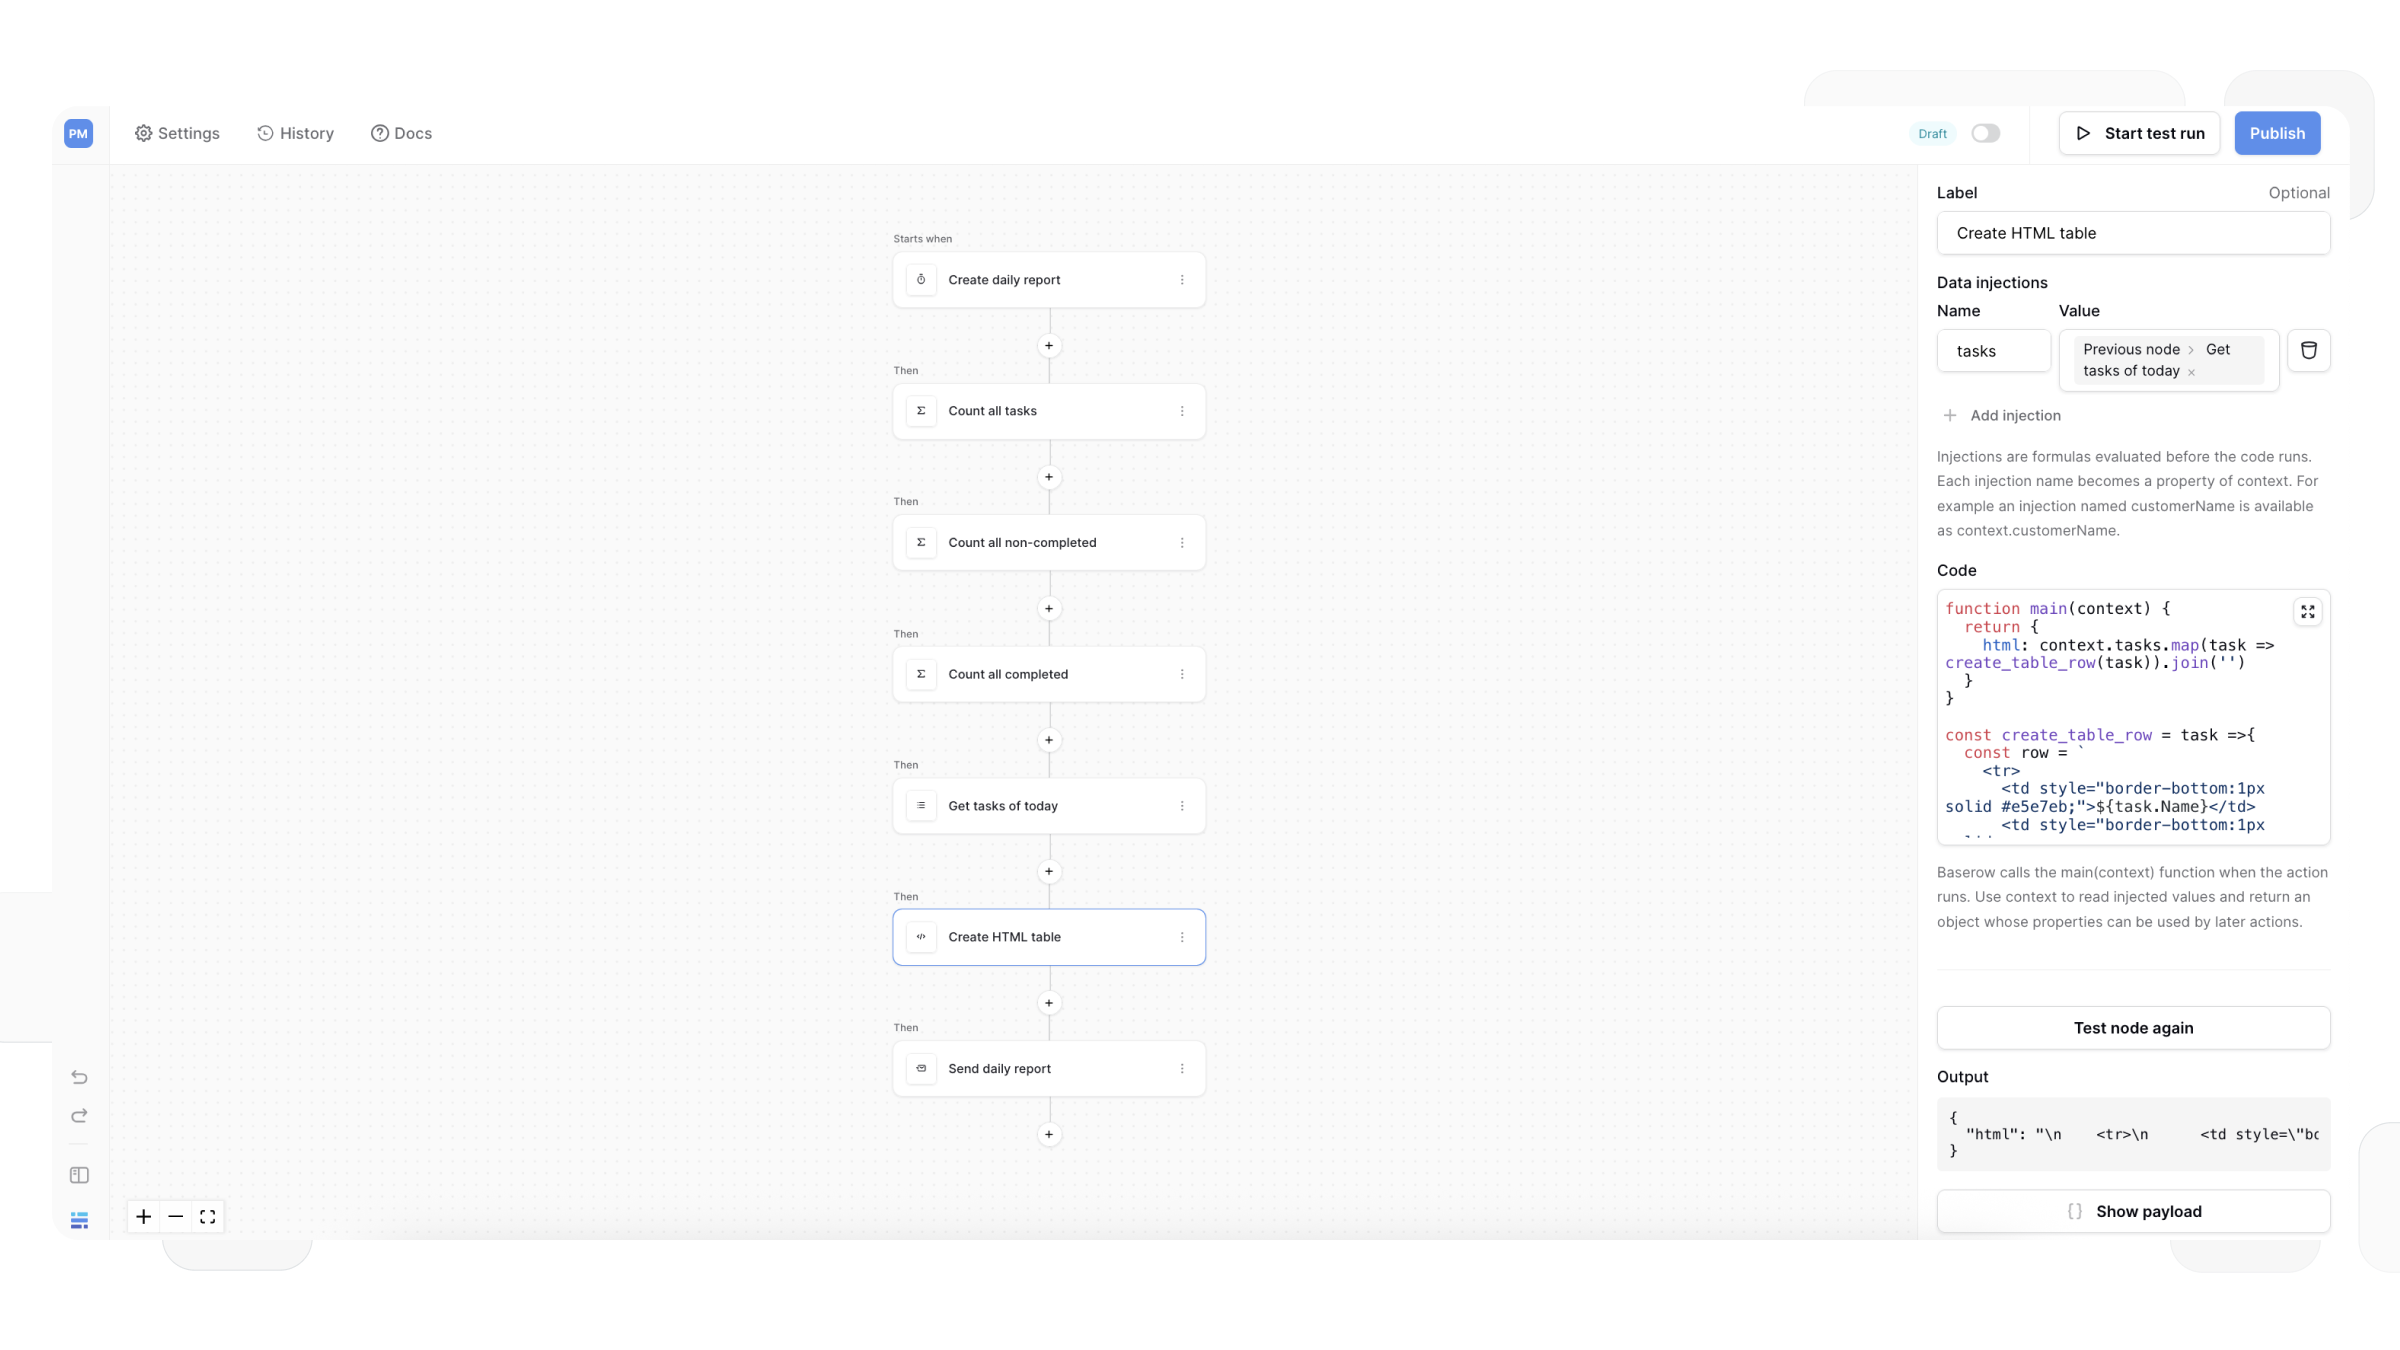
In this example:
- The Get tasks action retrieves a list of tasks.
- The list is injected into the Execute code action as
tasks. - JavaScript loops through the tasks and generates an HTML table.
- The HTML is returned as:
return {
    html:generatedHtml
}
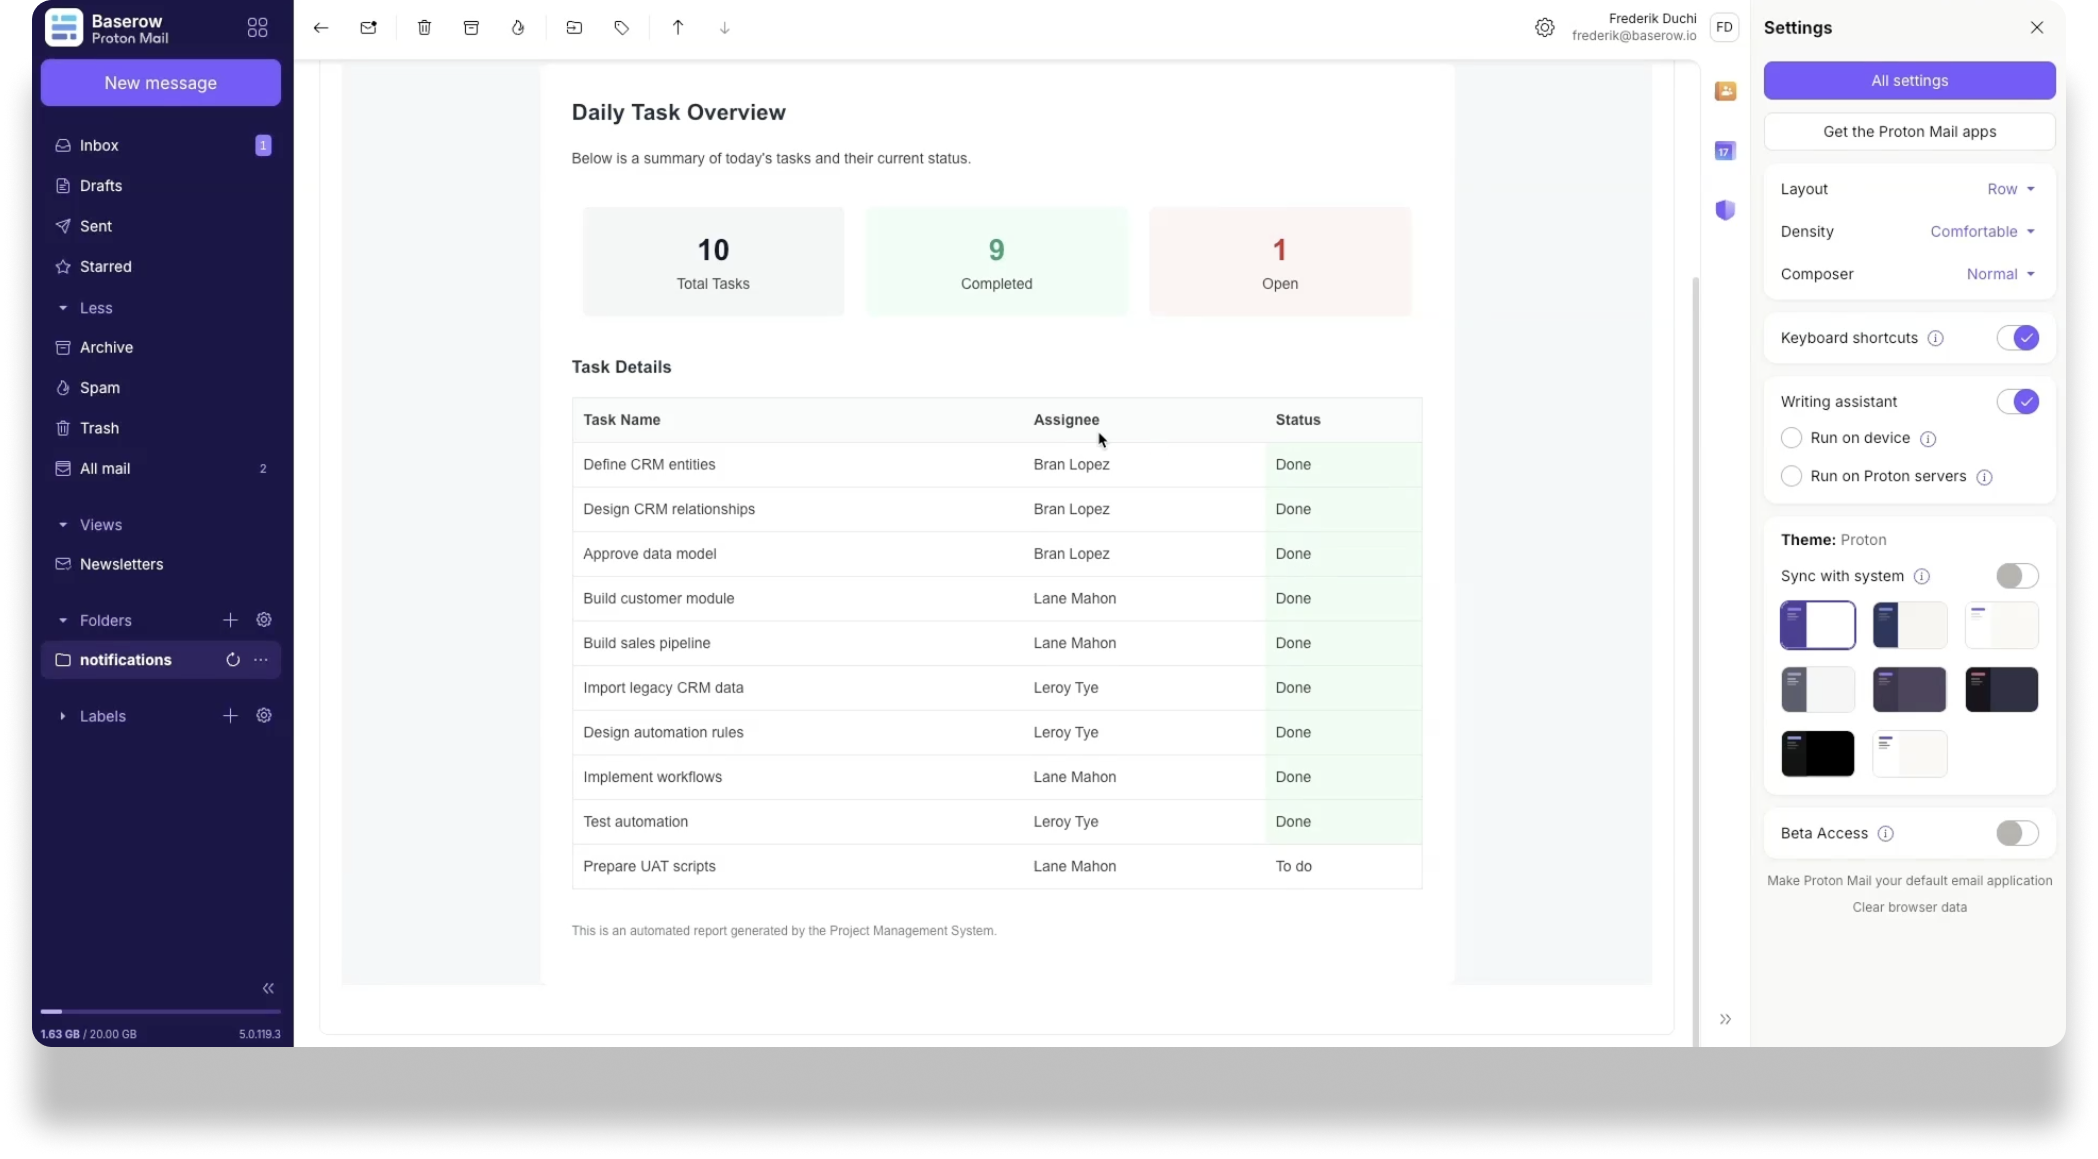
The following Send email action inserts html directly into the email body, producing a formatted report such as:
- Total tasks
- Completed tasks
- Open tasks
- A table listing today’s tasks
This approach is useful whenever you need to build custom emails, reports, or formatted content dynamically before sending it.
Code node security
Code is executed in a secure, isolated runtime designed to prevent access to the underlying server or operating system.
Your script only has access to the values you explicitly provide through Data injections, helping keep workflow execution isolated and predictable.
AI Prompt
The AI Prompt node connects to generative AI models to execute prompts, analyze data, or generate content directly within your workflow. This allows you to build powerful automations that can summarize text, categorize customer feedback, translate languages, or generate email replies based on your Baserow data.
Configuration:
To use the AI Prompt, you must first configure an AI integration.
-
Select AI integration:
- Click the AI integration dropdown. If you have already set up AI in your workspace, you can select it here.
- To add a new one, click Add new integration. A modal will appear.
- Workspace AI Settings: By default, new integrations inherit settings from your workspace. You can override specific AI providers with different API keys or models if needed.
- Click Create to save the integration.
-
Configure AI action: Once your integration is set, configure the AI prompt settings in the sidebar.
| Setting | Description |
|---|---|
| Label | A descriptive name for the AI action (e.g., “Summarize feedback”). |
| AI Provider | Select the specific AI provider you configured in your integration (e.g., OpenAI). |
| Output Type | Choose how the AI should format its response: * Text: For free-form responses, summaries, or generative content. * Choice: For classification tasks where you want the AI to select from a specific list of options. |
| Temperature | Controls randomness (0.0 - 2.0). Lower values (e.g., 0.2) are more focused and deterministic. Higher values (e.g., 0.8) are more creative and varied. |
| Prompt | The most important field. Write your prompt and use dynamic data from previous nodes. Example: Summarize the following customer feedback into one sentence: [map 'Notes' field from trigger] |
| Advanced formula mode | Check this box to use an expression to dynamically generate the entire prompt. |
External integration actions
Send a Slack message
This action sends a message directly to a Slack channel when your workflow runs.
Configuration:
- Integration: Select your “Slack Bot” integration.
- Channel: Choose the channel name.
- Message: Enter the text content. You can use dynamic data (e.g.,
New lead: [Name]) to personalize the message.
How to set up the Slack Bot:
To use this integration, you must create a Slack App and issue a token.
-
Navigate to your workspace’s apps page.
-
Create a new App in the Slack API portal, choose ‘From scratch’ and enter a name. Select the workspace your app should operate in, and click ‘Create’.
Notify your Slack workspace admin if you are unable to create a new Slack app. If you are re-using an existing app which can write messages, proceed to Step 5 to install the app to your workspace.
-
In the left sidebar, navigate to OAuth & Permissions, scroll down to Scopes and under ‘Bot Token Scopes’, select ‘Add an OAuth Scope’.
-
To allow your app to post messages, add the
chat:writescope. -
Navigate to the ‘Settings’ -> ‘Install App’ to install the App to your workspace.
-
Copy your Bot User OAuth Token and store it in the ‘Bot User Token’ field in the Slack integration form in Baserow.
-
Crucial Step: You must invite the bot to the Slack channel you wish to post in (e.g., type
/invite @YourBotNamein the Slack channel).
File processing actions
The Read a CSV file and Read an XLS file actions let you read structured spreadsheet data directly inside Automations and Application Builder.
These actions read CSV or Excel files and return their rows so they can be used by later actions.
Common use cases include:
- Reading project templates stored as CSV or Excel files
- Processing spreadsheets uploaded through an application form
- Reading files stored in Baserow file fields
- Creating or updating records from spreadsheet data
The Read a CSV file action can read data from either a CSV file or raw CSV content, while the Read an XLS file action supports both .xls and .xlsx files.
Read a CSV file
The Read a CSV file action reads rows from a CSV file and makes them available to the following actions in your workflow.
Add the action
- Open your workflow.
- Click the + button where you want to add an action.
- Select Read a CSV file.
Configure the action
You can configure the following options:
- Label (optional) – Give the action a descriptive name.
- Source – Read data from a CSV file or provide raw CSV content directly.
- CSV data – Select the file or provide the CSV content to read.
- Separator – Specify the delimiter used in the CSV data.
- Encoding – Choose the character encoding of the CSV file.
- First line is header – Enable this if the first row contains column names.
After configuring the action, run a Test node (or preview the application page) to inspect the returned data and make it available to later steps.
Output
The action returns an array of rows. Each row can be referenced by later actions, such as Iterator, Create row, Batch create rows, or Execute code.
Example
The workflow below automatically creates project tasks from a CSV template. It:
- Retrieves the appropriate CSV template.
- Reads the CSV file.
- Calculates task dates.
- Iterates through the returned rows.
- Creates a task for each row.
This allows a complete project plan to be generated automatically from a single template file.
Read an XLS file
The Read an XLS file action reads rows from .xls and .xlsx spreadsheets and makes them available to later actions.
Add the action
- Open your workflow.
- Click the + button where you want to add an action.
- Select Read an XLS file.
Configure the action
You can configure the following options:
- Label (optional) – Give the action a descriptive name.
- XLS file – Select the Excel file to read.
- Sheet name (optional) – Specify which worksheet to read. If left empty, the first worksheet is used.
- First line is header – Enable this if the first row contains column names.
After configuring the action, run a Test node (or preview the application page) to inspect the returned data and make it available to later steps.
Output
The action returns an array of rows from the selected worksheet. The returned data can be used by any subsequent workflow or application action.
Example
A workflow receives an uploaded Excel workbook containing project tasks.
The workflow reads the selected worksheet, processes each row, and automatically creates the corresponding project tasks. This makes it easy to use Excel files as input without importing them into a database first.
Testing and debugging actions
To test an action,
- Ensure all previous nodes (trigger and any prior actions) have been tested
- Click the action node to open its configuration
- Configure all required settings and field mappings
- Click Test this event in the sidebar
- Review the results to verify correct execution
- Check the generated sample data for use in subsequent actions
Why previous nodes must be tested first: Actions often reference data from earlier steps. You can’t properly configure field mappings without test data from previous nodes.
After testing an action, review several key indicators to ensure it worked correctly. Look for success indicators, examine the payload generated by the action, and verify that all field values were mapped correctly.
Also, check for error messages in the history which indicate configuration issues that need to be addressed.
Frequently asked questions
How many actions can I add to a workflow?
You can add multiple actions to a single workflow. They execute sequentially in the order they appear. There’s no strict limit, but consider workflow performance for very long sequences.
Can I reuse data from multiple previous actions?
Yes. Any tested node’s data is available to all subsequent actions. For example, you can use row data from both a “Get single row” action and a “Create a row” action in a later “Send email” action.
What happens if an action fails?
The workflow stops at the failed action and doesn’t execute subsequent steps. The failure is logged in the History tab with error details. Fix the configuration and test again.
How do I delete a Router node?
First, delete all actions in every branch coming out of the Router. Once all downstream actions are removed, you can delete or replace the Router node itself.
What’s the difference between “Get single row” and “List multiple rows”?
“Get single row” returns one record as an object with its field values. “List multiple rows” returns multiple records as an array/collection that you might need to iterate through.
Do HTTP requests timeout?
Yes. Configure the timeout setting to control how long the workflow waits for a response. If the external service doesn’t respond within the timeout period, the action fails.
Can I send emails to multiple recipients?
Yes. Enter multiple email addresses separated by commas in the “To emails,” “CC emails,” or “BCC emails” fields. You can also use dynamic values from your trigger or previous actions.
How do I know which HTTP method to use?
Check the external API’s documentation. Generally:
- GET: Retrieve data
- POST: Create new records
- PUT/PATCH: Update existing records
- DELETE: Remove records
How do I update multiple rows at once?
The best way to update multiple rows is to combine three actions:
- List multiple rows: Find all the rows you want to update (e.g., all tasks with “Pending” status).
- Iterator: Set the source of the iterator to the list from the previous step.
- Update a row: Place this action inside the Iterator. In its “Row ID” field, map the
row_idfrom the Iterator’s current item. This will cause the workflow to update each row, one by one, that was found in the list.
Can I use my table data in an AI prompt?
Yes. This is the primary function of the AI Prompt node. In the Prompt field, you can write your instructions (e.g., “Translate the following to French:”) and then drag and drop a field from your trigger or a previous action (like [field_name]) into the prompt.
What does the AI ‘Temperature’ setting do?
Temperature controls the “creativity” or randomness of the AI’s response. A low value (like 0.1) will produce very consistent, focused answers. A high value (like 1.0) will produce more varied and creative, but less predictable, responses.
Troubleshooting common issues
“Previous node must be tested first” error
You’re trying to configure an action that depends on data from an untested previous node. Work through your workflow sequentially from trigger to end, testing each node before configuring the next one.
Update or delete action can’t find the row
The Row ID you’re referencing doesn’t exist or is incorrect. Verify the Row ID source. Print the ID value to check it’s valid. Ensure you’re using the correct field from your trigger or previous action.
HTTP request returns authentication errors
Missing or incorrect API credentials. Check the external API’s authentication requirements. Add necessary headers (like Authorization or X-API-Key) with valid credentials.
Router condition always takes default branch
The condition formula isn’t returning a boolean value or has syntax errors. Test your condition formula separately. Ensure it returns exactly true or false. Check for typos in field names.
I’m trying to create a new row, but I’m getting an error or no response.
This usually happens when your workspace has reached its row limit. Check your current plan to confirm that it allows additional rows. If the workspace has exceeded its row limit, you’ll need to either delete some rows to stay within your plan’s limit or upgrade your plan to continue adding new rows. Learn more about Baserow pricing plan and limits.
Related content
- Workflow automation overview - Learn workflow fundamentals
- Workflow triggers - Configure events that start workflows
- Automation Settings
- Manage workflow automation
- Formula field reference - Build formulas for conditions and mappings
- Webhooks - Alternative method for external integrations
- Database API documentation - Direct API access to your tables
- Email field - Configure email fields in your tables
Still need help? If you’re looking for something else, please feel free to make recommendations or ask us questions; we’re ready to assist you.
- Ask the Baserow community
- Contact support for questions about Baserow or help with your account
- On this page
- Overview
- How actions use trigger data
- Baserow data actions
- Workflow control actions
- Core actions
- External integration actions
- File processing actions
- Testing and debugging actions
- Frequently asked questions
- How many actions can I add to a workflow?
- Can I reuse data from multiple previous actions?
- What happens if an action fails?
- How do I delete a Router node?
- What’s the difference between “Get single row” and “List multiple rows”?
- Do HTTP requests timeout?
- Can I send emails to multiple recipients?
- How do I know which HTTP method to use?
- How do I update multiple rows at once?
- Can I use my table data in an AI prompt?
- What does the AI ‘Temperature’ setting do?
- Troubleshooting common issues
- Related content