Workflow triggers: How to start an automation
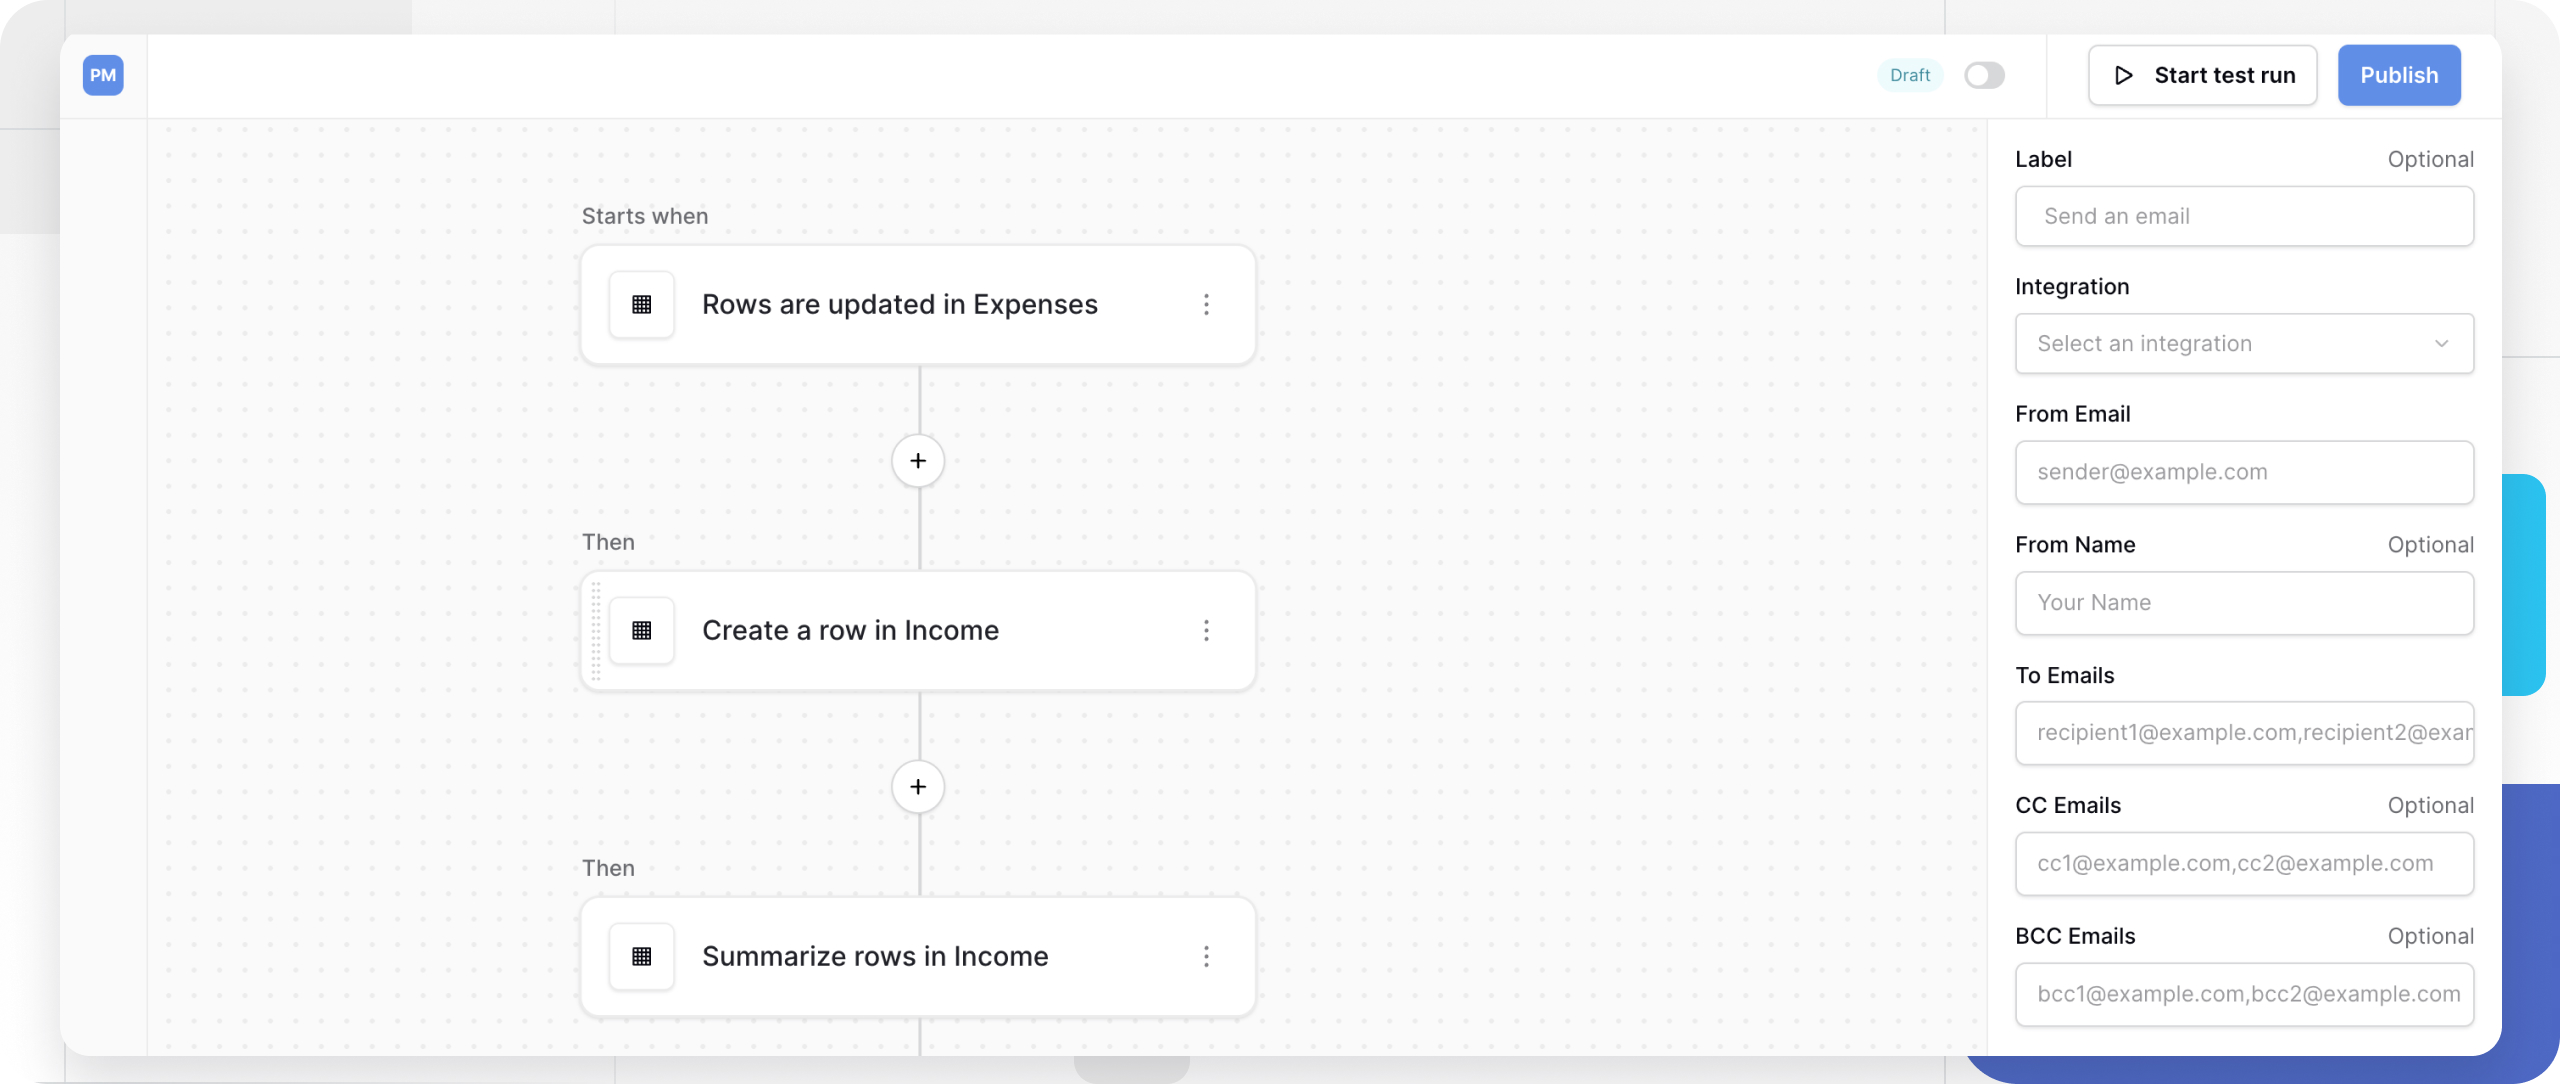
Triggers are the starting point of every Baserow workflow. They define when your automation runs, whether on a schedule, when data changes in your tables, or when external services send requests. Configure your trigger first, then build actions that respond to it.
What are workflow triggers?
Triggers define when and why your automated workflow should start, ensuring your tasks run exactly when they’re needed.
Every Baserow workflow begins with a trigger, which is the event that initiates your entire automation sequence. Without a trigger, your workflow has no way to know when to execute. Triggers can be time-based (run every hour), data-driven (when a row is created), or external (when an API request is received).
How triggers work
Once configured and tested, triggers generate a data payload containing information about the triggering event. This payload can include:
- The row that was created, updated, or deleted
- Data sent in an HTTP request
- Timestamp information from periodic triggers
All subsequent action nodes in your workflow can access and use this trigger data to perform their tasks.
| Characteristic | Description |
|---|---|
| Always first | Triggers must be the first node in every workflow |
| Cannot be deleted | You can only replace a trigger with a different trigger type |
| Generates data | Creates a payload that subsequent actions can reference |
| Must be tested | Requires testing to populate sample data for workflow building |
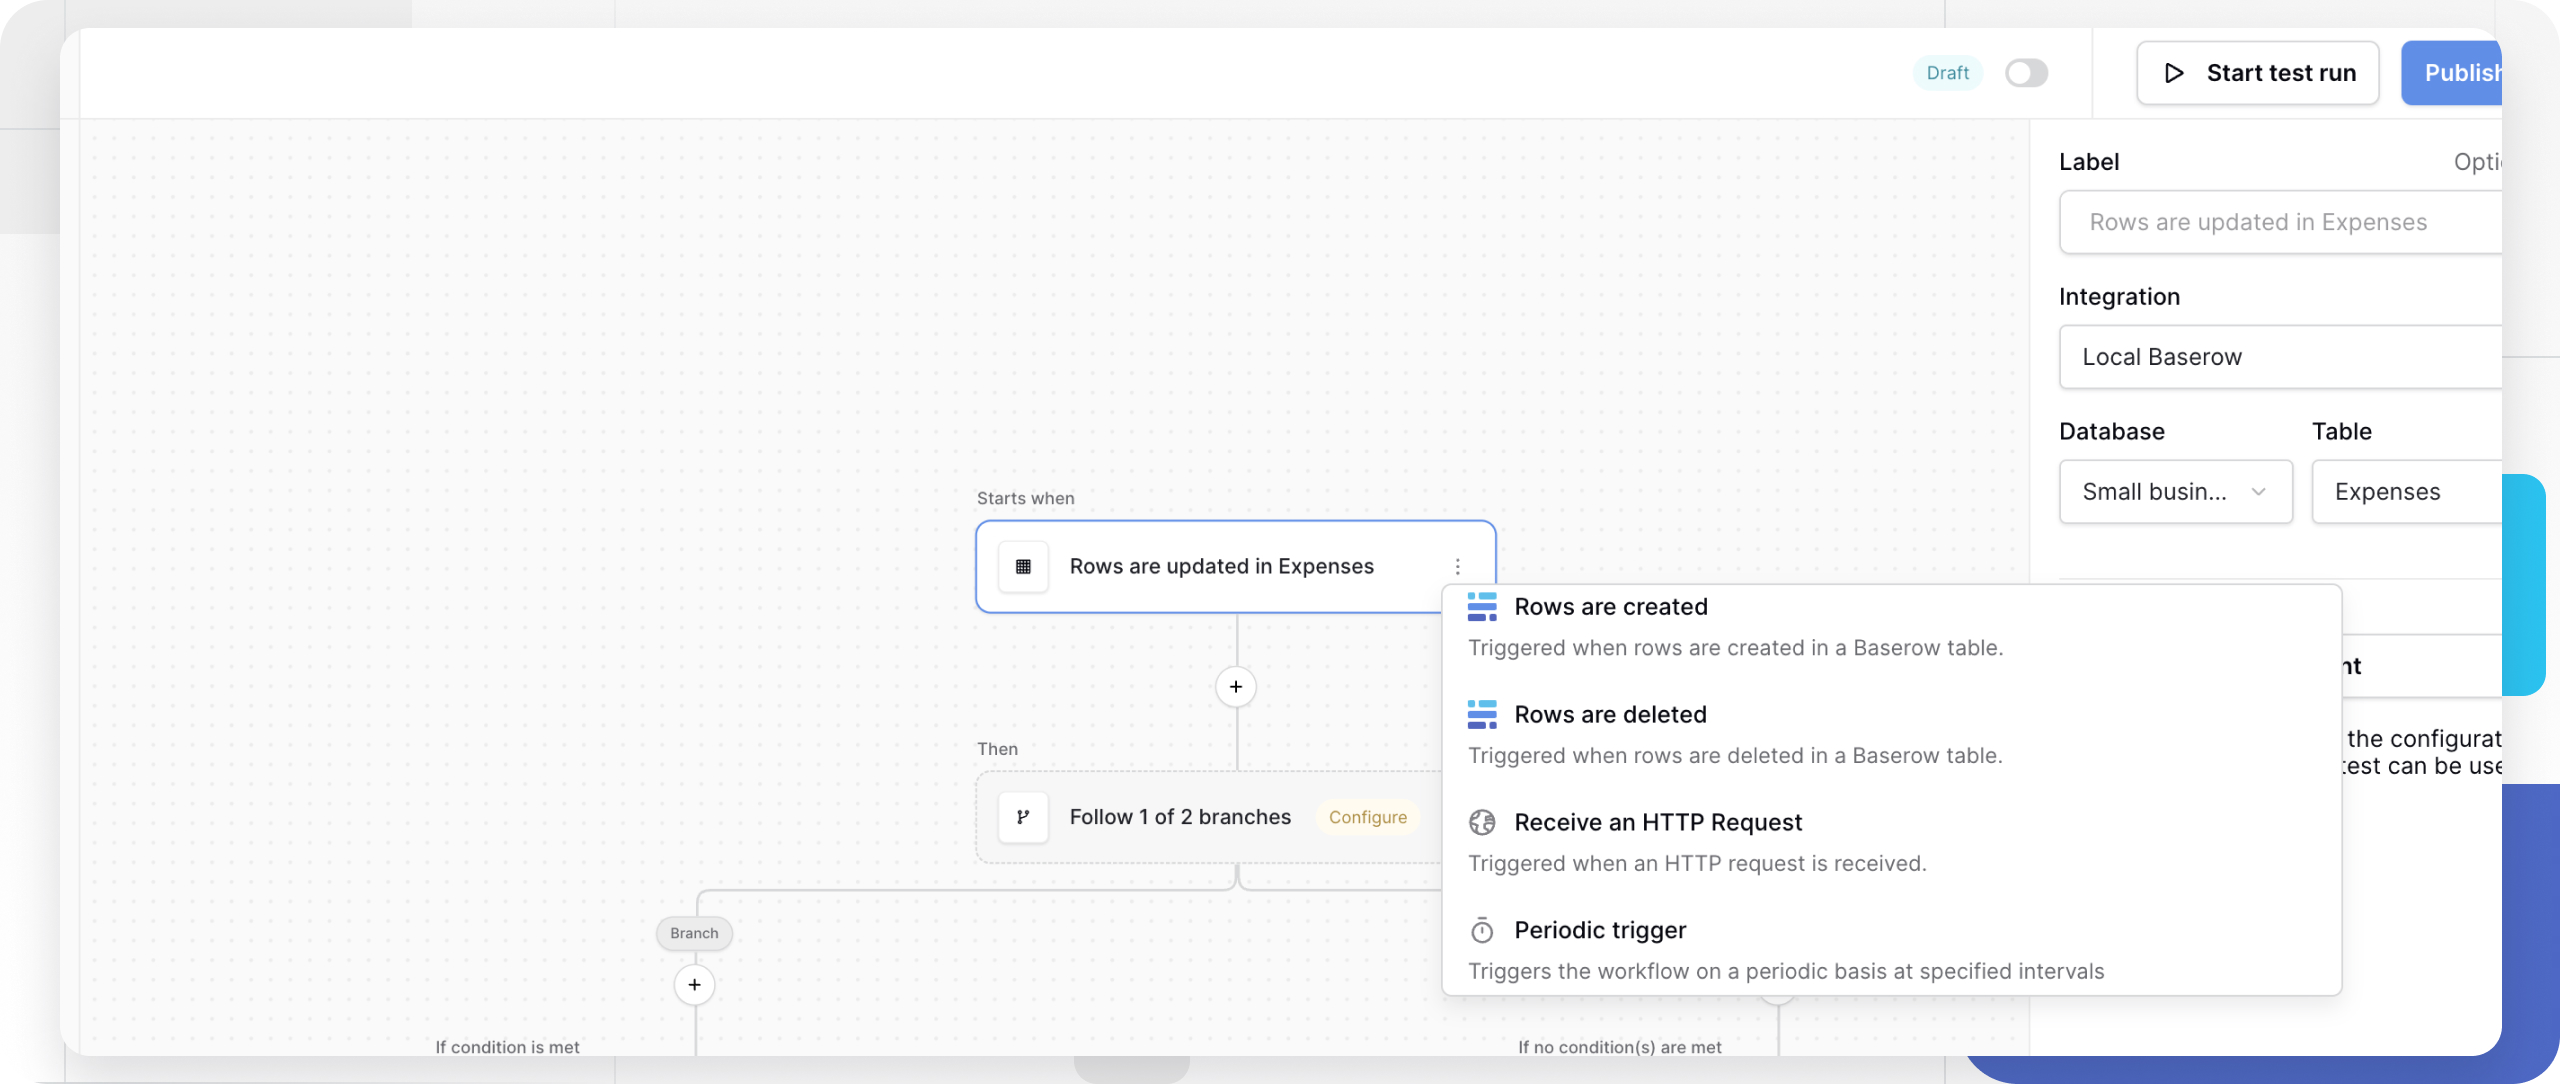
Available trigger types
Baserow provides categories of triggers to match different automation needs.
- Periodic trigger (time-based)
- Table-change triggers (data-driven)
- Receive an HTTP request (webhook)
Periodic trigger (time-based)
The periodic trigger executes your workflow on a fixed schedule without requiring any external input. Schedule workflows to run automatically at regular intervals, like generating daily reports or cleaning up old data.
Configuration:
| Setting | Description | Example |
|---|---|---|
| Label | Descriptive name for your trigger | “Daily Sales Report” |
| Interval | How often the workflow runs | Every hour, daily at 9 AM, weekly on Monday, Monthly |
The periodic trigger can be scheduled to run at every specified minute. In Baserow Cloud, the minimum you can set is every 15 minutes. Users on the self-hosted version can set it as low as every minute.
This trigger is useful to send weekly summary emails to your team, archive completed tasks every night, check for expired records hourly, or generate monthly reports automatically.
Table-change triggers (data-driven)
These triggers monitor your Baserow tables and fire immediately when specified changes occur. React to changes in your database in real-time, like notifying users when data is added, updated, or removed.
| Trigger type | Starts when | Example use case |
|---|---|---|
| Rows are created | New rows are added to a table | Welcome new customers, assign tasks to team members |
| Rows are updated | Existing rows are modified | Notify stakeholders of status changes, log edit history |
| Specific field values are updated | One or more selected fields are updated | Trigger approvals when a Status changes, notify assignees, react only to important field changes |
| Rows are deleted | Rows are permanently removed | Archive deleted data elsewhere, send deletion confirmations |
Configuration (applies to all table-change triggers):
- Label: Give your trigger a descriptive name
- Integration: Select the integration that connects to your workspace. Authorizing your account gives everyone who has edit permissions to the application full access to the data you have access to.
- Database: Choose the database containing your table
- Table: Select the specific table to monitor
Batch behavior
When rows are created or updated through the API, the trigger behavior depends on how the rows are sent:
Single request creating multiple rows: If one API request creates several rows (for example, 10 rows in a single batch), the workflow trigger fires once, passing an array of all affected rows.
Multiple requests creating individual rows: If you send separate requests for each row (for example, 10 individual requests), the workflow trigger fires once per request, resulting in 10 separate workflow executions.
Specific field values are updated
The Specific field values are updated trigger starts a workflow only when selected fields in a Baserow table are updated.
Instead of running every time a row changes, you can choose one or more fields to watch. Changes to any other fields won’t trigger the workflow.
This is useful for workflows that should only run when important information changes, such as a status, assignee, or approval field.
Configure the trigger by selecting:
- Integration – The Baserow integration to use.
- Database – The database containing the table to monitor.
- Table – The table to watch for changes.
- Fields – One or more fields that should trigger the workflow when their values change.
The workflow will only run when one of the selected fields is updated.
Example
An expense approval workflow should only run when the Status field changes.
Configure the Specific field values are updated trigger to watch the Expenses table and select the Status field. The workflow will start whenever the status changes, but not when other fields, such as the description or amount, are edited.
Receive an HTTP request (webhook)
This trigger creates a unique webhook URL that external services can call to start your workflow. When Baserow receives a request at this URL, the workflow executes with the request data as its payload.
Connect external applications and services to your Baserow workflows, enabling integrations with tools like Zapier, Make, or custom applications.
Configuration:
| Setting | Description | Recommendation |
|---|---|---|
| Label | Descriptive name for your webhook | “Stripe Payment Webhook” |
| Webhook URL | Auto-generated URL to receive requests | Copy this URL to your external service |
| Allowed HTTP methods | Which request types trigger the workflow | Select “Exclude GET” for security |
Why exclude GET requests?
GET requests are used by web browsers and crawlers for simple page visits. Excluding GET prevents your workflow from accidentally triggering when someone visits the URL in a browser or when search engines crawl it. Use POST, PUT, or other methods for intentional triggers.
Common use cases:
- Process payments from Stripe or PayPal
- Receive form submissions from your website
- Sync data from external CRM systems
- Trigger workflows from Zapier or Make automations
Manual trigger
The Manual trigger creates a workflow that is only triggered on demand.
Unlike other triggers, it doesn’t run on a schedule, when rows change, or when an HTTP request is received. It only runs when another workflow or an application starts it using the Start workflow action.
This is useful for creating reusable workflows that can be started whenever they’re needed.
Configure the trigger by setting:
- Label (optional) – Give the trigger a custom name.
No additional configuration is required.
Limitations
- A workflow with a Manual trigger can only be started using the Start workflow action.
- It can’t be started by a Periodic trigger, another Manual trigger, or any other trigger directly.
- To run a manual workflow automatically, start it from another workflow using the Start workflow action.
Example
Create a Send monthly report workflow with a Manual trigger. The workflow gathers project data and sends a Slack notification.
A scheduled workflow runs every month and uses the Start workflow action to start the Send monthly report workflow. The same workflow can also be started from an application when a user clicks a button, allowing the reporting logic to be reused without duplicating it.
How to test your trigger
Testing generates sample data that you’ll use to configure your workflow’s actions. Always test your trigger before adding actions.
Testing time-based triggers
- Configure your periodic trigger settings
- Click Test event in the trigger configuration sidebar
- The trigger will execute once immediately
- Review the generated timestamp data in the trigger node
Testing table-change triggers
- Configure your table-change trigger
- Manually perform the action in your table (create, update, or delete a row)
- Click Test event in the trigger configuration sidebar
- Baserow will capture the most recent matching event
- Review the row data now available in the trigger node
If no data appears, verify you performed the triggering action (like creating a row) in the correct table.
Testing webhook triggers
- Configure your webhook trigger
- Copy the generated webhook URL
- Send a test HTTP request to the URL using:
- A tool like Postman or cURL
- Your external service’s test feature
- A simple form submission
- Click Test event in Baserow
- The trigger will capture the request data you sent
Example test request (using cURL):
curl -X POST [YOUR_WEBHOOK_URL] \
  -H "Content-Type: application/json" \
  -d '{"customer_name": "John Doe", "amount": 99.99}'
Frequently asked questions
Can I have multiple triggers in one workflow?
No. Each workflow can have only one trigger. If you need to respond to multiple different events, create separate workflows, one for each trigger type. However, you can use conditional logic (Router nodes) after a single trigger to handle different scenarios.
What happens if a trigger fires while the workflow is already running?
Each trigger event creates a new workflow execution. If your workflow is still processing and a new trigger fires, Baserow will start a second concurrent execution. Both will run independently with their own data payloads.
Can I manually trigger a workflow without waiting for the event?
Yes, use the Start test run button to manually execute the workflow once with your test data. This is useful for debugging and development. However, manual test runs don’t replace actual trigger events in production.
How do I see when my trigger last fired?
Check the History tab in your automation. It logs every trigger event with timestamps, showing when workflows executed and whether they succeeded or failed.
Can I temporarily disable a trigger without deleting the workflow?
Yes, use the toggle switch to pause your published workflow. This stops the trigger from firing while keeping your configuration intact. Toggle it back on to resume automation.
What’s the difference between testing and publishing a workflow?
Testing executes the workflow once with sample data for development purposes. Publishing activates the workflow indefinitely; it will continue responding to trigger events until you pause or unpublish it.
Can external webhooks include authentication?
The webhook URL itself doesn’t require authentication by default. For security, you can:
- Exclude GET requests to prevent accidental triggers
- Validate request data within your workflow actions
- Use query parameters or headers that your external service provides
- Keep the webhook URL private (don’t share it publicly)
All API requests must use JSON. Other formats, such as XML, are not accepted.
Troubleshooting common issues
Trigger test shows no data
Cause: The triggering event hasn’t occurred yet.
Solution: For table-change triggers, manually create/update/delete a row in the specified table, then test again. For webhooks, send a test request to the URL first.
Workflow doesn’t fire after publishing
Cause: The workflow is paused, or the trigger event isn’t occurring.
Solution: Check the toggle switch shows “Live” (not paused). Verify the trigger event is actually happening in your database or that external services are sending requests.
Webhook returns an error
Cause: The external service is using an excluded HTTP method or sending invalid data.
Solution: Verify the HTTP method is allowed (check your “Allowed HTTP methods” setting). Review the History tab for specific error messages.
Related content
- Workflow automation overview - Learn the basics of Baserow workflows
- Webhooks - Detailed webhook configuration guide
- Manage workflow automation
- Database API documentation - Connect external services to Baserow
- Workflow automation
- Workflow Actions: Reading and modifying data
- Automation Settings
Still need help? If you’re looking for something else, please feel free to make recommendations or ask us questions; we’re ready to assist you.
- Ask the Baserow community
- Contact support for questions about Baserow or help with your account
- On this page
- What are workflow triggers?
- Available trigger types
- How to test your trigger
- Frequently asked questions
- Can I have multiple triggers in one workflow?
- What happens if a trigger fires while the workflow is already running?
- Can I manually trigger a workflow without waiting for the event?
- How do I see when my trigger last fired?
- Can I temporarily disable a trigger without deleting the workflow?
- What’s the difference between testing and publishing a workflow?
- Can external webhooks include authentication?
- Troubleshooting common issues
- Related content