Integrate Baserow and Notion
Notion and Baserow complement each other, especially for users or teams who want both flexible documentation and structured database management.
Notion is a note-taking, docs, knowledge and task management tool best for project documentation, meeting notes, wikis, and planning. Baserow is a database creation, data management, and automation tool best for managing structured datasets, CRM, inventory, product data, and issue tracking.
Both tools offer APIs. Baserow REST API can manage, query, and modify tables. Notion API can read and write pages, databases, and blocks. You can build lightweight scripts to keep them synchronized automatically (e.g., with Python or Node.js).
Using both gives you a combination of context + data:
- Notion handles narrative and coordination (what, why, who).
- Baserow handles structured execution (how much, when, where).
In Baserow, you manage due dates with automated reminders for tasks with a specific deadline, dependencies between tasks, and overall marketing program management. Notion is mainly where you write content, Baserow is where you manage tasks, capture performance data of marketing activities and automate work processes.
Use cases for using Baserow and Notion
The specific use cases can vary greatly. These are examples of what you can build with Notion’s public API.
| In Notion | In Baserow | |
|---|---|---|
| Project Management & Operations | Document project goals, roadmaps, meeting notes, retrospectives. Each project page in Notion links to a Baserow view filtered for that project’s tasks. | Manage project tasks, milestones, resource allocations, and dependencies using structured tables. |
| CRM or Client Workflows | Store client onboarding docs, meeting notes, contract templates, and communication records. Link each client’s Notion page to their record in Baserow and click through from Notion to update structured CRM data. | Maintain a CRM database of leads, clients, and deals with automation and filters. |
| Product Development & Knowledge Base | Keep design docs, product specs, changelogs, and team wikis. Product managers view the roadmap in Notion. | Track product features, sprints, bugs, and release schedules. Developers update real data in Baserow. |
| Content Creation Pipeline | Write briefs, content calendars, and style guides. Writers use Notion to draft. | Store metadata: content pieces, publication dates, platforms, statuses, and assigned authors. Editors use Baserow to track pipeline progress. |
| Data-Driven Documentation | Maintain dashboards or reports for management with commentary and charts (embedded from Baserow). Use Notion as your readable reporting layer, pulling real-time data from Baserow. | Store raw data and analytics logs that feed the reports. |
How to connect Baserow and Notion
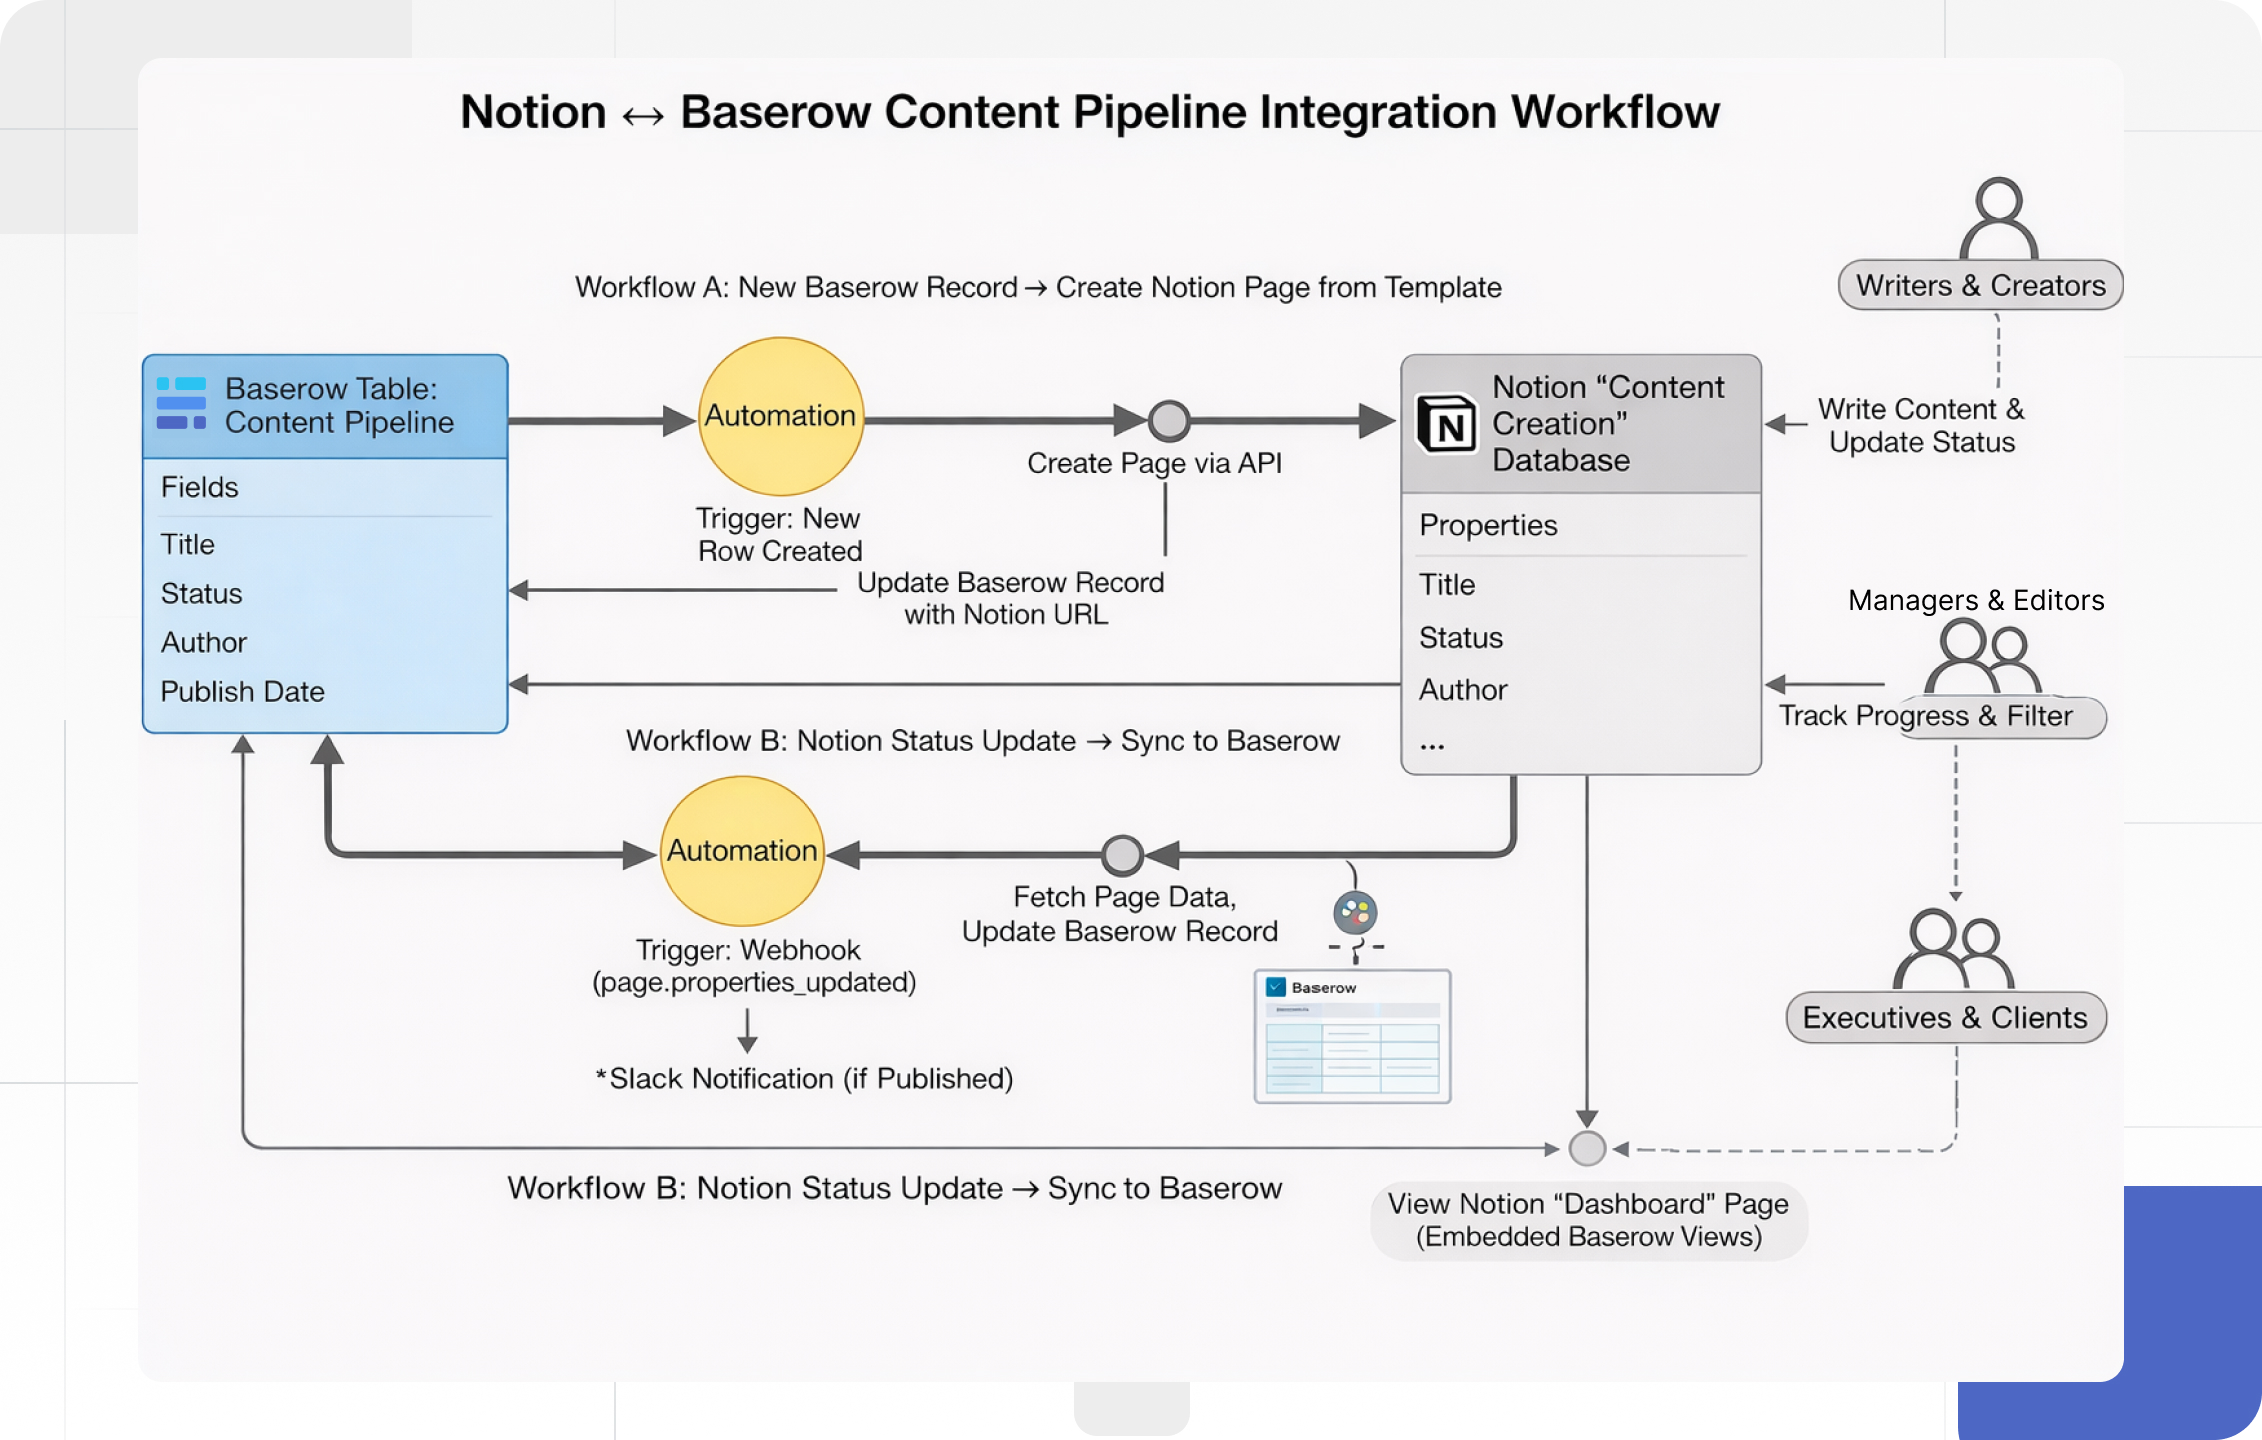
We have created a complete, ready-to-use Content Creation Pipeline workflow package for integrating Notion and Baserow. This step-by-step workflow covers how to use both tools together to manage the workflow day-to-day.
We’ll use the Content Creation Pipeline usecase. You and your team produce blog posts, videos, and social media content weekly. You want to keep structured data (titles, deadlines, statuses) organized and reportable, write and collaborate in Notion, and have both tools stay in sync automatically.
By the end of this guide, we’ll have a functional workflow that looks like this:
| Time | Tool | Action |
|---|---|---|
| Morning | Baserow | Add a new content idea in Baserow → automation creates a full Notion draft page. |
| Morning | Notion | Open the content dashboard → see embedded Baserow view of today’s tasks |
| Midday | Baserow | Team collaborates and updates the status of content pieces, adjusts deadlines |
| Afternoon | Notion | Write new content using template linked to Baserow record |
| End of day | Notion | Weekly report page in Notion shows an embedded Baserow “Overview” view. Review dashboard → check off “Published” items, syncs to Baserow automatically |
Writers & Creators work mainly inside Notion for content writing, and update “Status” (Draft, Editing, etc.) in Notion (which syncs back to Baserow). Managers & Editors use Baserow to track overall progress, see what’s due soon, and filter by team member. They also use Baserow dashboards for metrics (e.g., content count per week). Executives / Clients view a Notion “Dashboard” page embedding the relevant Baserow views: Upcoming publications, Published content this month, and Workload per author.
Prerequisites
To follow along with this guide, you will need:
- A Notion page template
- A Baserow table schema
- A Baserow automation blueprint
What we’ll do
- Create the Baserow table.
- Create the Notion database using a template structure.
- Connect both through automations.
- Use the Update page API to modify attributes of the Notion page, such as its properties, icon, or cover. Auto-populate and embed the Baserow dashboard view for live update. The public Baserow row URL will show as an embed block (live table row view).
%20of%20Notion%20%E2%86%94%20Baserow%20integration%20workflow%20showing%20data%20flow%2C%20automation%20triggers%2C%20and%20team%20roles.png)
1. Create Baserow Table Schema
This will hold the content pipeline. Create a table in Baserow named “Content Pipeline” with the following fields:
| Field Name | Type | Example / Notes |
|---|---|---|
| Title | Text | “10 AI Tools for Designers” |
| Type | Single Select | Blog / Video / Newsletter |
| Status | Single Select | Idea / Drafting / Editing / Published |
| Author | Text or Link to “Team Members” table | “Alex Rivera” |
| Publish Date | Date | 2025-11-14 |
| Notion URL | URL | Link to the Notion page |
| Notes | Long Text | Background info, keywords, etc. |
| Days Until Publish | Formula | date_diff('day', field('Publish Date'), today()) |
| Overdue? | Formula | if(field('Days Until Publish') < 0, '⚠️ Yes', '✅ No') |
Then create filtered views (e.g., “By Status” or “By Author”), so your team can easily focus on what’s relevant.
2. Create a database template in Notion
Database templates save time when adding a new page to a data source. Instead of building manually from a blank page, templates accelerate your workflows by providing a blueprint for the page’s properties and content.
In Notion, we will create a reusable “Weekly Review” page template inside a database.
Create a database, click the dropdown arrow next to New at the top right of the database, then select + New template.
Template Title: {{Title}} – Content Draft. Whatever you title this page will be the name of the template you use going forward.
Page structure: On this page, we will define properties for the template and add content to the page itself.
Metadata
| Property | Type | Description |
|---|---|---|
| Content Type | Select | Blog / Video / Newsletter / Social |
| Status | Select | Idea / Drafting / Editing / Published |
| Author | Person | Assigned writer |
| Publish Date | Date | Planned publish date |
| Baserow Record URL | URL | Link to corresponding Baserow row. |
Section 1: Content Brief
- Goal: What’s the purpose or target KPI?
- Audience: Who are we speaking to?
- Key message: Main takeaway or insight.
Section 2: Draft
- Write or paste your draft content here.
- Use headings, callouts, and comments collaboratively.
Section 3: Publishing Checklist
- [ ] Edited and proofread
- [ ] Approved by manager
- [ ] Graphics complete
- [ ] Uploaded to CMS
Section 4: Analytics & Notes
- Performance link: (once published)
- Notes / Feedback:
3. Create Notion integration
Integrations define how the public API can interact with your Notion workspace. We want to use the Notion template when creating pages in the API.
-
Create a new integration with Insert Content capabilities on the target parent page or database. For your integration to interact with the page, it needs explicit permission to read/write to that specific Notion page.
-
Get your API secret: API requests require an API secret to be successfully authenticated (or “Internal Integration Secret”). Any time your integration is interacting with your workspace, you will need to include the integration token in the
Authorizationheader with every API request.Your integration can now make API requests related to this Notion page and any of its children.
-
Get the details needed to create the templates with Baserow automation.
Use the List data source templates endpoint to retrieve details of all page template IDs and titles available for a data source, or manually navigate to the template in the Notion app and get its ID.
curl --request GET \
     --url 'https://api.notion.com/v1/data_sources/{data_source_id}/templates' \
     -H 'Notion-Version: 2025-09-03' \
     -H 'Authorization: Bearer '"$NOTION_API_KEY"''
Create Page
Use the Create a page API to duplicate the template into a new page.
Provide a
page_idordata_source_idunder theparentparameter to create a page under an existing page or data source. To set up the page content, use thetemplatebody parameter to specify the data source template to be used to populate the content and properties of the new page.parent[type]=data_source_idparent[data_source_id]= Get a data source ID from the Notion app → database settings → "Manage data sources” → “Copy data source ID” buttontemplate[type]=template_idtemplate[template_id]= ID of the template to apply to the newly created page
curl 'https://api.notion.com/v1/pages' \
  -H 'Authorization: Bearer '"$NOTION_API_KEY"'' \
  -H "Content-Type: application/json" \
  -H "Notion-Version: 2022-06-28" \
  --data '{
  "parent": { "data_source_id": "d9824bdc84454327be8b5b47500af6ce" },
  "template": {
    "type": "template_id",
    "template_id": "YOUR_TEMPLATE_GUID_HERE"
  },
  "properties": {
    "Name": { "title": [{ "text": { "content": "Tuscan Kale" } }] },
    "Content Type": { "select": { "name": "Blog" } },
    "Status": { "select": { "name": "Idea" } },
    "Author": { "people": [{ "id": "USER_ID" }] },
    "Publish Date": { "date": { "start": "2026-01-06" } },
    "Baserow Record URL": { "url": "https://baserow.io/example" }
  }
}'
The keys to the
propertiesobject body param must also match the parent data source’s properties (the data columns). Notion property breakdown for the columns:Content Type&Status: Use theselectobject. Note that the value you provide (e.g., “Blog”) must either already exist in the database options or the integration must have “Insert” permissions.Author: Uses thepeoplearray. You need the specific Notion User ID (found via the “List all users” endpoint) rather than a name string.Publish Date: Uses thedateobject with ISO 8601 format (YYYY-MM-DD).
The Create Page API request is returned as a blank page with a new Page object until the template finishes applying, aside from any initial page
propertiesset on the page. Store the ID of the newly created page in your app’s backend storage systems. This will be necessary in the next step.Retrieve a page
The webhook payload itself does not contain the page’s data (like the Title or URL). It only tells you which page changed (
entity.id) and which property was touched (updated_properties). To find the matching Baserow record, you need to perform a “Retrieve a Page” request to Notion using the ID from the webhook before you can talk to Baserow.curl 'https://api.notion.com/v1/pages/b55c9c91-384d-452b-81db-d1ef79372b75' \ -H 'Notion-Version: 2025-09-03' \ -H 'Authorization: Bearer '"$NOTION_API_KEY"''
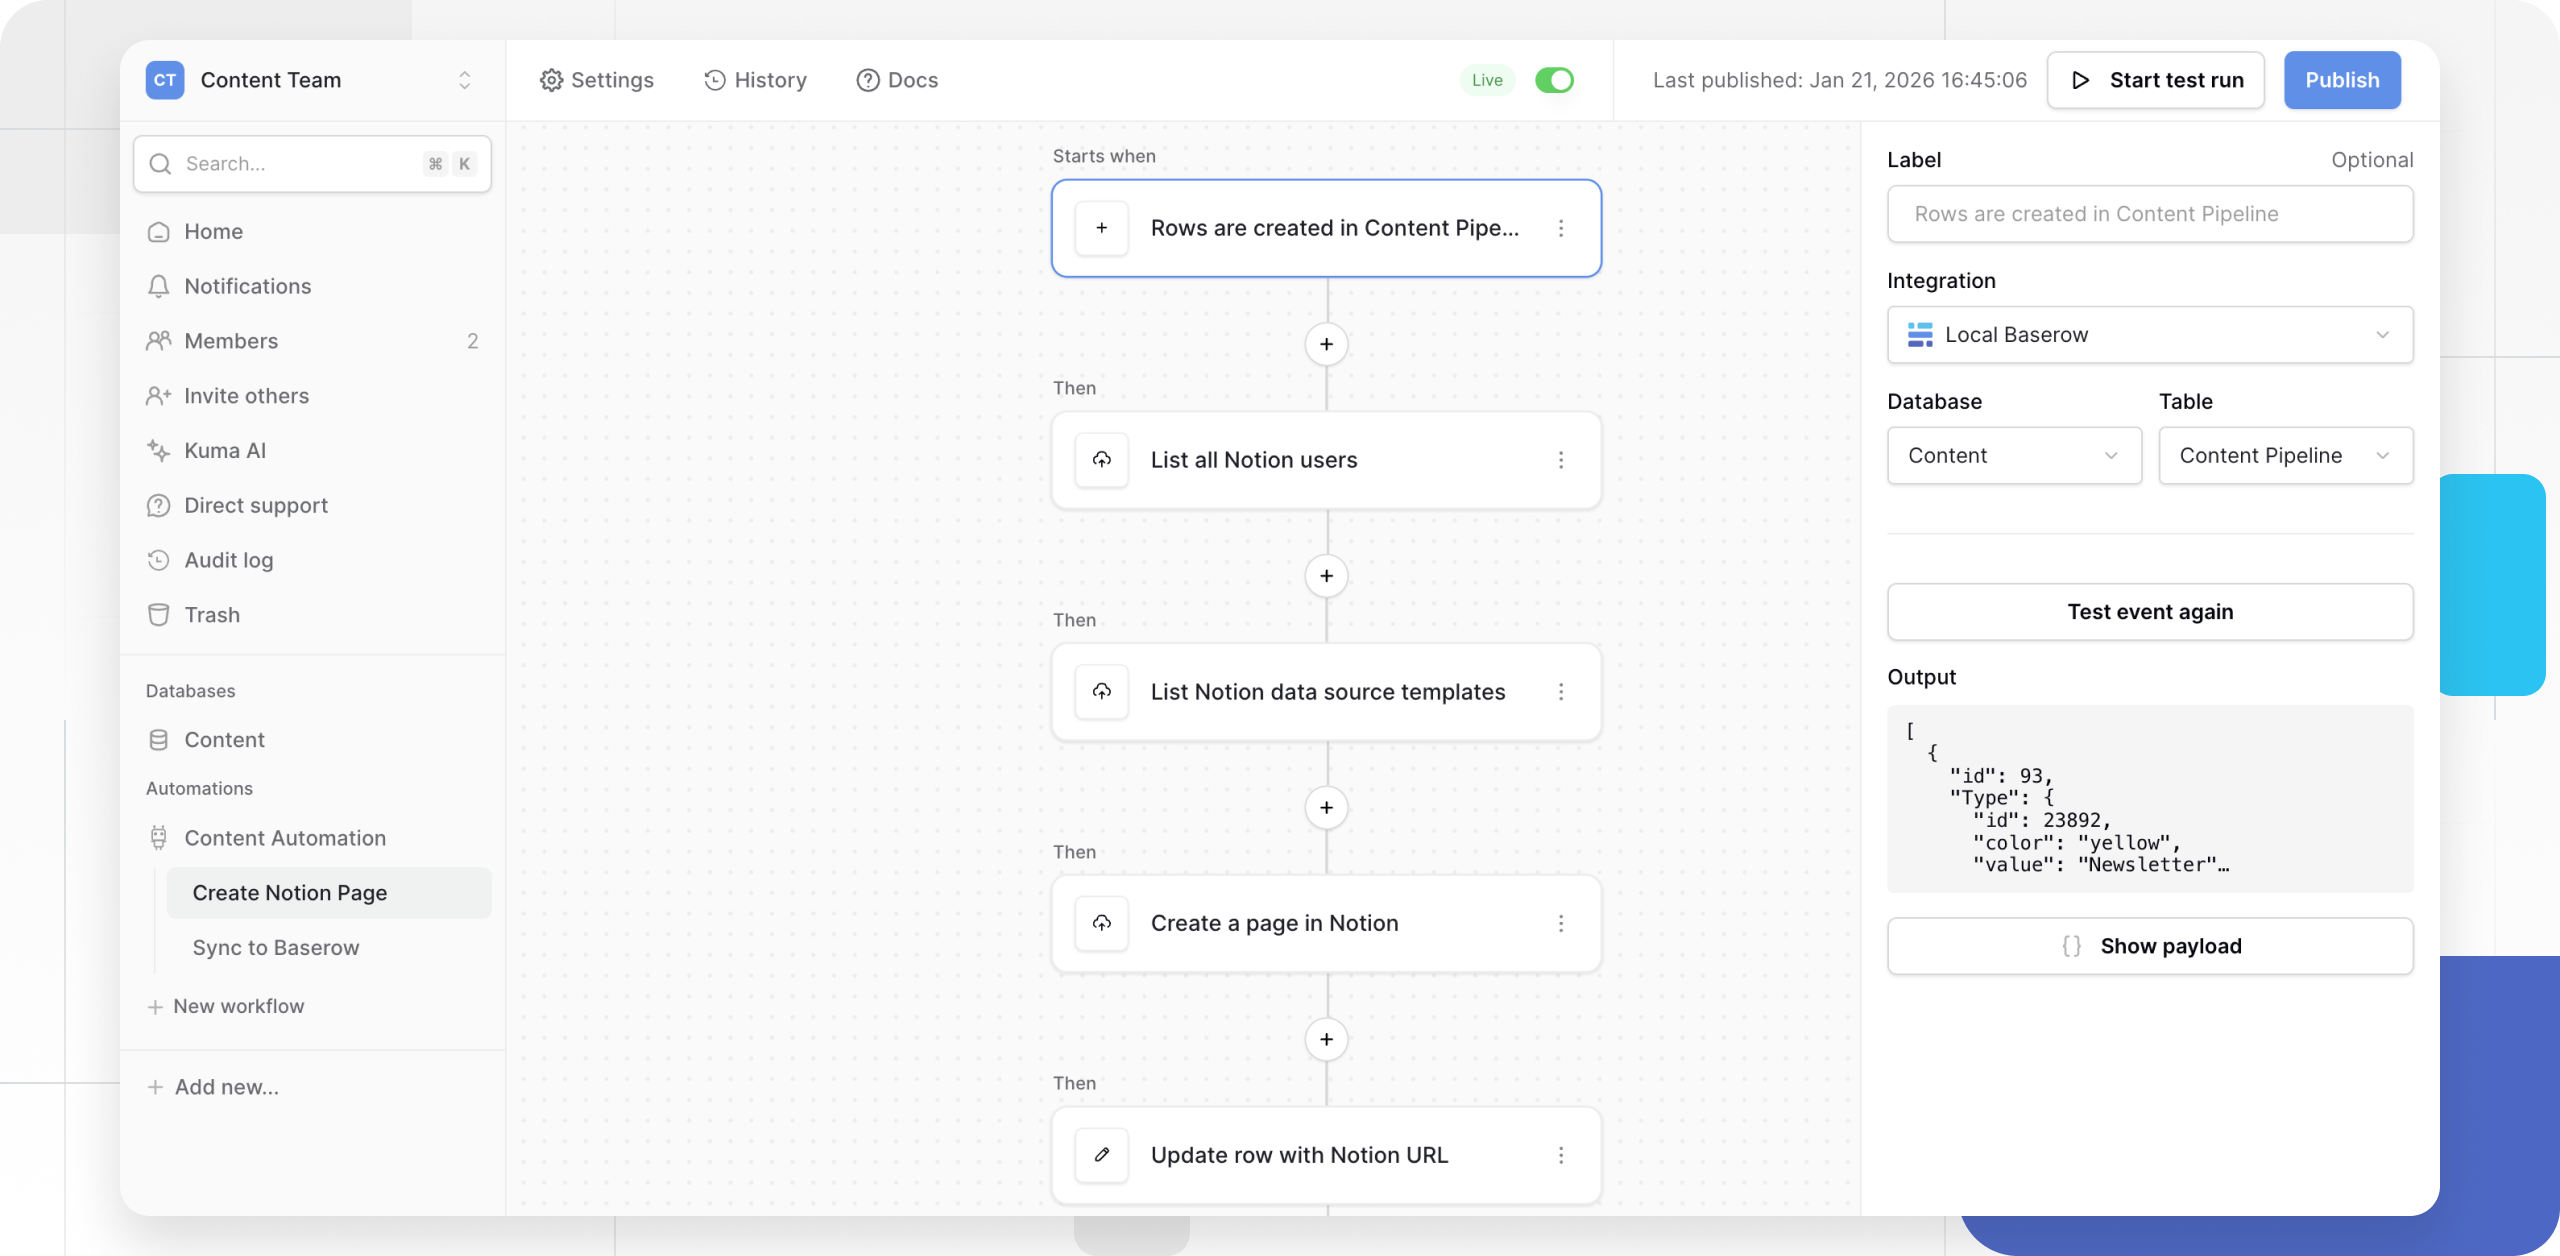
4. Automation to create pages from templates
Next, we want to automate this process to duplicate the Notion page template for each new piece of content.
- Add a new automation in Baserow
- Create two workflows to keep Notion and Baserow synchronized automatically.
Workflow A – New Content Record → Create Notion Page
Whenever a new row is added to Baserow, we want a fully prepared Notion page to appear automatically.
Trigger: → “Rows are created in Baserow table: Content Pipeline”
Actions:
-
Send an HTTP request: Use the List data source templates endpoint to retrieve details of all page template IDs
-
Send an HTTP request: Use the List all users endpoint to retrieve a paginated list of Users for the Author field.
Use the Iterate on items node to loop through the list.
-
Send an HTTP request: Use the Create a page endpoint ****to create a new page in Notion ****from the template
- Select HTTP method, input Endpoint URL, add headers, and add query parameter
- Body content: Map fields
- Title → Notion page title
- Type → “Content Type” property
- Author → “Author” property
- Status → “Status” property
- Publish Date → “Publish Date” property
- Baserow Record URL → “Baserow Record URL” property
-
Update the same Baserow record: Fill in the Baserow’s
Notion URLfield with the new Notion page link. The Baserowrow_idvalue must be an integer or convertible to an integer.
Start test run. The content will show up identically on each page created with the template.
Instead of repeatedly polling the Notion API to check if anything has changed, you can set up a webhook URL for your Notion integration and enable
page.createdandpage.content_updatedevents.
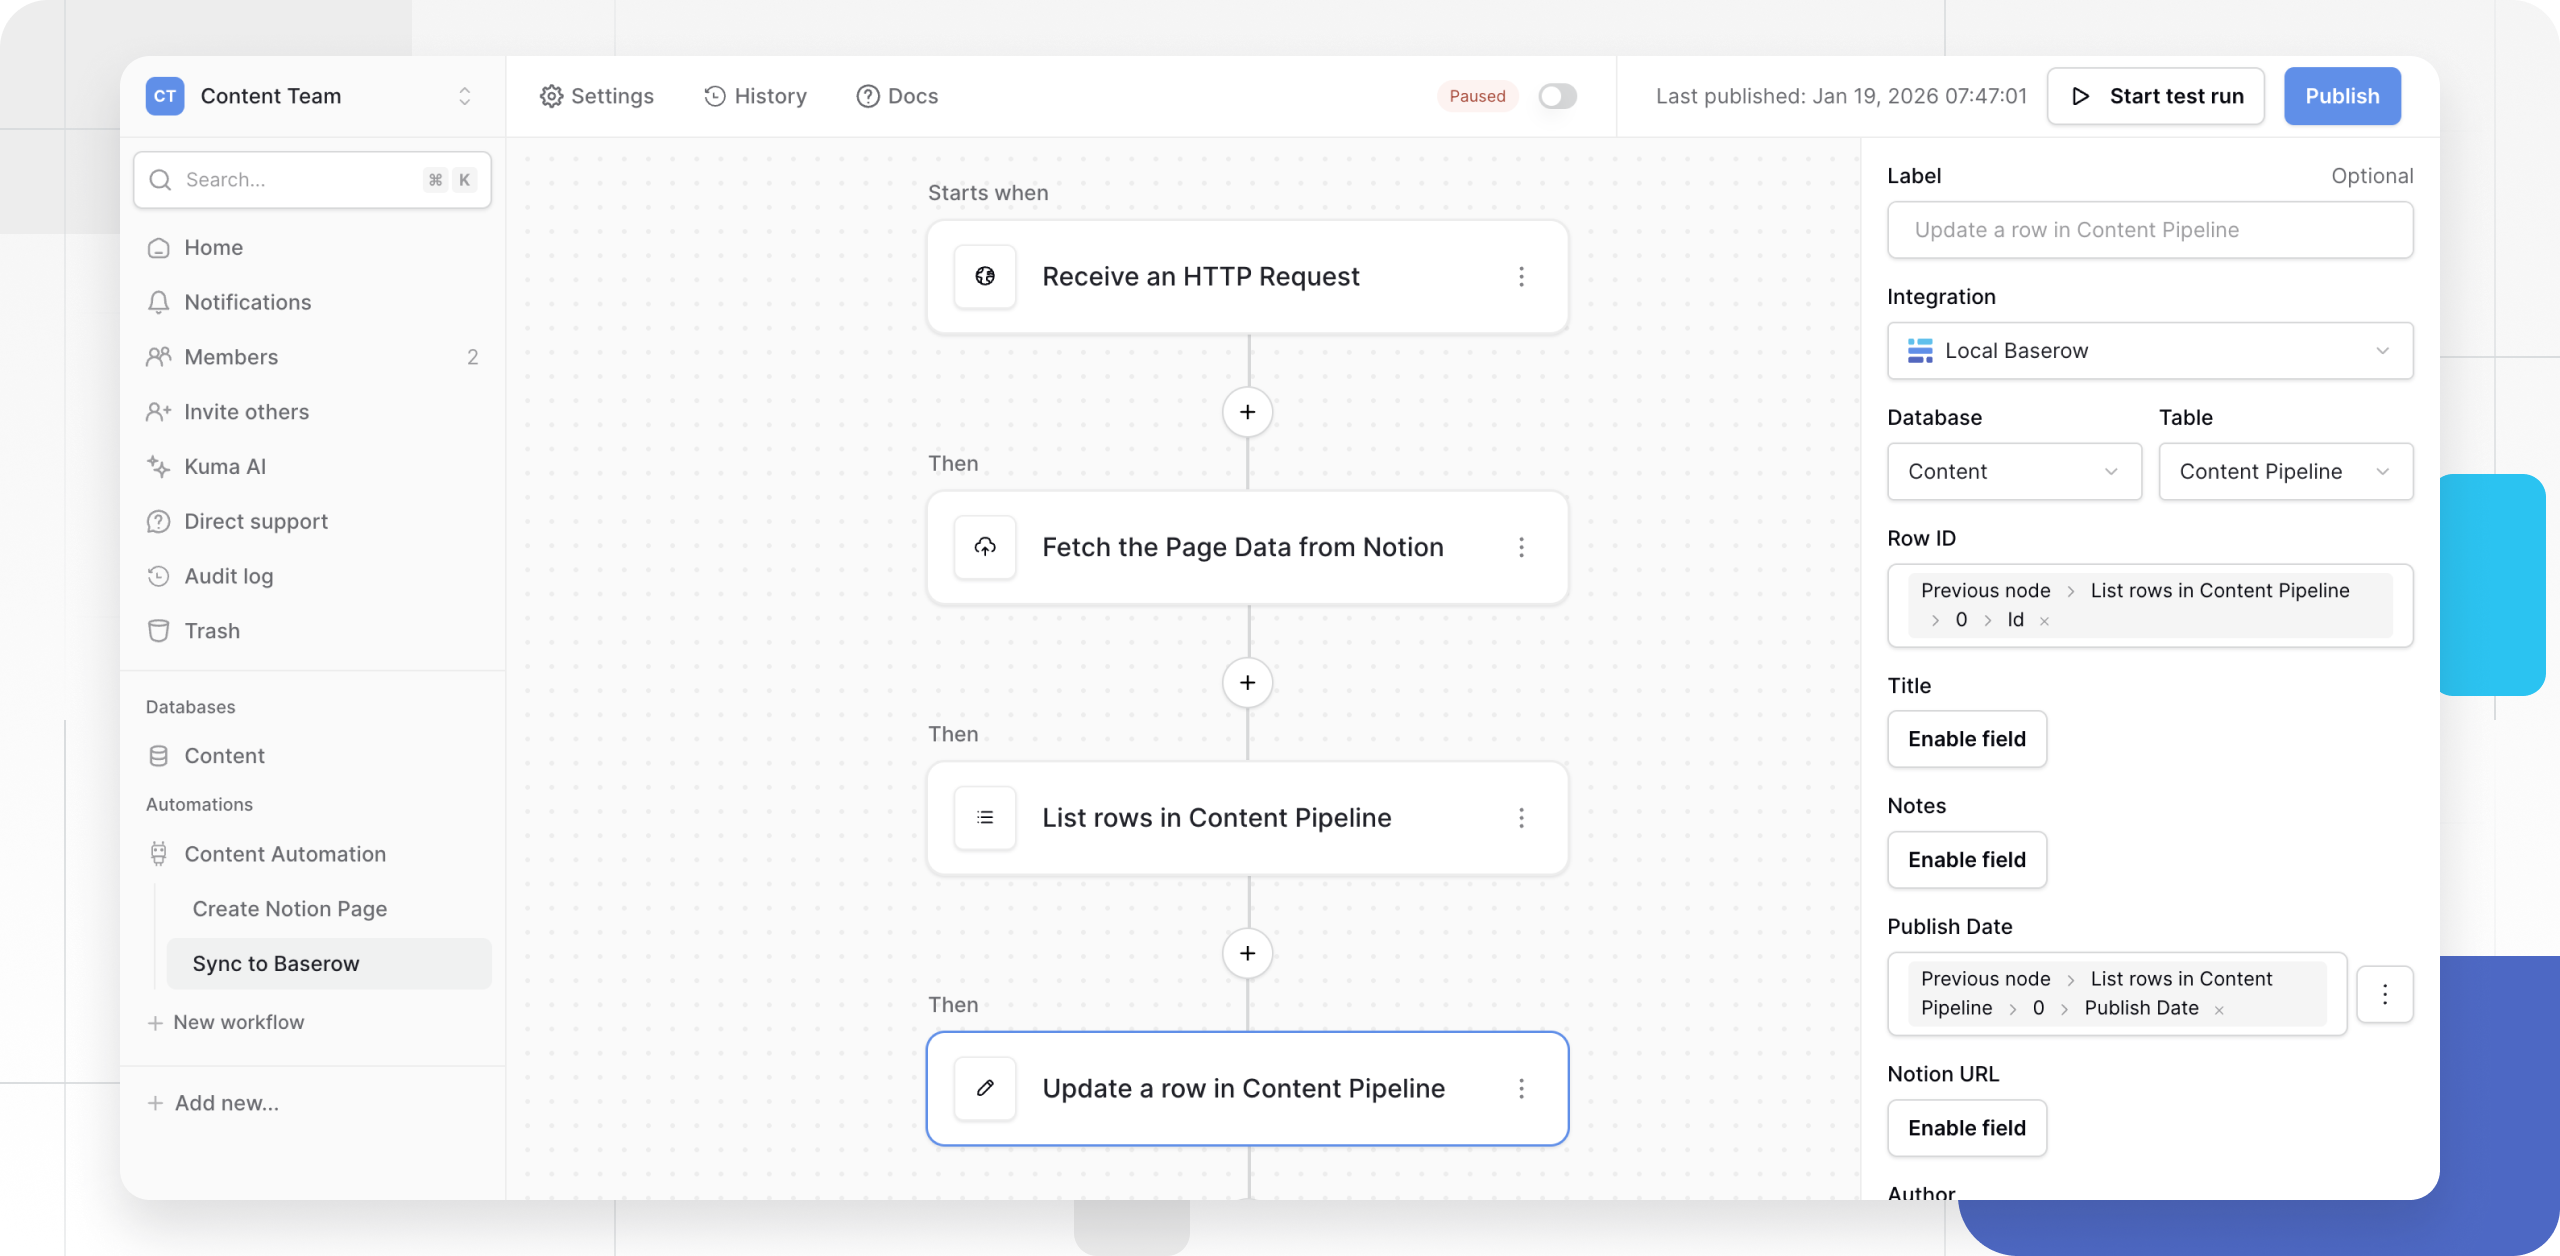
Workflow B – Status Update in Notion → Sync to Baserow
We want any updates in Notion sync back to Baserow’s structured data.
Trigger: → Receive an HTTP request “Notion database item updated”
Visit your Notion integration settings → Navigate to the Webhooks tab and click + Create a subscription. Enter the Baserow Webhook URL to send events.
When you create a subscription, Notion sends a one-time POST request to your webhook URL. The body of the request contains a
verification_token, which proves that Notion can successfully reach your endpoint. Confirm that your endpoint can receive and respond to verification.
Actions:
-
Send an HTTP request: Use the Retrieve a page endpoint to fetch the Page object using the
entity.idfrom the webhook. This will return the full JSON including the “Name” (Title) and the “Baserow Record URL” properties defined earlier. -
List multiple rows: Find a matching Baserow record by Notion URL or Title. Use the Title or URL retrieved to filter Baserow.
-
Update fields in Baserow:
StatusPublish Date- (Optionally
Notes)
-
Send a Slack message: “When Status = Published → Send message to #content channel:
‘🎉 New post published: {{Title}} ({{Notion URL}})’”
Notion’s systems will asynchronously begin processing a task to populate the page contents and properties based on the template. This way, both tools stay perfectly in sync, structured data remains clean, and documentation remains rich and readable.
Best Practices
By combining Notion and Baserow, we have integrated the creative, contextual, collaborative side with the operational, analytical, structured side. This creates a seamless workflow that handles how you think and how you execute.
- Keep structured data in Baserow: anything you might want to filter, sort, or automate.
- Keep contextual information in Notion: anything narrative
or collaborative. - Embed instead of duplicating data: avoid versioning chaos.
- Use views smartly in Baserow: create filtered or aggregated views to show exactly what teams need.
- Use templates in Notion: connect them to the right Baserow datasets automatically for consistency.
Still need help? If you’re looking for something else, please feel free to make recommendations or ask us questions; we’re ready to assist you.
- Ask the Baserow community
- Contact support for questions about Baserow or help with your account.