Build a Baserow custom connector in Power Automate
You have your data organized in Baserow. Now you want that data to do work. You want to automatically send emails when a status changes, sync rows to a SharePoint list, or generate contracts in Word based on your database fields.
To do this, you need Microsoft Power Automate to build your own Custom Connector. Power Automate unlocks the entire Microsoft Ecosystem and complex logic.
By the end of this guide, you will have:
- A Baserow custom connector inside your Power Automate account.
- A flow that sends an email from Baserow data.
- A way to trigger flows instantly using Webhooks.
Integration Architecture
Before we build, let’s look at the blueprint.
- The Source: Baserow holds the data.
- The Custom Connector: This acts as a translator. It takes the “Create Row” action in Power Automate and translates it into the language Baserow understands (via API calls).
- The Flow: This is the automation logic (e.g., “If status is Done, send email”).
Why use a Custom Connector instead of a generic HTTP Request? You can use generic HTTP requests, but it requires you to write JSON code every time you build a flow. A Custom Connector gives you a nice, easy-to-use menu where you just fill in the blanks, making it reusable for your whole team.
Prerequisites
- Baserow account: You need a Token. Baserow distinguishes between Data actions (which use the Database Token) and User/File actions (which require a JWT User Token).
- Power Automate account with access to make flows.
Configuration guide integrating Baserow into the Microsoft Power Platform via OpenAPI
To create a custom connector, you must define the API you want to connect to so that the connector understands the API’s operations and data structures.
In this guide, we will create a custom connector from scratch.
You can alternatively create a custom connector using Baserow OpenAPI definition which you can import into Power Automate. The OpenAPI definition must be less than 1 MB and needs to be in OpenAPI 2.0 (formerly known as Swagger) format.
Step 1: Create the Custom Connector
To create a custom connector from scratch in Power Automate:
-
Log in to make.powerautomate.com.
-
In the left sidebar, click Data → Custom Connectors. If the item isn’t in the side panel pane, select …More and then select the item you want.
Alternatively, in the left pane, select Solutions → Edit or create an unmanaged solution.
-
Select + New Custom connector and select Create from blank.
Alternatively, in the Solution page, select + New dropdown → Automation → Custom connector and select Create from blank.
-
Enter the Connector Name
Baserow. Select Continue to open your connector wizard.
We will complete these five sections in Power Automate: General, Security, Definition, Code (optional), and Test.
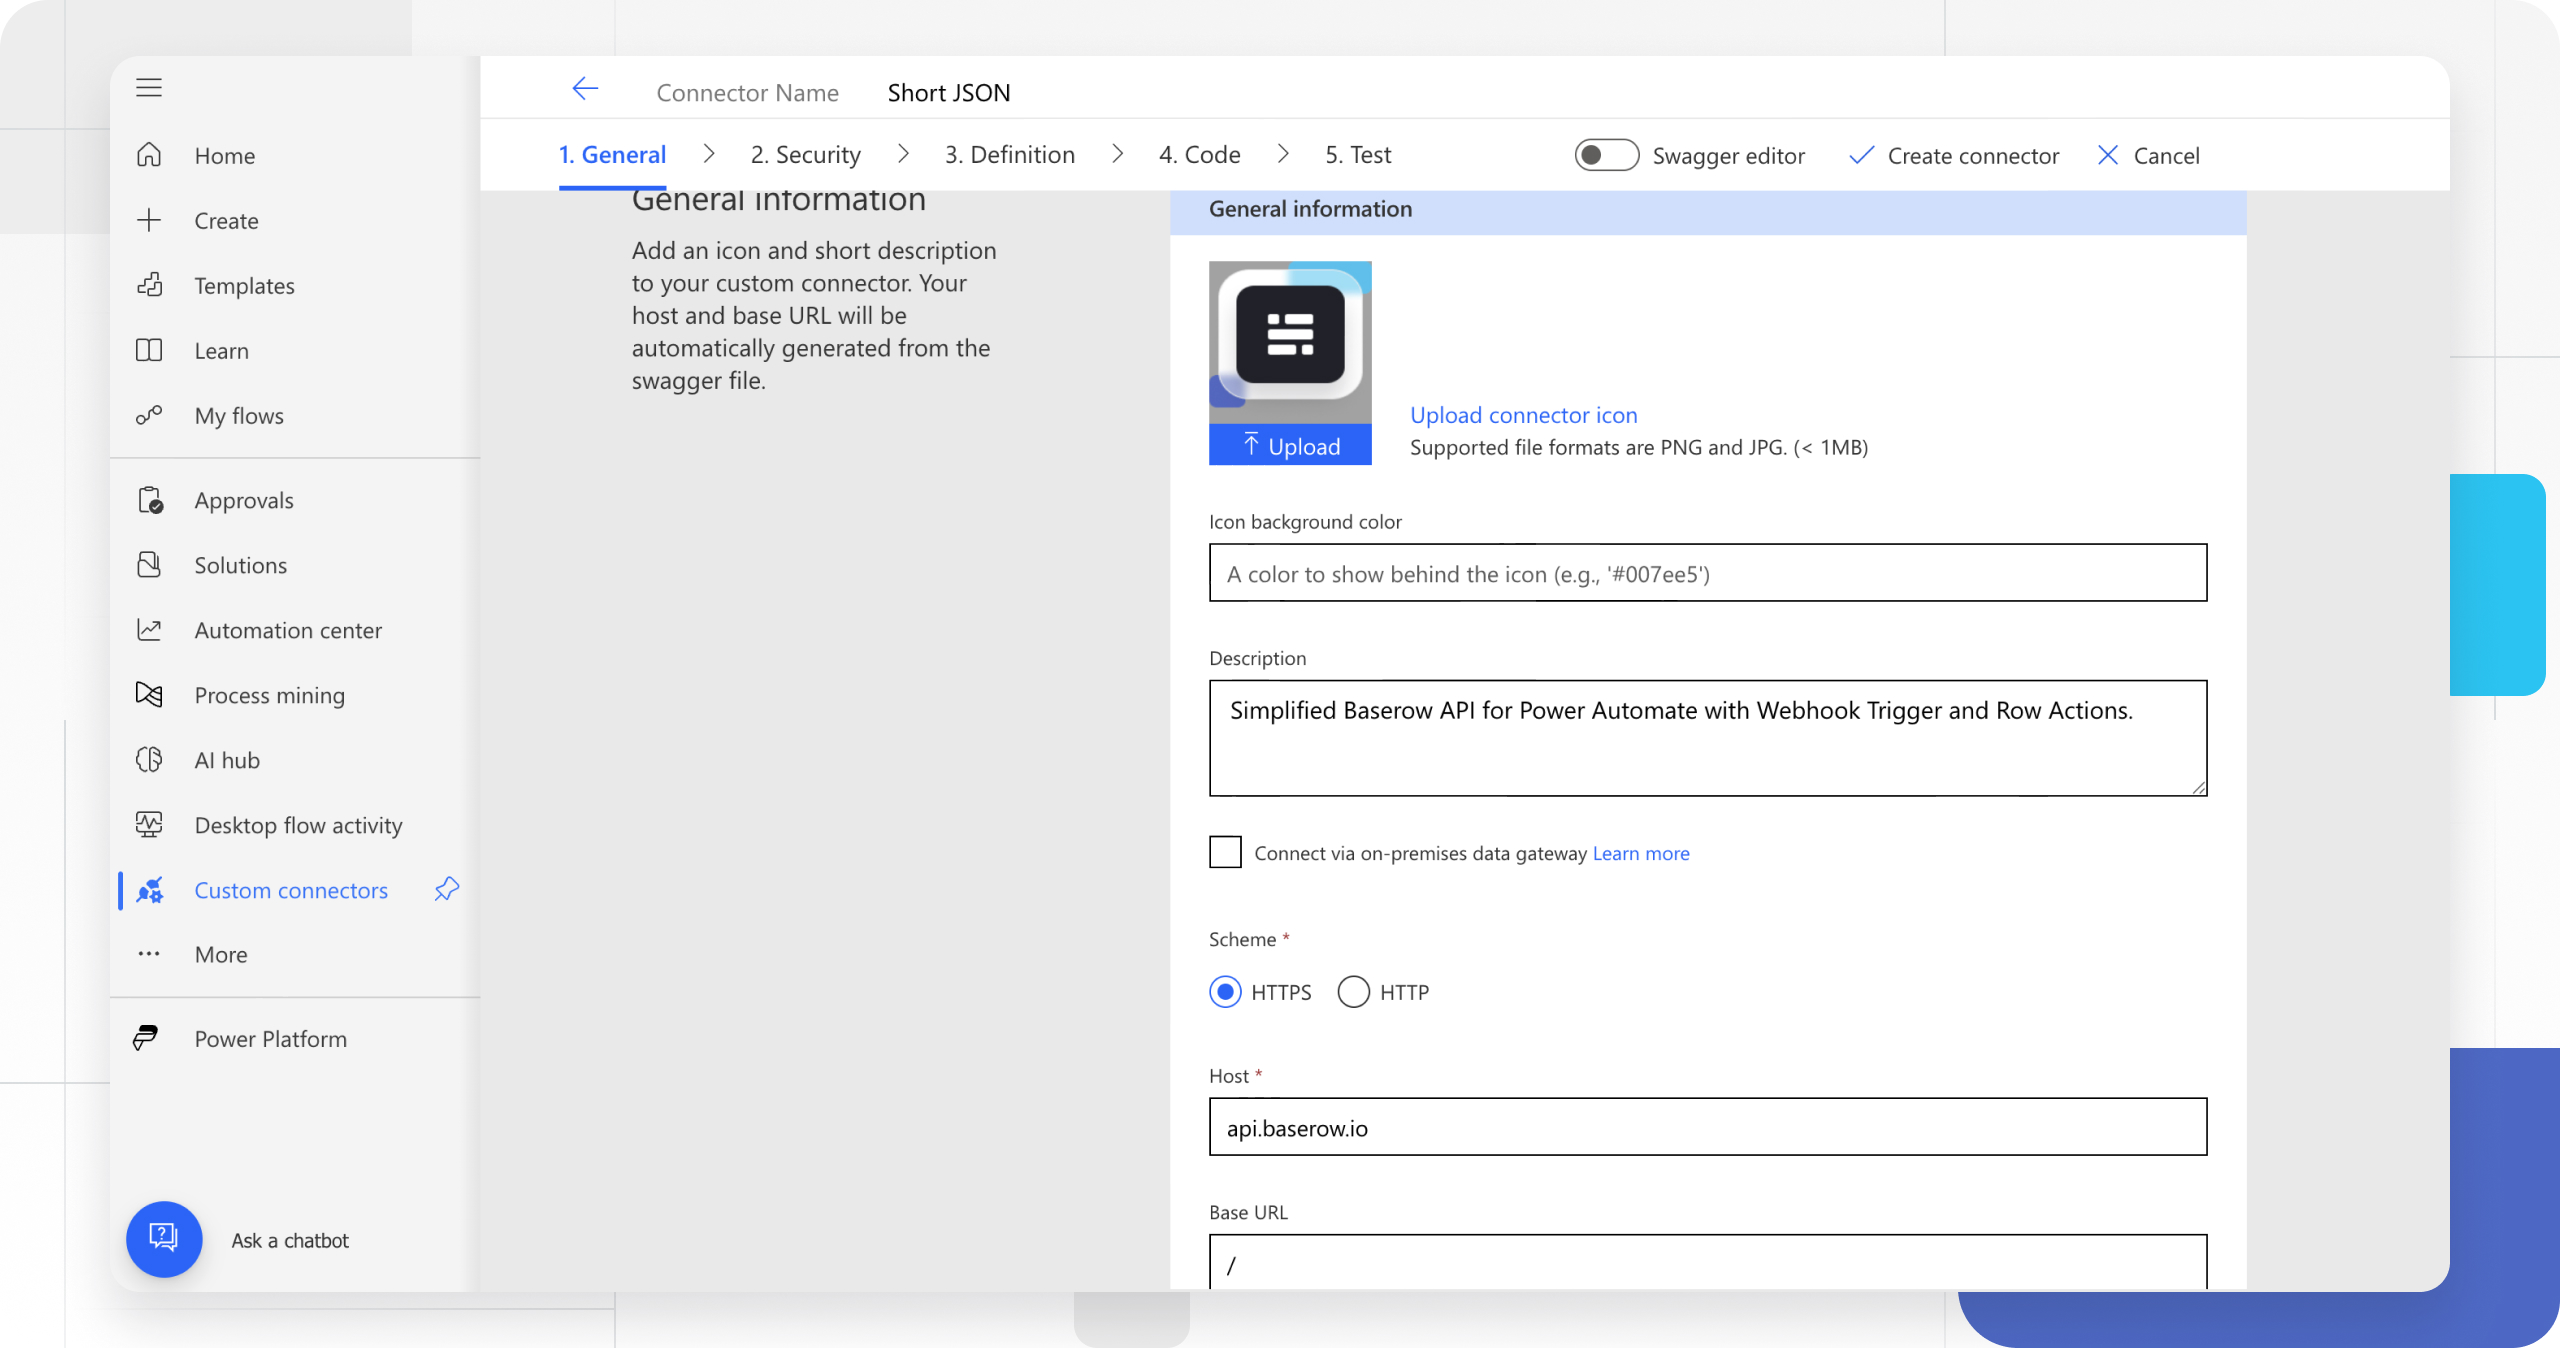
Step 2: Update general details
In the General section, we will give connector information such as the icon, description, scheme, host, and base URL:
-
Click the Upload connector icon or Upload in the icon box to upload a PNG or JPG of the Baserow logo. Be sure that it’s less than 1MB. You can also designate a background color for the icon.
-
In the Description field, enter a value. This description appears in the custom connector’s details, and it can help others decide whether the connector might be useful to them.
Parameter Value Description “Simplified Baserow API for Power Automate with Webhook Trigger and Row Actions.” Connector’s URL scheme “HTTPS” Host api.baserow.io(or your self-hosted domain).Base URL / -
Select Security at the bottom to go to the next section.
The connector uses the API host and the base URL to determine how to call the API. The Base URL is the starting point for all API calls.
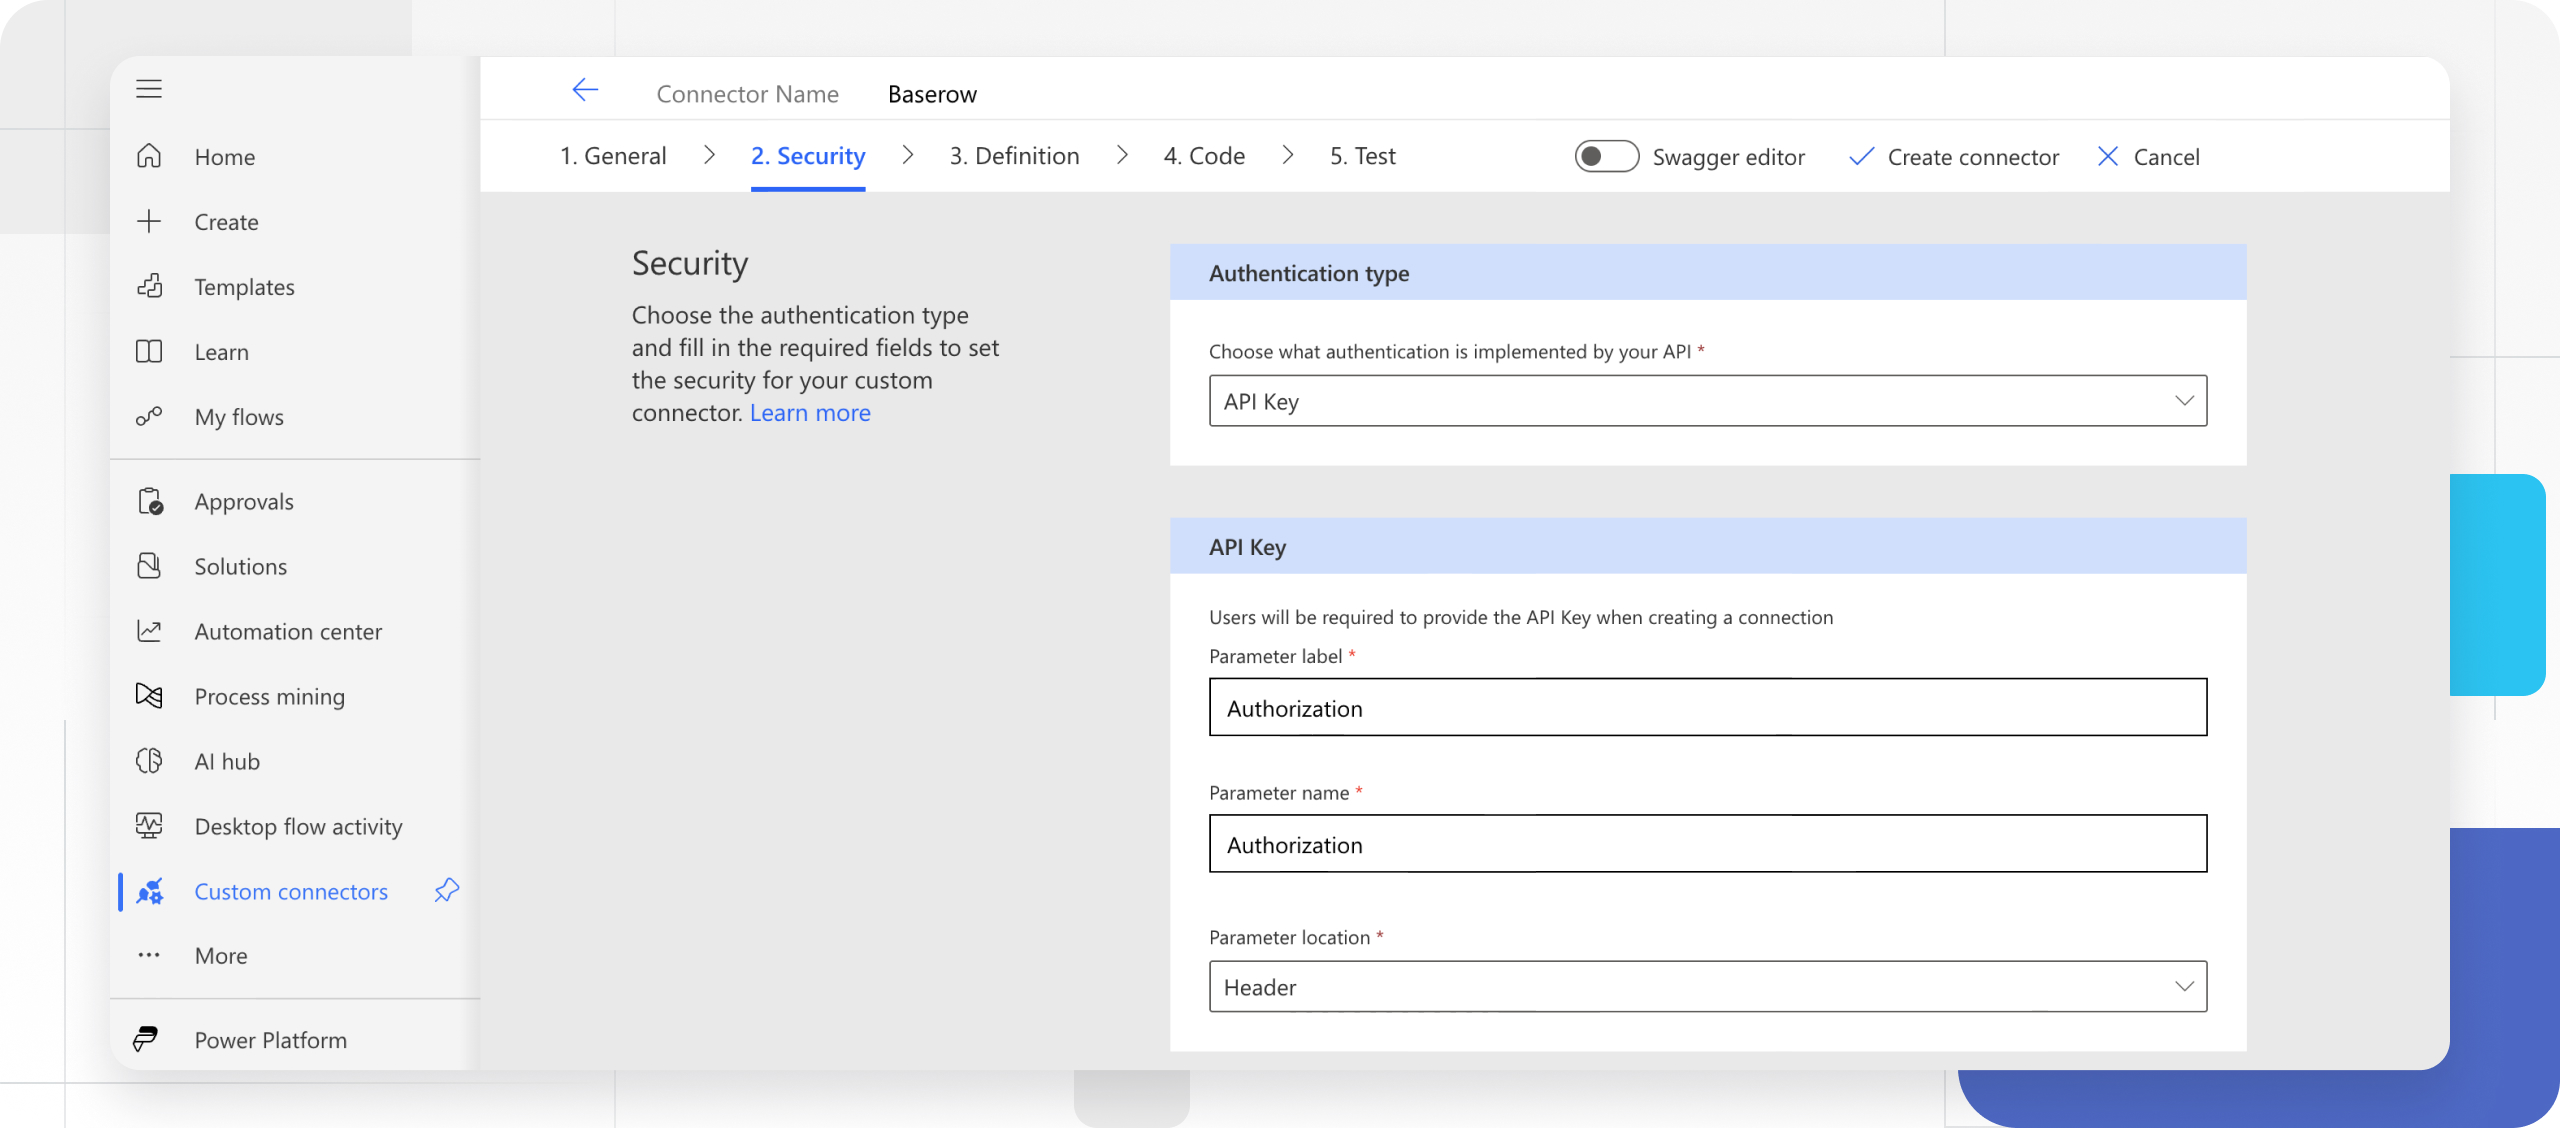
Step 3: Specify authentication type
This is how Power Automate logs in to Baserow.
There are several options available for authentication in custom connectors. Baserow uses API key authentication.
-
In the Security section, under Authentication type, select API Key from the dropdown.
-
Under API Key, specify a parameter label, name, and location. The label is displayed when someone first makes a connection with the custom connector. The parameter name and location must match what the API expects.
Parameter Value Parameter label AuthorizationThis is what the user sees when they log in. Parameter name AuthorizationThis is the actual header name Baserow expects. Parameter location Header
Select Definition at the bottom to go to the next section.
The connector definition
The Definition page of the custom connector wizard gives you many options for defining how your connector functions and how it’s exposed in logic apps, flows, and apps. We will define actions and triggers in the following section.
The left area will display any actions, triggers, and references that are defined for the connector.
References are reusable parameters used by both actions and triggers.
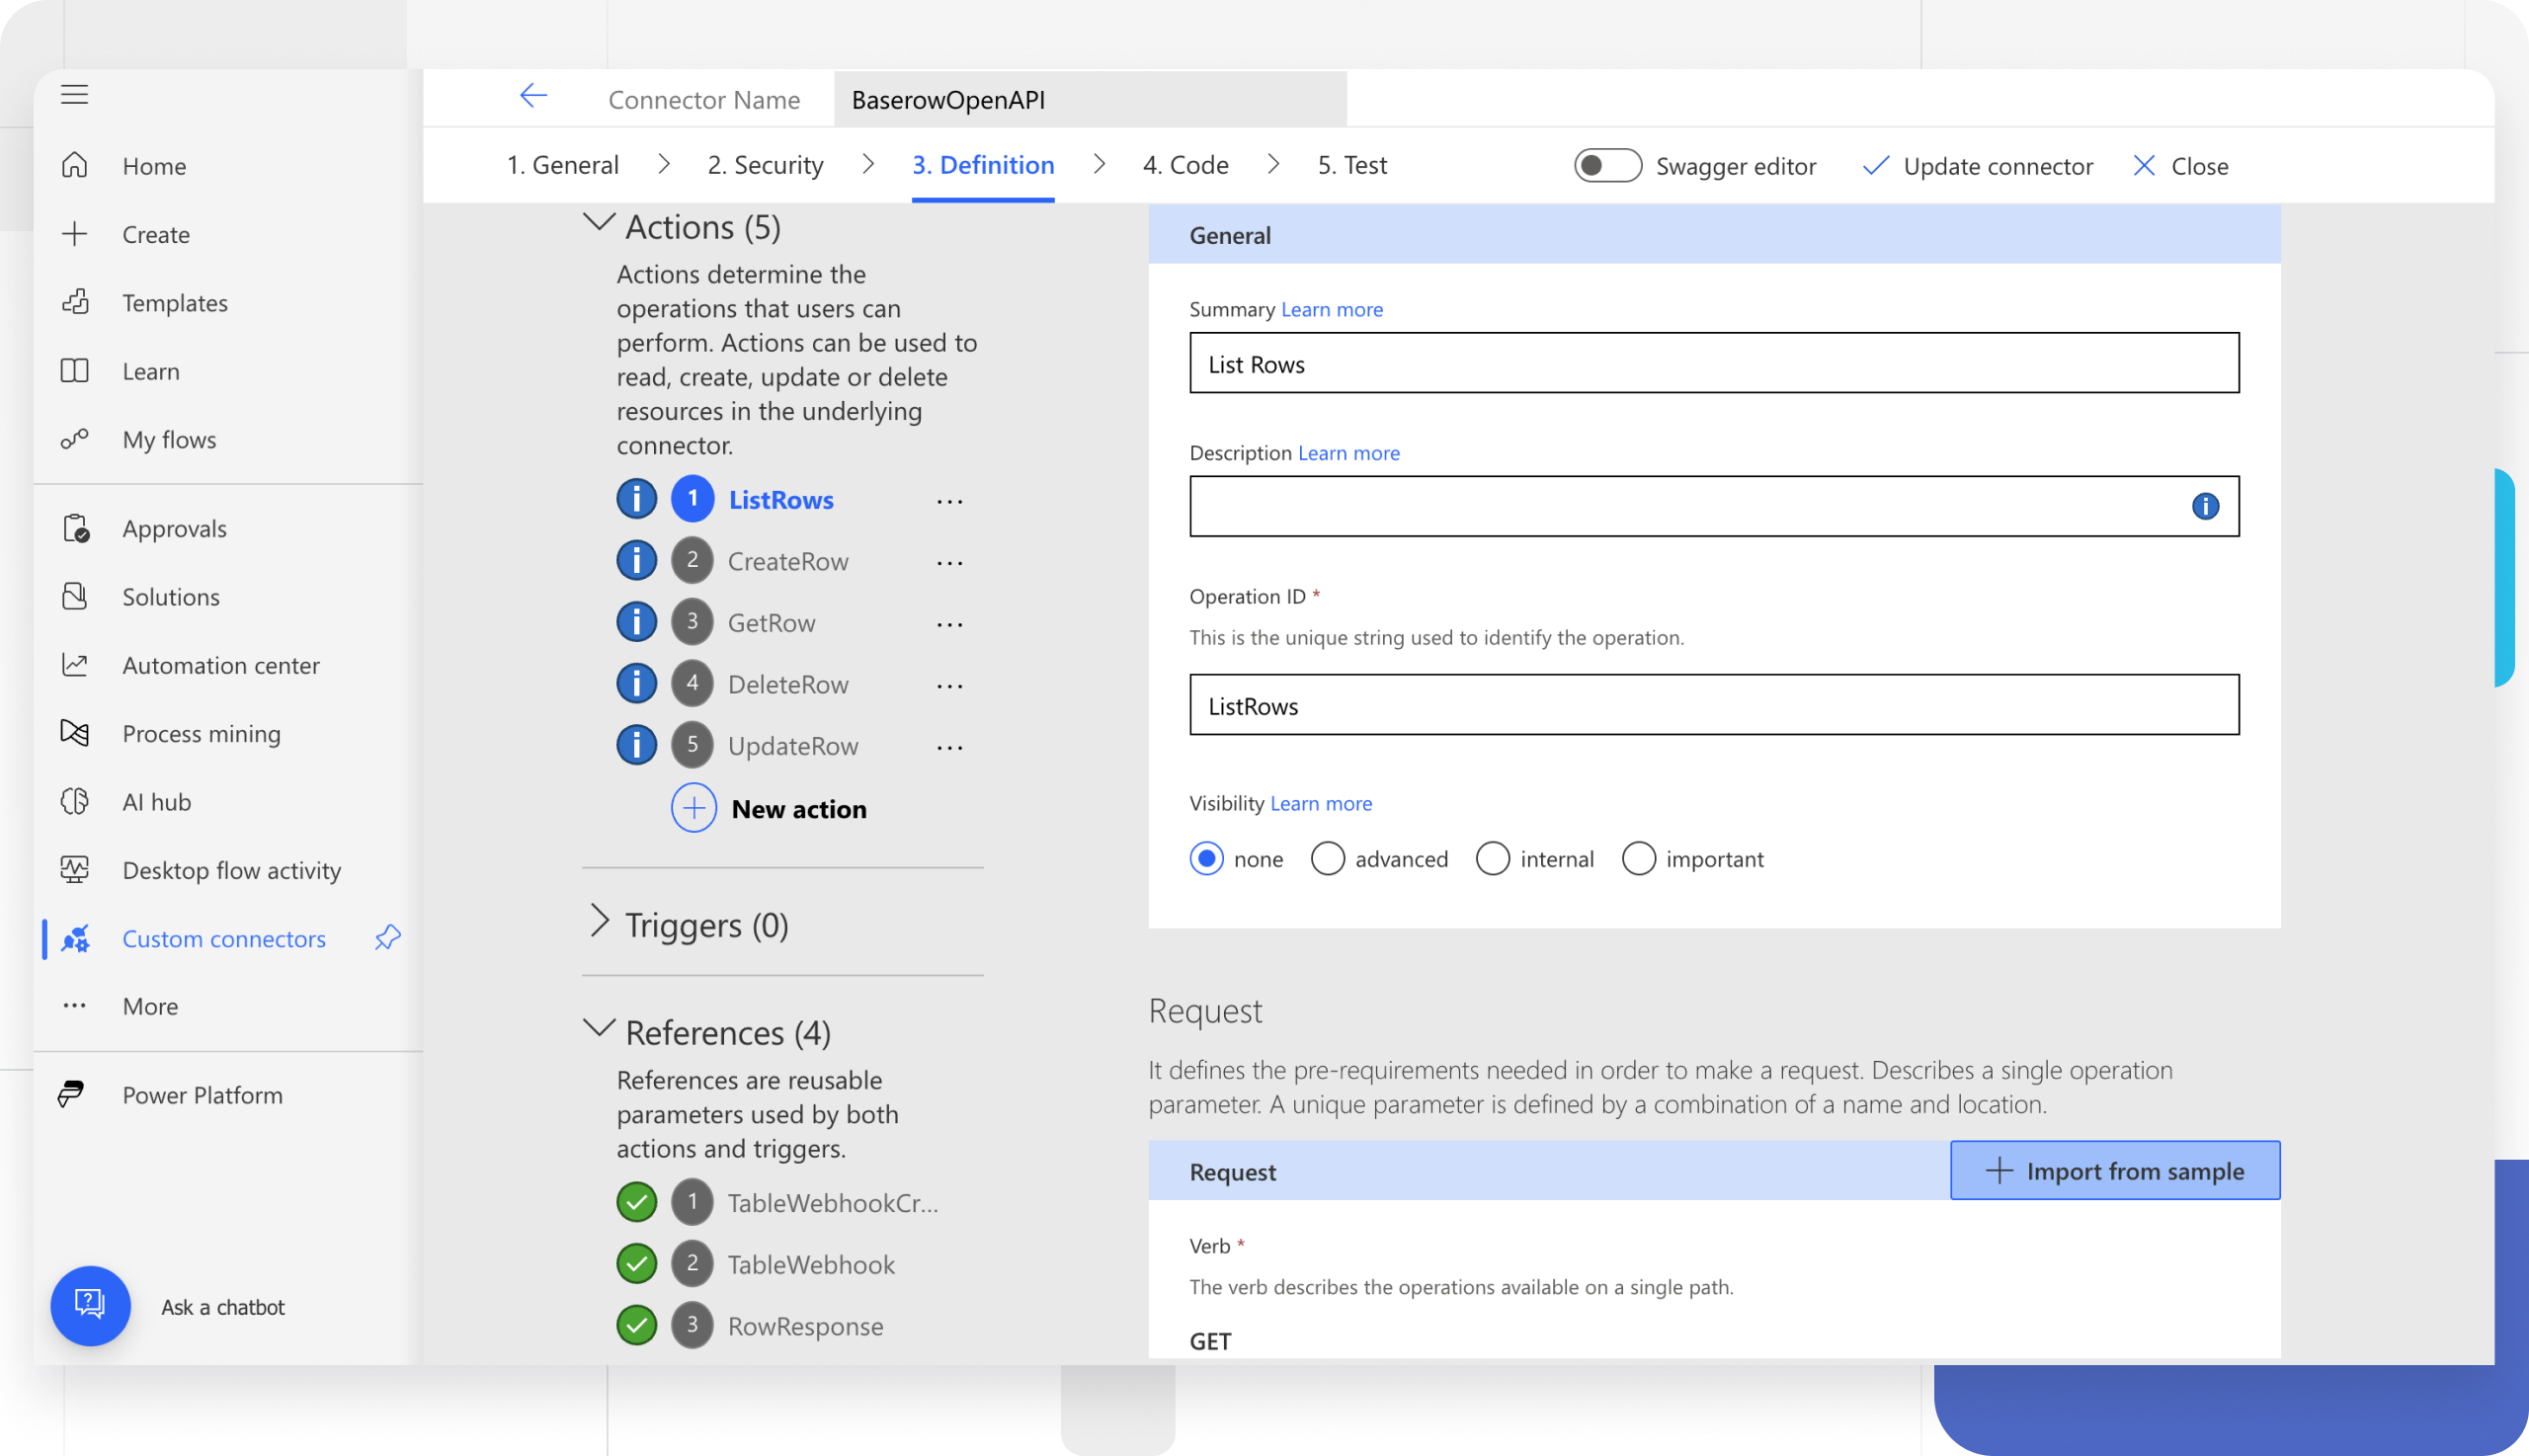
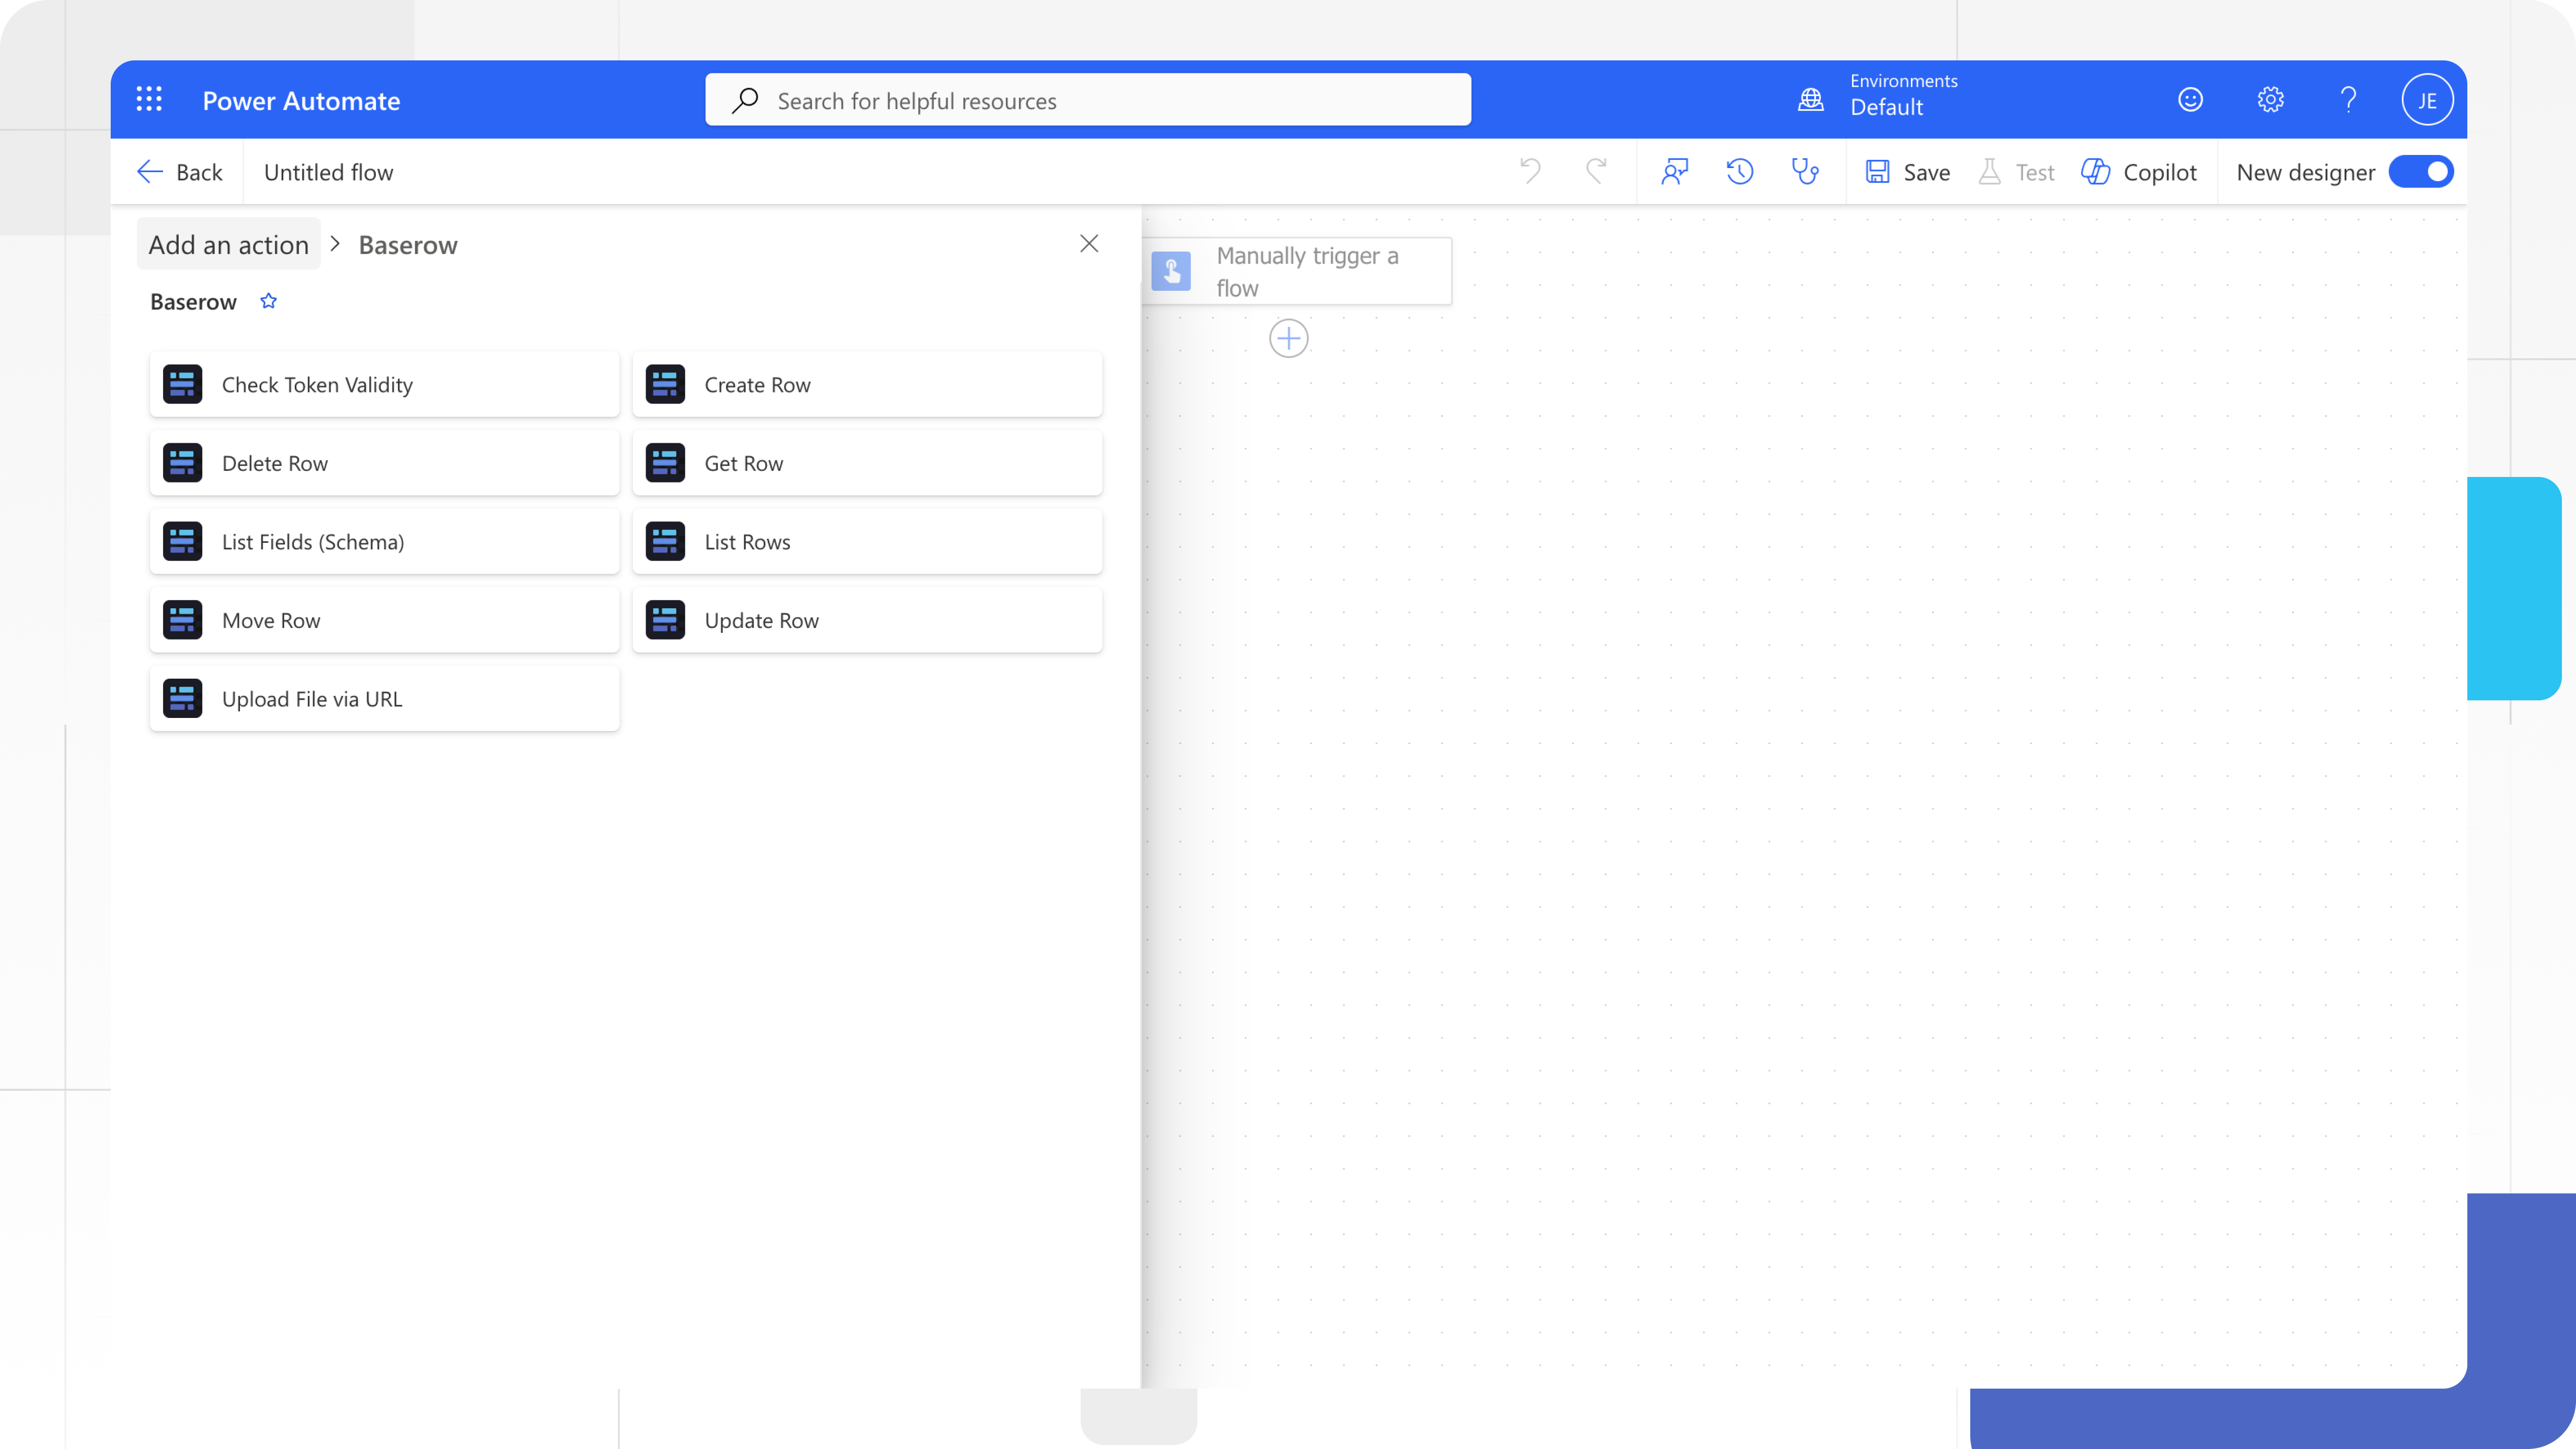
Step 4: Define the Actions
Actions determine the operations that users can perform.
-
In the Definition tab, select New action.
-
In the General area, add a summary, description, and operation ID for this action.
Parameter Value Summary “List Rows” Description “Lists all the rows of the table” Operation ID “ListRows” Visibility “none” The Visibility property for operations and parameters has the following options:
- none: Displayed normally in the flow
- advanced: Hidden under another menu
- internal: Hidden from the user
- important: Always shown to the user first
-
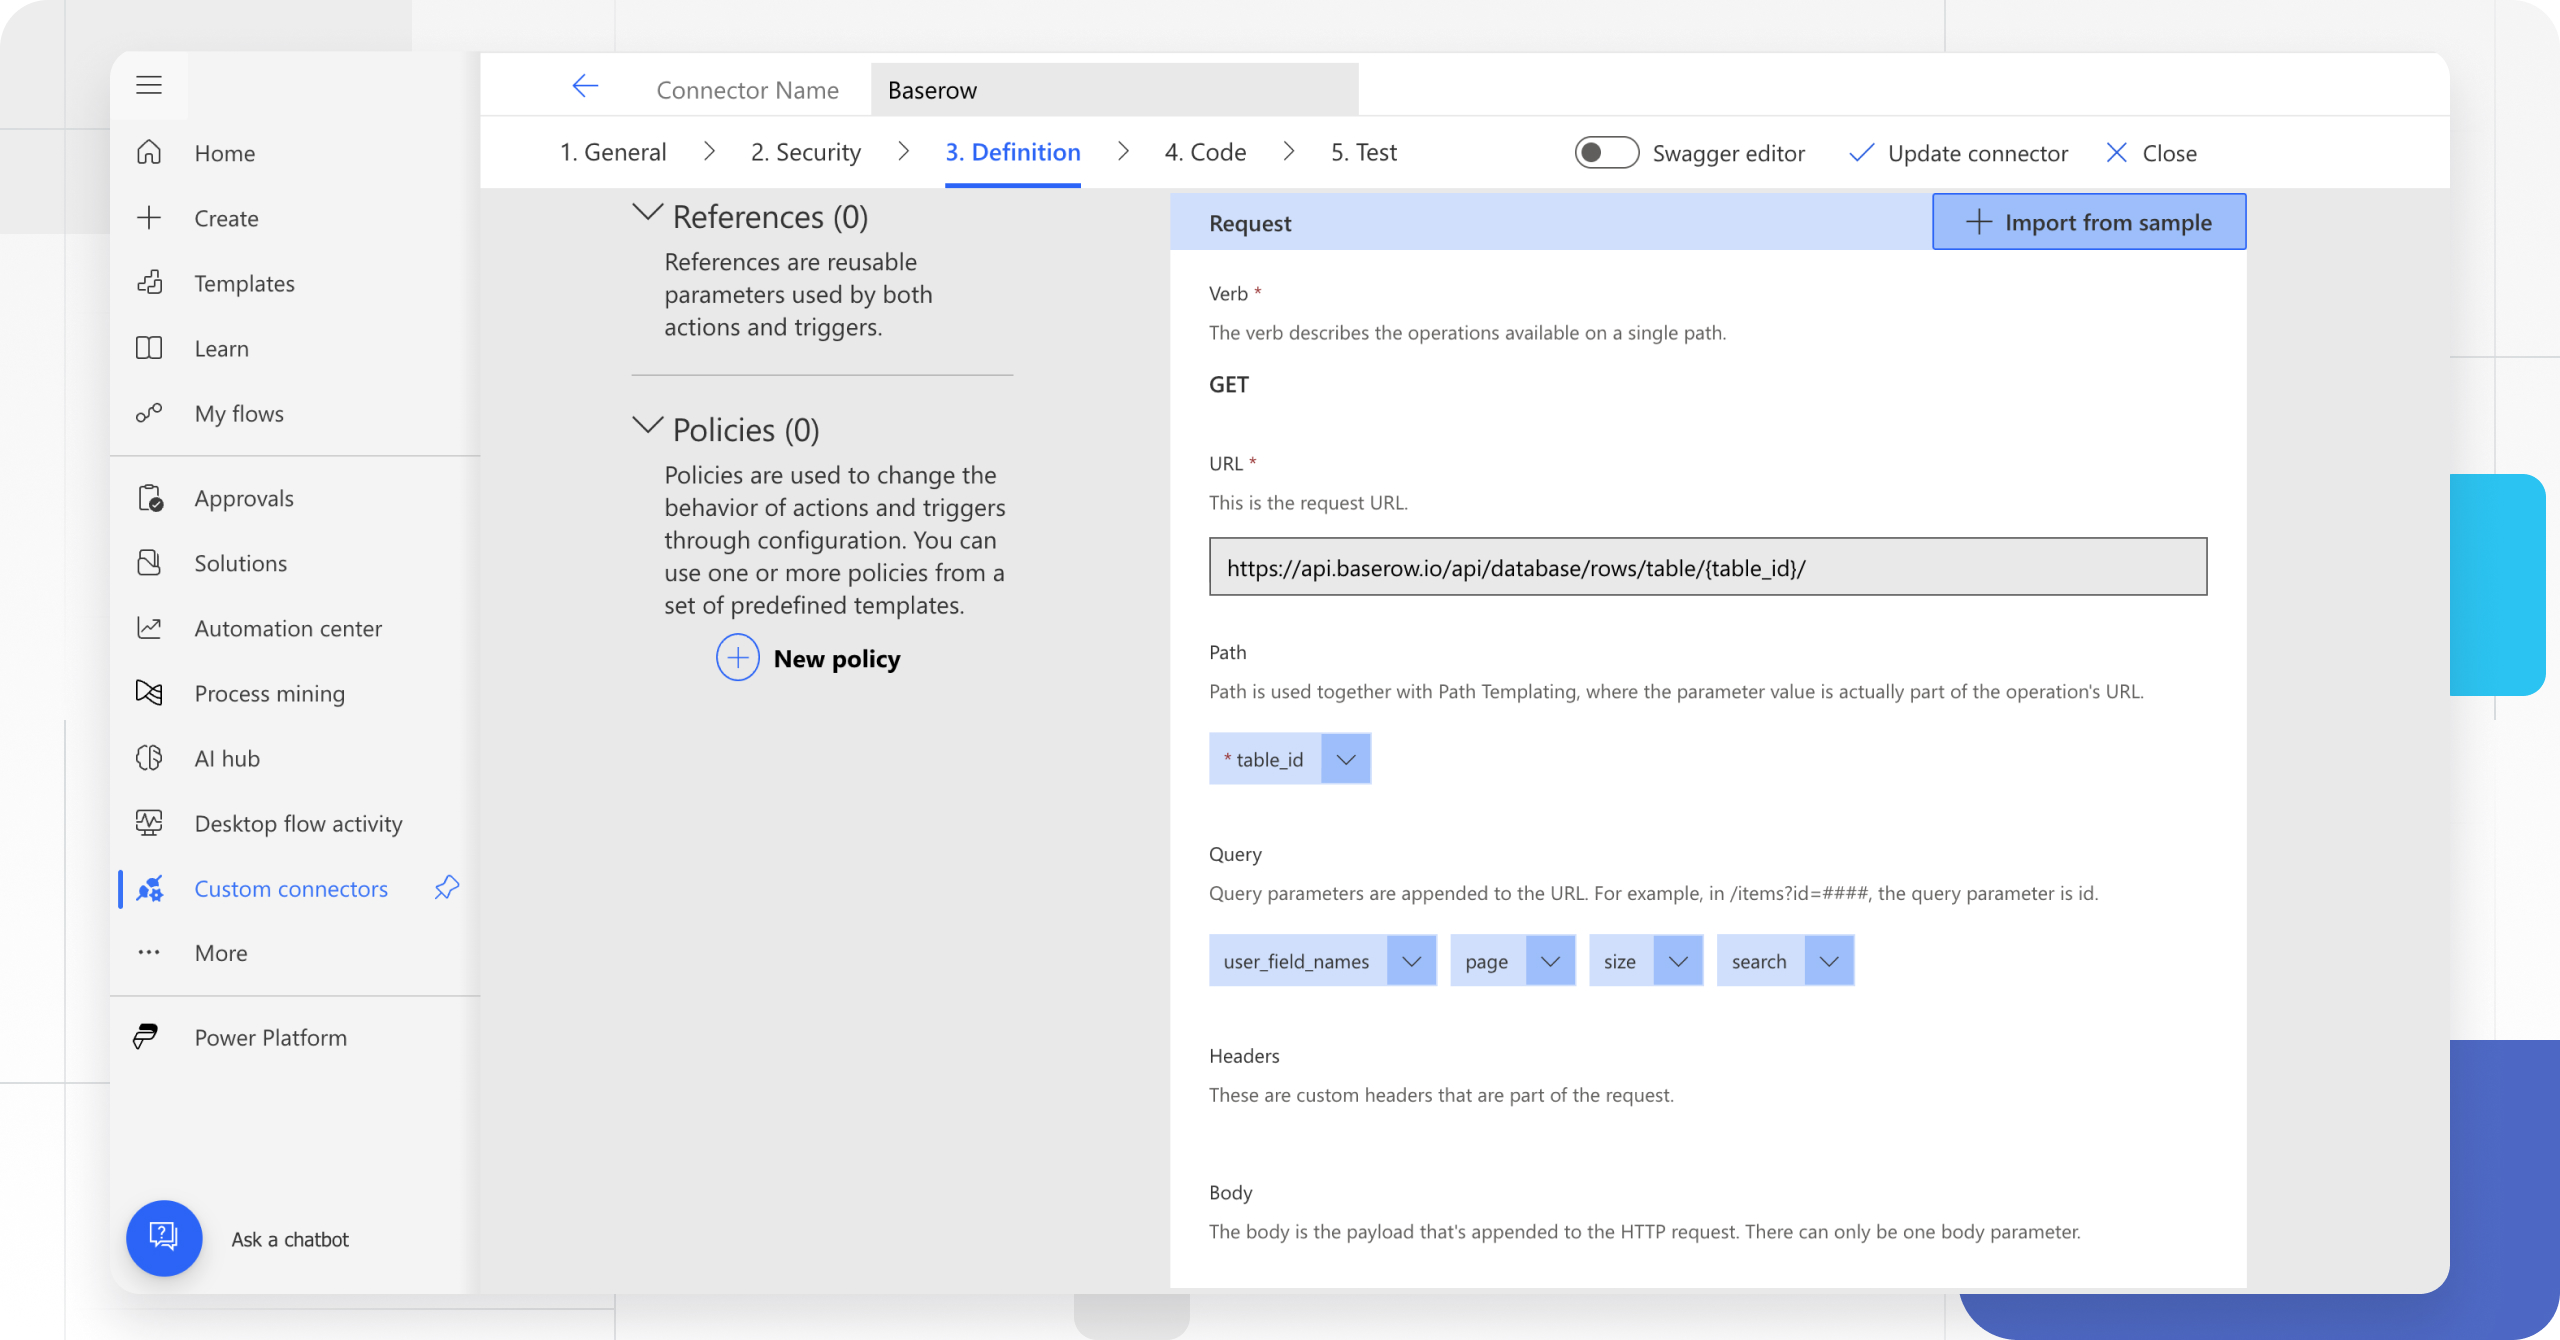
The Request area displays information based on the HTTP request for the action. Choose Import from sample.
These actions interact with the table data directly. You must use the Token you generated in the Baserow settings.
Auth Details:
- HTTP: Database token
- HTTP Authorization Scheme: API Key (Header:
Authorization) - Format:
Token your_token_here
Actions:
- List tables (
list_database_tables) Note: Ensure your token has “Read” permissions for the database. - List fields (
list_database_table_fields) - List rows (
list_database_table_rows) - Get row (
get_database_table_row) - Create row (
create_database_table_row) - Update row (
update_database_table_row) - Delete row (
delete_database_table_row)
-
Specify the information necessary to connect to the API from the documentation, specify the request body (provided after the table), and then select Import.
For list rows, verify that
user_field_namesis set to true by default. Sample request forlist_database_table_rows:https://api.baserow.io/api/database/rows/table/{table_id}/?user_field_names=true&page=1&size=100&search="string"Set the description, default values and visibility for each body property in the wizard.
Parameter Value Verb GETURL https://api.baserow.io/api/database/rows/table/{table_id}/Body Use the example JSON. -
In the Response area, select Add default response. This is where you tell Power Automate what the output looks like. Specify the response body, and then select Import. This is provided in the API documentation.
Sample default response for
list_database_table_rows:{ "count": 0, "next": "http://example.com", "previous": "http://example.com", "results": [ { "id": 0, "order": "string" } ] } -
The Validation area displays any issues that are detected in the API definition. Fix any issues. You should see a green check mark when the definition validation succeeds.
At the top right of the wizard, make sure the name is set, and then select Create connector.
Step 5: Test the Connection
Now that you created the connector, test it to make sure it’s working properly.
-
Go to the Test tab.
-
Click New Connection.
-
A pop-up will appear asking for your API Key. You must type the word “Token” followed by a space, and then your key. Baserow distinguishes between Data actions (which use the Database Token) and User/File actions (which require a JWT User Token).
- Format:
Token eyJ0eXAiOiJK...
- Format:
-
Click Create Connection.
-
Back in the Test tab, select the refresh icon to make sure the connection information is updated.
-
Select an operation.
-
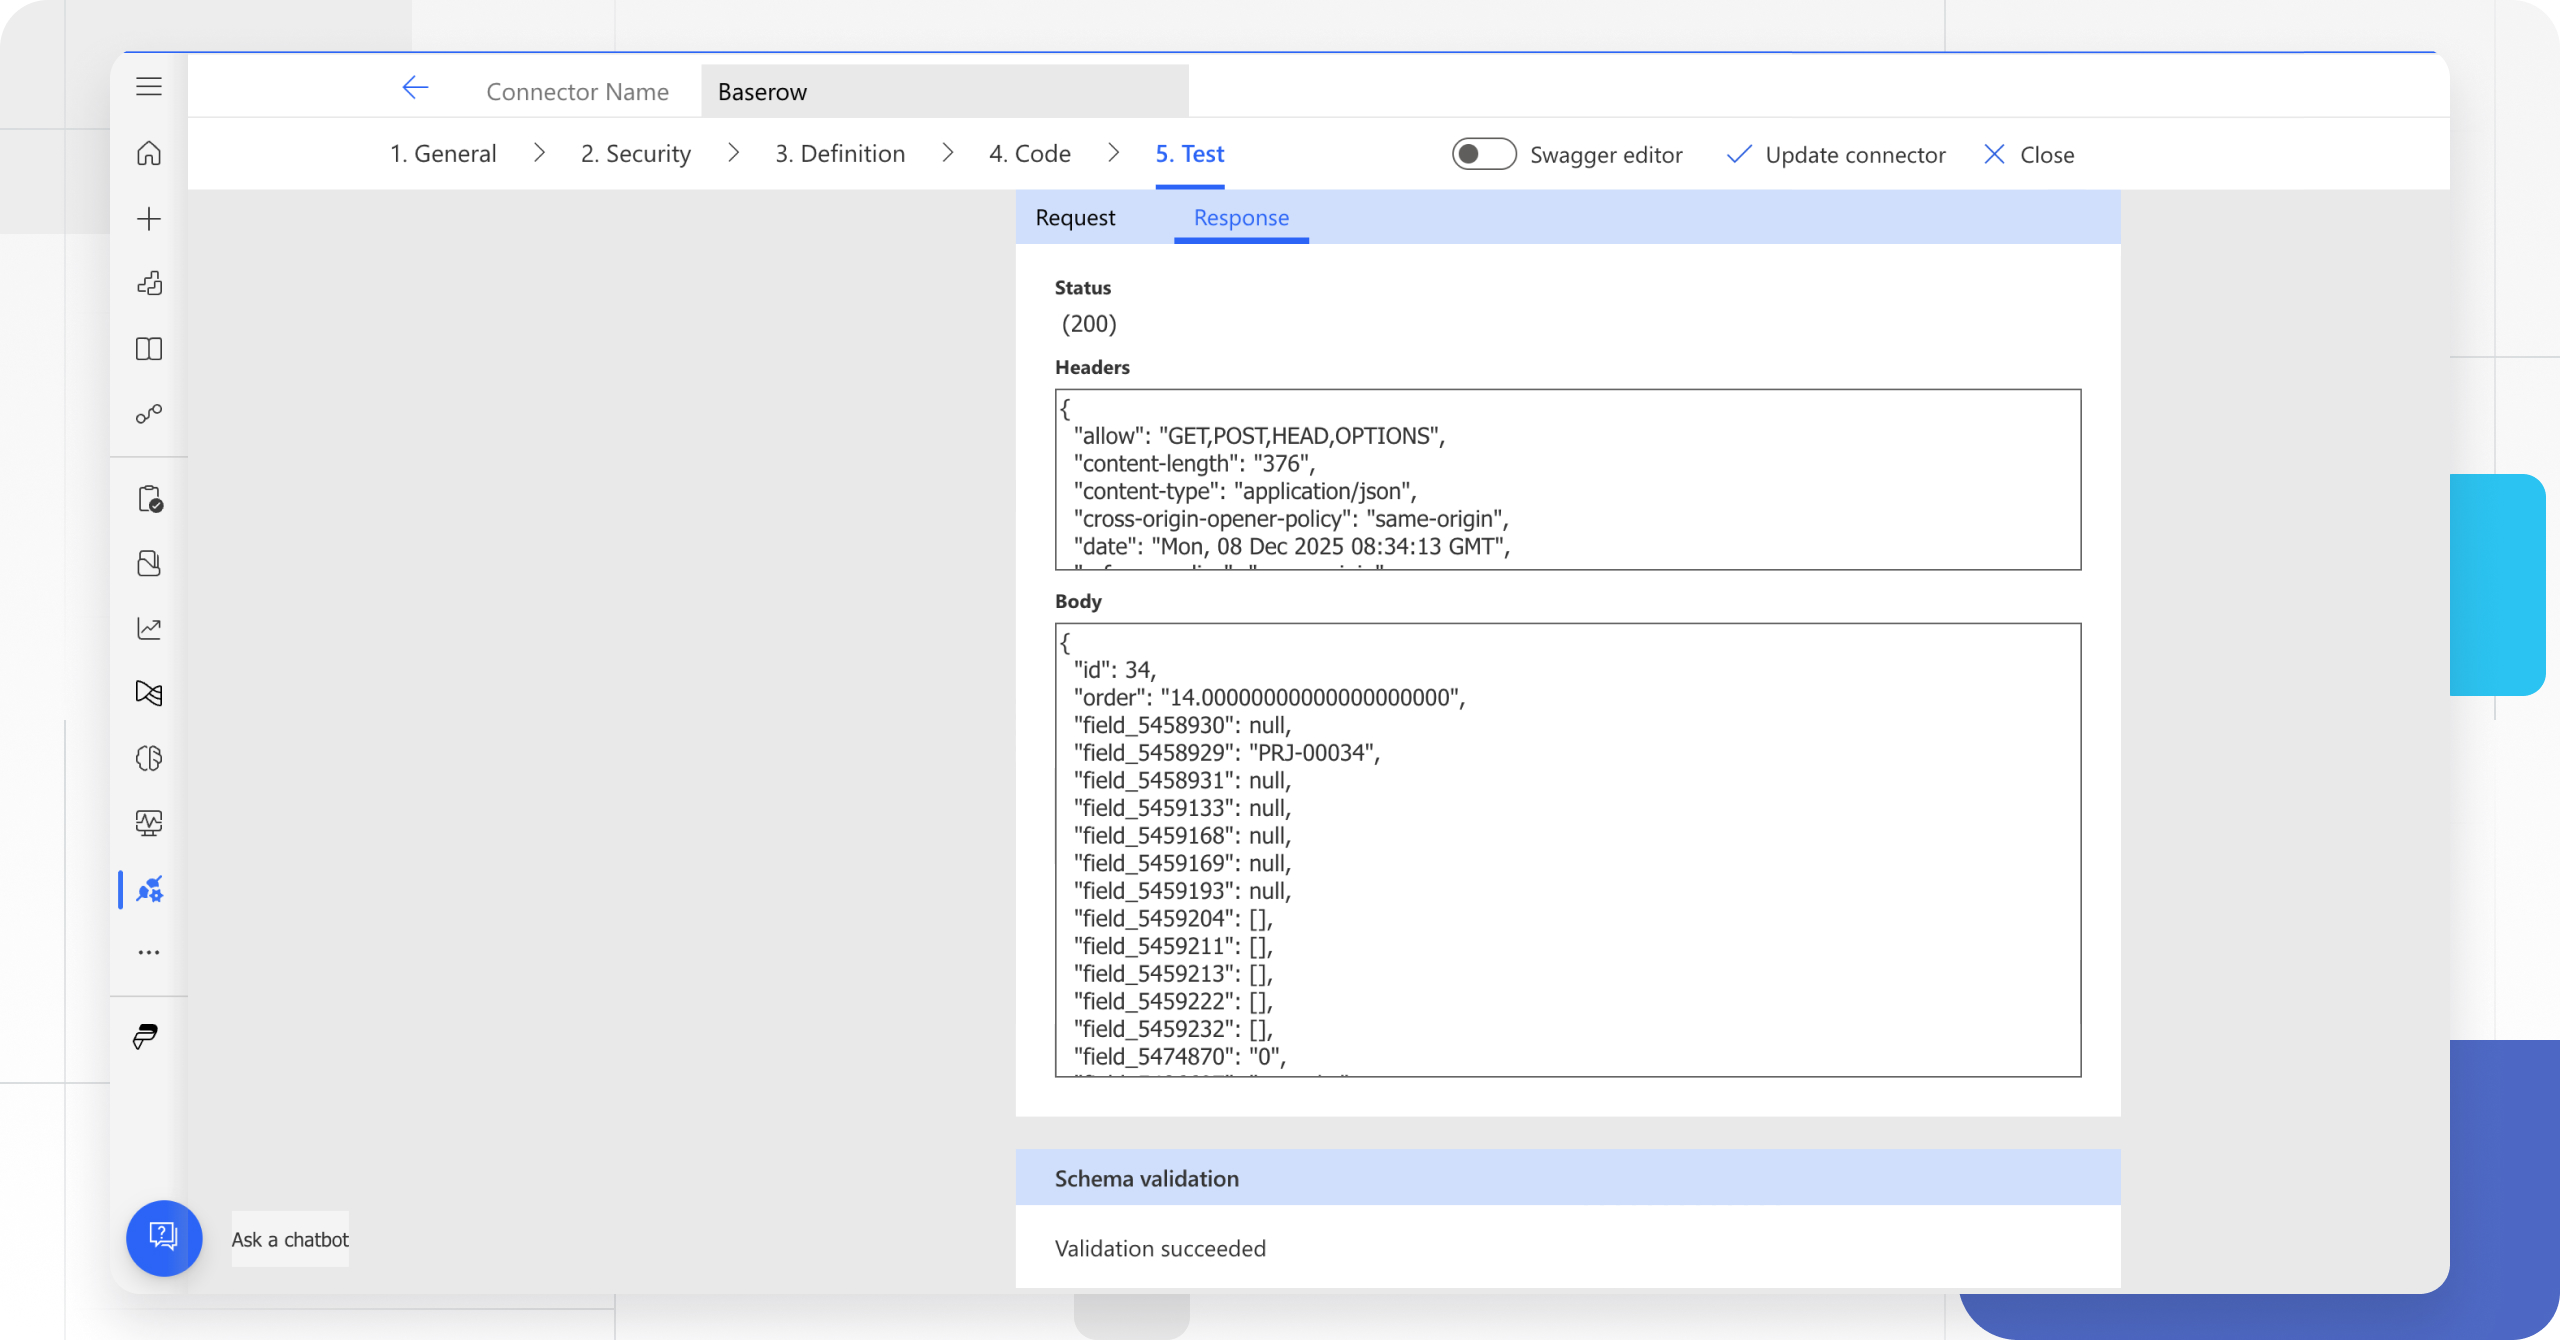
On the Test tab, enter a value for the Table ID (the other fields use the defaults that you set earlier).
The connector calls the API.
-
Click Test operation. Review the response, you should see a status of
200.
Now that you created a custom connector and defined its behaviors, you can use the connector.
You can also share a connector within your organization, or get the connector certified so that people outside your organization can use it.
Troubleshooting Common Issues
| Issue | Diagnosis | Solution |
|---|---|---|
| 401 Unauthorized | The Connector was rejected. | You likely pasted just the API key. Edit the connection and ensure you type Token [Your_Key]. |
| Flow Fails on “Apply to Each” | Power Automate can’t find the list. | Ensure you are selecting the results list from the dynamic content, not the top-level body. |
| Can’t find column names | Field ID confusion. | If you didn’t use user_field_names=true, Baserow sends field_45 instead of Client Name. You may need to look up your field IDs in Baserow to know which is which. |
| “Bad Gateway” or Timeout | Data overload. | If fetching thousands of rows, Power Automate might time out. Use pagination or filtering in the List rows action to reduce data size. |
Best Practices
- Filter at the Source: Don’t pull 10,000 rows into Power Automate and filter them with a Condition action. Use the Baserow API filters in the “List rows” step (e.g.,
filter__Status__equal=Done) to only pull what you need. This saves “Action Credits” in Power Automate. - Secure your Keys: Never share screenshots of your Flow that show your API Key.
- Renaming Fields: If you use the
user_field_names=trueparameter, be aware that if someone renames a column in Baserow, your Flow might break because it is looking for “Status” but now it’s called “Project Status”. For mission-critical flows, use the Field IDs (e.g.,field_123) which never change.
Use Case 1: The “Morning Report” (Baserow → Email)
Let’s build a flow that sends you an email every morning with the status of your projects.
- Create a Scheduled Cloud Flow. Set it to repeat every 1 Day.
- New Step: Click “Add an action”.
- Click the Custom tab. Select your new Baserow connector.
- Select List rows.
- Table ID: Enter your Table ID.
- Filters: You can add
filter__field_123__equalhere if you want only “Active” projects. - New Step: Choose Apply to each.
- Input: Select
resultsfrom the Baserow step dynamic content.
- Input: Select
- Inside the Loop: Add an action Send an email (V2).
- To: Your email.
- Subject: Project Update:
[Name](Select Name from dynamic content). - Body: The status is currently
[Status].
Use Case 2: The “Instant Trigger” (Baserow Webhooks → Power Automate)
Scheduled flows are great, but sometimes you want something to happen immediately when a row is created. For this, we use Webhooks.
Part A: Prepare Power Automate
- Create an Automated Cloud Flow.
- Trigger: Search for
When an HTTP request is received(Request connector). - JSON Schema: You can generate this by clicking “Use sample payload” and pasting a snippet of your Baserow JSON, or just leave it blank for now.
- Save the Flow.
- Copy URL: Once saved, the trigger will generate a specialized URL (HTTP POST URL). Copy this.
Part B: Configure Baserow
- In your Baserow database, click Webhooks (left sidebar).
- Click + Create Webhook.
- URL: Paste the long URL you got from Power Automate.
- Method: POST.
- Events: Check
rows.created(or updated/deleted). - Click Create.
Part C: The Logic
Now, whenever you create a row in Baserow, it pings Power Automate.
- Back in Power Automate, add a Parse JSON step to understand the data Baserow sent.
- Add your actions (e.g., “Post message to Teams”).
Still need help? If you’re looking for something else, please feel free to make recommendations or ask us questions; we’re ready to assist you.
- Ask the Baserow community
- Contact support for questions about Baserow or help with your account.